Darkslide
Kitesurfing Trick: Darkslide
 Darkslide is a pre-step to another highlighted kitesurfing trick which is the Jesus Walk. This attempt can be really tricky because you do not wax your surfboard’s bottom. Darkslide and Jesus Walk pertain to everything which refers to Hangtime, but instead of Boost it is Hangtime above the water. You just need to recall your first attempt to Boost and you just could not get any height that you simply looked like swinging under your kite. Well that is just exactly what you are attempting to do with a Darkslide or Jesus Walk.
For the starters, Darkslide trick is just a matter of eradicating some kind of psychological barrier through an intentional trip forward over the board’s toeside edge. It depends on how your approach could be in which the trick can really be made successful after quite some tries. Most kitesurfers find it easier to do a Kiteloop which is believed to be an effective sequence to a smooth Darkslide. Such preliminary move prepares the surfer of that surge of power which allows an ideal timing to get back up and immediately get the legs back underneath. Majority of good Darkslide delivery is attributed when the kite is stably powered and smoothly travelling up and almost over 12 o’ clock. As soon as it reaches 1 o’ clock the surfer initiates the kiteloop which will then pull the surfer back up.
Best Tip: A slow kiteloop is the key to the trick.
We all know that kiteloop is an initiation trick for you to be called a surfer. It is the foundation in the family of kitesurfing tricks. It requires skill to neatly loop the kite while you do the spinning. Normally, the surfer loops the kite one way and spins the other way. This is done so that at the end of a kiteloop your lines aren’t twisted (this is not actually a requirement for the trick but it is more a confirmation that the kite actually loops while the surfer do all the spinning). A surfer may opt to use shorter lines (15-20m) to gain more kite’s response and less power while executing a faster loop. A Jump Huge is needed to be practiced to allow enough air time for your kite to loop. The Back Spin technique should also be enhanced in order to kiteloop neatly to pave way for a successful Darkslide. The moment you execute this trick, you may now want longer lines to stretch the sliding time due to the kite’s long distance travel before the loop. Another way to increase the sliding time is probably to be more powered allowing the kite to be flown slower and still generate enough lift.
Trick Sequence
1. Ride with speed and initiate the trick by steering the kite slowly towards 12 o’clock.
2. As soon as you feel the lift, pop off the water and then slightly fall forward
3. Slide the back tip of the board through the water by stretching your back leg and bending your front leg.
4. While doing this, you’ll need to keep pulling with your both hands through the slow kite loop.
5. Bend both your legs to lift the board completely off the water and get back on the board before the kite has finished looping.
6. Hold the tip of the board for full control of the board and likewise to gain stability and style at the same time.
Shifty 3
Shifty 3
Back then we covered the shifty to wrap. If you’ve got that down you will have no uncertainties, thoughts about or even tried its advance version, the shifty 3 – an energetic technique which positively looks chipper and even more strikingly, and thus the key to several moves. Master this technique and later on you’ll be adding up new moves to your routine faster than you could imagine.
Whilst mastering this technique, there are some other things that you’ll have to insert to get the popular air pass in. So let’s not waste time and get this job done.
Elevation and Timing
Stating the obvious is as good as a place to begin. Instead of giving yourself the necessary elevation and timing to do it, you could do a lot worse if you just settle for an average pass. Perhaps you’ve already presumed that the launch should be quite aggressive.
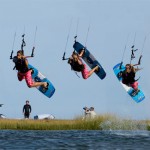
Pic A.
 The surfer is about to pop in an instant. In our Shifty, we consider popping a little serious to make sure we could turn to shifty without the board going into a raley. Now being aware of it, we should be able to edge hard and still get the board behind us. In this picture, the surfer is carving hard across the wind with his weight low and his board upwind. As a matter of fact, the take off of a raley is somehow similar to this. The only thing to prevent this into turning into raley is the head. Observe that his shoulders are not turning up into the wind, only his hips and the board because his head is positioned well looking forward and downwind.
You would want this edge and carve for two good reasons. Clearly you need to get a fierce pop for the elevation, but even more importantly is that you need the pop to be able to make the pass in the air. By edging like this, you clutch the kite back while it drops back in the window and you can blast off against it. The kite hurls forward once you pop, and as you go faster after it, the lines slightly relaxes, giving you the chance for a timely pass.
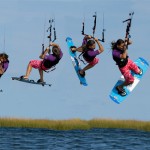
Pic B. – Patience
 This is the in-flight amusing phase of this technique. The surfer has done a nice slow shifty. The focus here is to prepare you for the pass. When you feel the kite is puling, you must go with it. The surfer has his arms flexed maintaining the bar below the shoulders to gain balance. He’s in a superior position, all set to pull hard when he needs to. If you extend your arms, you’ll have further to pull which requires more power and more time.
The surfer extends his rear leg behind him to keep his body up. Just like in the wrapped version, the surfer needs this leg to produce speed for the spin and to give his lower body enough forward drive for the board to land in front and not get left behind. Also you should plan to thrust the leg back immediately after launch.
Last thing to remember for this part is to make sure you have your kite set in the right position. Pulling the bar up can make the pass even more tough.
Pic C. – The Pull Down
The time has come when just as the surfer senses that he will drop. It is an indication that the tension has gone off from the lines and it is time to make the pass. Observe his arms; the surfer stretches his arms with the bar down towards his back hip, so it’s like pulling the bar in and at the same time also pushing it down. You can also see that the surfer’s rear leg is coming through to provide him the spin. His right knee is on a course towards his hands and the bar. During all of this, the surfer still has both hands on the bar. You should get the bar in and low because using your both arms is a lot easier.
Pic D. – The Spin
Before we proceed, observe the surfer’s right leg. In the previous picture it was coming through and was rather straight. Nevertheless, the surfer brings his knee up once it is underneath him. This is the time where you should let go of your front hand off the bar. In bringing the legs up, the weight of the board comes up and it will not draw you down. Immediately as the surfer let go of the bar, he turns his head and twists the bar, which allows him further turning his shoulders.
Pic E. – Don’t Give Up, Try and Try
Having twisted his wrist, the next thing he needs to do is to grab the bar with his free hand. So he has to concentrate on having his hand around the bar. At first you’ll have a hard time and is most likely the main obstacle when moving from surface passes to air passes. It’s a good idea having the bar ready but it’s no good if you untimely get the other arm around.
This is the portion where most kite surfers think, “I’ve missed it” and just let go. You have to spin around the arm with the bar, so you won’t turn fast when you release it. You will be in a position where you can get to the bar if you hold on. If you can shift the hand quickly and hold on, you will turn just in time. As a matter of fact, you know that you could turn this far because you can already wrap.
The board is now underneath the surfer and is ready for landing. As long as the knees are flexed up, the board will spin with you. It will get left behind if you keep your legs extended.

Best Tips
In this technique, you should also concentrate on the small details due to a lot of pass moves. It can help if you give the kite a sharp pull down with your front hand prior to passing. This will prevent the kite from dragging the bar up and away, and also it will encourage you to keep both hands on the bar. Aside from that we’re back to getting the elevation so you will have time to
Sequence Summary
1. Position your kite around 11 o’clock. Gather up some speed and bear away to let loose, keeping your shoulders back and your hips low.
2. Carves hard up across the wind with your weight over your rear foot and your front leg extended. Look forward and downwind.
3. Continues to look forward upon take-off.
4. Quickly turn your rear foot behind you, extending your rear leg.
5. Maintain your arms bent and your head above the bar. If the kite continuously goes high up, this would be the ideal time to hurl it down.
6. Pull and push the bar hard down towards your back hip, while pulling your back knee in towards your hands to begin the spin.
7. Let go of your front hand and bend your knees up, while moving your head and free hand around with the rotation.
8. Having your wrist twisted. Put the bar where you will be able to reach it. All your effort now is concentrated on getting your free hand around and onto the bar. Grasp on tightly with your right hand, so that you can spin your arm and reach the bar.
9. Grab the bar and let go yourself out of the arm lock, while dropping back down to the water surface.
10. Eventually, land on a flat board successfully.

Usual Problems
If you can’t reach for the bar though you are holding on, chances are, your kite is way too high. However, you will see a lot of surfers doing this technique with their kites quite high, but they’re either amateurs or wannabe’s. Just position the kite no higher than 11 o 1 on your advance, and give it that pull down before passing.
You are spinning too slowly. The key is to simply just use your legs and crunch the knees up. Synchronizing your legs with the arms and pulling with both hands will give you a nice quick spin.
You are not spinning far enough around.
If the kite is dragging you hard, it can halt your spin. There few probabilities here. First, if you set out too early the kite will still be dragging you and thus it pulls you back as you turn away from it. So give it a lot of thought and wait for a timely opportunity.
Having too much power or the kite is dragging you like a train, it may pull you hard all the way through the movement. Importantly, make sure you are trimmed correctly, or if needed to be adjusted down. The more power you have the harder you’ll need to carve and pop to make the kite more controllable.
Important Reminders
1. Burst with speed and pop hard
2. Kick leg, pull arms in and wait
3. Both hands down to back hip
4. Back knee up to hands
5. Hold on and quick free hand
Here are some dudes that know how to perform this trick!
Ole from Blind
Ole from Blind
Here is one harking back to them good old days of Shinn, Tobias et al, and the Ole. Not seen a grand deal now unless you’ve seen those peddlers of surfboard techniques. Cracking name to boot this clever little matador’s flip of the wrist can compose any blind landing with the kite up high. Just popping to blind and spinning with style below your bar and kite will have the crowd going wild.
Ole is a pertinent description of passing of the bar over head from one side of your body to the other, to allow a blind landing to continue a toe side at the same time remains hooked.
Ideally, you will need great hopes of success of a half decent blind and some calm water to execute this technique. So let us get things started.
Pic A
Let’s presume that you could successfully pop and ride blind hooked, the idea is to look at the diversity between the Ole blind and your run off the mill variant. You can see that the surfer has her kite positioned around 11 o’clock, front hand centered on the bar has popped up, twirl her 180, pushed the bar against her and normally setting to land the nose of the board first. However, notice that she is very upright, almost standing over the board with just her head moving back and down. The focus here is that you need to land with your weight over the flat board so that you could maneuver the board downward and towards the kite. This way the lines will not be so tensed and the chance to complete the Ole. You will edge off from the kite if you land on an edge and if you turn your shoulders down making the lines tensed and doing the Ole somehow unstable.
Pic B
The Surfer has landed nose first but flat on her board, that is to say without edge. Her weight is on her front foot (left foot), and she is still standing upright with the bar still pushed away. To get to this position, you will need to pop a bit harder than normal and aim to turn a bit further, landing gently slightly downwind. This landing position is a must as already pointed out. From here, the surfer can actually weigh her heels and turn the board downward towards the kite, making sure to maintain her weight on her left foot.
Pic C
Now with more stability and heading down towards the kite, the surfer should prepare for the next move while she still has some drive and focus. The surfer pulls her hand across and front of her face to the other side. With relative slack lines the bar and all pass her visage without incident – Ole.

 Pic D
Pic D
As the surfer moves her hand across, she follows it with her head, then shoulders and eventually her lower body until she is facing the right direction. Now, all she needs to accomplish is to get the board moving ahead, which is easily done by putting her weight over her back foot ( the right one), which will slide her left foot forward.
Best Tips
Compared to all moves, this technique entails a definite amount of trial and error, as you’ll be trying to adjust something you can already do. However, if there is one part to concentrate on, it is the landing on the board and then turning the board downwind before even having the thought of pushing the bar across to the other side. So pop, land, carve then push, sorry Ole.
We have broken the Ole down into two phases for sequential purpose, the actual popping to blind and then the defining Ole.
Summary of the Trick
Sequence 1
1. With the kite set at 11 o’clock and hand centered on the bar, pop up hard for an early blind.
2. Let go your rear hand and push the bar away.
3. Move your had downward and around, and lift your back leg up aiming to rotate the board further than your normal blind.
4. As you turn, extend your front leg and maintain your back foot raised and chest up.
5. This all leads to a pleasant nose first landing.
6. As you land with nose first, keep your weight on your new rear foot and stand up.
7. Wait temporarily and then consider the heel of your back foot to carve the board down towards the kite and get all the tension off the lines.
8. Now you’re ready for the Ole!
NOW SHEET IN THE BAR TO GET SOME FORWARD POWER FROM THE KITE!

Sequence 2
1. Once you have landed and still has some momentum, weigh your heels and carve the board more downwind.
2. With the tension off the lines and your weight steady on your new rear foot, push the bar upwind.
3. Now with enough room between your face and the bar, pull the bar across the other side
4. And follow it with your head
5. Then your shoulders, and then your hips.
6. With the bar positioned “where it should be” and your body facing the right direction, pull the bar in to get some forward power from the kite.
7. To slide the board around, you must first move your hips and put your weight onto your present front foot.
8. Once you stand on this foot, push your other foot forward and slide the board through the wind.
9. Gracefully ride off into the sunset.

Usual Problems
Landing on an edge and then riding blind! Uncertainly spending time pushing yourself to do this will take a bit of encouragement to undo what you have worked hard for. Try to pop a little harder and plan to land pointing slightly downward. With the board already moving the way you want, this way you will be less likely to edge it. To accomplish this, try to begin further off the wind and pop a little earlier without turning so far across the wind.
Catching your heel side edge and burying the nose of the board as you Ole! We have an effective remedy for this one, the reason is simply you are trying to spin into the Ole from your initial pop. So plan first that you must land blind, and then momentarily wait for a bit until you gain stability and could move with your weight back on the board before doing the Ole.
Keystones
1. Pop hard and early
2. Turn fast
3. Land
4. Carve on heels
5. Ole
Here is the Ole from Blind in reality:
Grabbed Popped Back Loop
GRABBED POPPED BACK LOOP
Whatever level you are in, specializing with the hooked in Grabbed Popped Back Loop technique is very satisfying. This technique will let you master on rotation control if you are really an aspiring popper. There is a lot to be said for carrying out the basics hooked in, comprehending with vital actions and opening both body and mind for some changes. You’ll be soaring up high on a variety of back loop based moves, both hooked and unhooked once you get use to this.
The Goal
If you want to fit in a bona fide grab, attaining a slow rotation is a must. So if you like hurling yourself frantically into a back loop, spinning with eyes shut while hanging around in the air and waiting for the board to land gracefully into the water surface, then this trick is undeniably for you. This can be also of help if you are discovering something like a back to blind.
Importantly, you’ll have to obtain your high elevation from your pop for you’ll not make use of the kite for the time being. So it indicates that the “exploding” rear leg should hurl you upright and high, in contrast of spinning you through the wind. This strap in well with the preceding point too.
Lastly, you’ll be glancing for a degree of inversion in your rotation. Executing a back flip is not a good idea, but if your board sets upright and you turn slightly back in your harness, then the grab will be much easier and modish. Furthermore, this too also strap in rather brightly with the preceding two points.
Highlights of the Trick
Pic A.
 The surfer is about to take off and this picture tackles all about the approach and thus the preparation. Even though this is a pop technique and you’ll not be setting the kite, but with a little bit of positioning, it’s still possible to get some lift assistance to help you around. So put this 45 degree idea out of your mind and park it at about 11 or 1. To be certain that she can get the desired after up pop, the surfer pushed the board nicely into the wind before carving upwind by putting all her weight back over the rear end of the board, relaxing her rear leg and setting her hips back, while pushing the tip of the board against you. You can carve into the rotation timely if you go further off the wind and still give yourself the option to pop up off the water before the board has turned away into the wind and your rear leg is uncontrollably forcing you to spin. Observe in the picture that the board is slightly nosed up due to putting the weight back, and she’s got quite some edge jointed with a timely sturdy stamp resulting to a nice up pop. Lastly, the more you push against off the wind before a pop technique, the more downward you land.
Pic B.
 This is a great instance of contradiction. Previously would have captured the surfer completely extended upright much like a high jumper, as she does it big time to head upward into the stratosphere. She is by now taking her knees up in anticipation. This could be very perplexed, so consider about extending before compressing. Observe how she manage the board in the air, it has not carved through the wind yet, this way she could grab sufficiently during the resultant slow spin, all due to going nicely into the wind and timely stamping off her rear foot. The surfer’s board is going upward in front of her in an inverted manner due to putting all her weight at the back of the board as she carved, as this shaked her back in her harness. Lastly is the surfer’s head. She has her head positioned almost looking forward between her shoulders, this prevents her to spin too fast.
Pic C.
 Now we can look at the outcome of all the previous good work. With the timely and inverted launch, the surfer needs to let go of her rear hand, pull her knees in and look for the grab. This is not completely inverted, but sufficiently to get the right rotation and make the grab easier and stylish. The surfer has just carved through the wind, but she had sufficient time and elevation. This is what it is all about, as you picture with this kind of maneuver and rotation, you’ll be able to do your back loops with ease. Observe that the surfer is concentrated on her grab, this way she’s not expecting to land over her shoulder and therefore will not spin around. Keeping the bar in is crucial, the lines tense and thus the kite will help you get the float, and to hold that grab for as long as possible.
Pic D.
 Once the surfer sense herself descending, she turns her head to see where she’ll be landing. She keeps the bar in with the kite heading towards on tight lines, this way she could get the right speed which is essential for a soft landing. Make sure to get the board back beneath you to have a solid platform to settle on, and you’ll be able to land on a leveled board rather than a bouncing edge if you give your legs a nice extension. This means that you’ll have to reluctantly let go that grab. You should land slightly off the wind with the downward approach, early launch and slow rotation.
Workable Tips
Before things get complicated, let’s break this down into two phases. Foremost, really focus on your early inverted launch and approach. With both hands on the bar and certainty that they are supporting you, you’ll be prepared to work hard on going around gently and not to rush.
Once you get a slow back loop down, give your rear hand some allowance before landing, and focus on getting it earlier and earlier until you master that perfect grab.
Don’t bend your rear leg too much in the approach and carve to get a nice early launch. The board will quickly move underneath you if you bend your leg too hard. If you flex it a bit and at the same time oppose it, you’ll be prepared to stomp off it and in a superior position for a comfortable rotation.
Summary (step-by-step)
Pic 1.
With kite positioned at 11 o’clock, pop off the wind with your lower body back over at the end of the board and a straightened front leg. Carve upwind, pushing back and pops up off your rear leg prior to your back loop not including your head to spin.
Pic 2.
Now go skywards. All your force and pop is focused up while your carve drives you into a slow back loop. Keep the bar in to maintain tension on the lines and to gain some float from the kite.
Pic 3.
With the board nosing up in front of you in an inverted back roll. Now let go of your back hand to get ready for the grab.
Pic 4.
Gently rotating, lift your knees towards your chest and extend your arm towards the board.
Pic 5.
Half way around rotation, search towards where to place the board.
Pic 6.
Tightly grips it on the rail, pulling the board in towards you.
Pic 7.
Grasps onto the grab, maintain the bar in and gracefully wait until you finish the rotation.
Pic 8.
Once you see the water surface, get ready for landing. Grasp onto your grab patiently for the perfect grab.
Pic 9.
As you sense yourself starting to drop, look towards your target landing spot and reluctantly let go the grab.
Pic 10.
Keeping the bar in and slightly extending your legs down to get the board beneath you.
Pic 11.
Finally land the rear end of the board first with both hands back on the bar.

Usual Problems
Rotating too quickly, and thus resulting to an untimely grab. Make sure you ho downward and pop before you carve through the wind. Focus more on extending up before tucking it up. And don’t use your head to turn, not a good idea.
Over rotating the back loop. You may surely over rotate if you set the bar out while grabbing, but assuming that you didn’t hurl the kite up, it’s more likely that you’ve tossed your head around, so keep it focused forward between your shoulders. If you are still having difficulties, try to maneuver the kite as you land.
Important Reminder
• Trim the bar
• Speed to a good edged blind
• Reach for bar without looking for bar
• Push against back foot to slow and turn
• Dive kite hard
Here is what it will look like in reality:
S-Bend Pass
The S-bend pass
Your next phase on from landing blind is the S-Bend pass, or the aggressively popped front logo pass. It’s a blind judge tagged onto the end of an S-Bend in the same way that blind is tagged onto an S-Bend. The secret lies here, once more you will be combining two different moves that you could hopefully land, which in contrast to discovering something that is totally new from scratch. Remembering all this, give yourself enough chance to think about the goal you are trying to attain to get this job done.
Let’s presume that you could successfully perform a smooth S-Bend, the chance is that you will finish in your fast rotation and consequently land thereafter with sufficient time to throw in a very swift last minute blind. You are going to need a bit more of elevation to pave way for a more successful pop and dare. Such option is suggestive of a smooth rotation finish and more time for a pass that is similar to a blind judge. You’ll be pulling big time and sway your front leg in the process so as to spin and acquire stability while closing the bar, thus, not trying to rotate into the pass from your spin but rather pull into the pass as you would normally.
Six Crucial Moments in the S-Bend Pass
1. With a light bar, sufficient height and good timing, you can achieve all the good pop you wish. In the demo picture A, we can see that the surfer is all set to pop and do a trick while preliminarily positioning the kite at 1 o’clock with some bursting speed. The idea is to come up with a good pop, so keeping the shoulders behind the hips while slightly flexing the knee gently and putting all the body weight over the back of the board would be the proper position for a pre-pop. Doing this, you could still have full control of the board as well as the kite for a maximum pop. Even though the aim is to rotate forward, the surfer is edging just as he would strongly proceed into a Raley. For a bit of height, this is the perfect timing to hurl the kite up in assisting a launch through the stratosphere.
2. In this picture, the surfer succeeded to do a good pop by pushing against his rear leg really hard, kicking at the rear end of the board. With an absolute speed, well positioned kite and proper body mechanics, this will lead you in an average ping forward and up. There is no chance for the surfer to move forward towards the kite – he doesn’t have a choice. Keep in mind that the extended rear leg is still straight from the launch and most importantly, the point when the board and the surfer’s front leg have flicked upwind while the upper body is turning the other way around from the rotation. Though randomly, this is by chance a laid out full Monty S-Bend. Allow the legs to be left behind by turning it upwind, only then you could break out from the rotation into a position which you recognize and rely upon from the Blind Judge. Give enough time and focus for just a split second after launching before releasing your upper body into the rotation. In addition, by keeping the elbows in on a rather chest level would facilitate your head to swivel around more quicker and with a lot of ease.
3. This is the outcome of the launch previously described in the other picture. The surfer could already start to mark his landing at the middle of his rotation, or at least see the water surface. This will give him such an instinct that will allow him to get set and be ready for the pass. From this particular position, the goal is to get your head and hands approximately around the rest of the rotation. Make sure that you have given enough height allowance before you go for the pass.
4. You should always remember this particular position, as it is not too far-off the position and you’d be in pre-Blind Judge post Raley. The legs and the board are high, upwind, flicked back and the bar is turned palms upwind, it’s just the shoulders position that is a bit off, but they’re on their way around. With the front leg extended and up, the surfer now pulls hard, taking his hands down towards past his right leg while pulling his right knee up towards the hand. This would get the rotation for an air pass under way. Concentrate and keep yourself focused because the next critical part to worry about is to submit to the pass.
5. As the kite surfer’s front leg swings down and under the bar, he releases his back hand and turns his head, just as he would be in a Blind Judge as he twists his front hand down and around. This lets his head and shoulders turn further into an airborne blind. Although in this demo picture the legs are frozen slightly behind him, they are actually moving forward at a high velocity as it swings downwind towards the bar.
6. The result of which is that the legs rock the board under the bar. This puts the surfer in a rather less intimidating position with his weight under the board and his feet under him. It will then allow him to perform a rotation around his front arm while aiming for the pass with his free back arm. Just like the Blind Judge, you can do all possible good work leading up to this point. but if you do not look for the pass with your free hand, good things are not most likely to happen. The moment you have passed the bar, try to hold your arm closer to pull your shoulders up for a neat landing just like a pro.

Helpful Tips
Before trying the air pass come out from a variation of soaring S-Bends, do not hesitate to find out which best works for you. Landing them successfully should be easy even at the end of your rotation up high, for this shows that you are going to do the rotation effectively and not over-rotate into the pass.
Once you have stabilized and assembled both your confidence and your alertness of your position in the air, go for the pass. Keep in mind that you may need to grasp onto the bar a tad longer than you think before holding the bar with your free hand. If you set off immediately, you won’t be able to spin timely for a pass.
Review sequence 1 and 2 to attain a plan of the timing. We’re not going to tackle everything but try and observe the part where the pass is “activated” up high. You will have limited time if you just wait further going down, time is of the essence, so better get that S-Bend done early and so timely.
Encountering Common Problems
The classic – the bar pulling up and away as kite goes high. If you stick into this move conservatively, you will not obtain the pop, so in order to make up for it, you’re going to hurl the kite right up and achieve the pass as high as possible. Go and locate some deep water and give the launch a nice preparation.
Another common problem is passing the bar and the board when still too distant from you and even upwind when you get the pass (but never from landing because it is really on your side edge). You are not pulling your legs underneath and swaying them under the bar. So remember to toughen both your legs and arms as well. When your knees come up untimely or early, you cannot sway your legs through, so give them a nice extension behind during takeoff time.
Indy Grab
 There are several ways to make your tricks look a bit more stylish. This trick is particularly stretched when you ride or turn you yourself. Another very effective way is to grab on your board. Grabbing the board is certainly borrowed from the surfing and skating. Since neither surfing nor skating bindings are available to make sure that you stay connected to the board, the grab has been found to be the only way to keep the board to their feet when jumping. Over time, many have developed several variants to grab. In Kite surfing we can basically distinguish between jumps, jumps with umbrella support and jumps without umbrella support. The grab without Kite support are much more difficult because you do not have much time to grab on to your board. Although it’s easier with kite supporting grabs it don’t mean that they are less stylish. We show you the easiest start for grabs so you can add a bit of your own kitestyle to them.
REQUIREMENTS
 To grab your board does not require much skill. You should be sure to control your kite with one hand as you grip the other hand to your board. In addition, you should be reasonably flexible to bend your back. The more flexible your legs and back are, the easier it will be and also look better on the water. In the beginning it will be relatively difficult to find a comfortable position, but gradually it gets easier as you learn to grab the board. As you get more and more comfortable, the more you will be able to stretch one or both legs. So a lot of practice helps a lot.
Technically, there are equipment as well as preferences. If you start with high jumps with kite support, we recommend without doubt a kite with a long hang time, so you have plenty of time to grab your board. Also recommended is a medium-large board. The larger the board, the more clumsy and uncontrollable. Many riders prefer a hip harness also which gives you more leeway to twist your body. Seat harnesses are also perfectly fine for practicing this trick.
The Indy Glide is one of the standard tricks. It belongs to the group of loaded jumps. You can make the Indy Glide either hooked or unhooked. In both ways, however, with right conditions you should try to make it without kite support, otherwise it belongs to the group of umbrella supported tricks. It is relatively difficult to make the Indy Glide look stylish, because you do not have much time to perform the trick.
DIRECTIONS AND JUMPING
Ride with medium speed and to keep your kite at 10:30 o’clock. Edge hard to build up tension in the lines. Release the edge of the water and pop out of the water.
Phase of flight and landing
The really important trick to Indy Glide is to go into a kind of forward rotation. So you have to look back over your head with your shoulder and make a half-forward rotation. Release your back hand and grab the bar at the front center of your board. Attempt to straighten your back leg as strong as possible and bring your front knee to your chest. Release the grab and look back in the same direction. Bend your knees to cushion the landing.

Backloop Handplant
Kiteloop with a back loop in which you simultaneously pull the hand through the water, is a trick for the audience: stunning, stylish and just something else. It is seen in many videos. We’ll tell you now how it works.
REQUIREMENTS
Back loops should not be a problem for you as well as kite loops. The trick works best if you also have a pleasant pressure in the kite. We suggest here a rather faster kite, a criterion now meet almost all kites on the market.
PREPARATION
Drive at normal speed (not too slow). The speed you can then increase again with time to pull the hand through the water longer can. If you have a sliding stopper, use it. If not, grab the back hand about ten inches from the depowerloop (depending on the kite). Fly the kite high up.
THE TRICK
Take your front hand on the bar and sit down at a slow back loop. Experiments as early as possible, the board up and the free hand to get it into the water. Throw your body a little bit more back than you would otherwise do with a back loop. As you pull the hand through the water, fly your kite at the zenith slowly backwards and carries you on a constant level. Be sure to depower, not, otherwise you will land soon in the water. When the kite is a bit behind the zenith, it is time to make the Kiteloop. Hit the bar and loop the kite through the top rear and as tight as possible. The Kiteloop will pull you up a piece, so you can finish your back loop and have enough height to get the board back under your feet.
TROUBLESHOOTING
It is important to keep the kite high up and looping the kite at the right time. If you aren’t coming out of the water after the kiteloop, then you may loop the kite to early. If the kiteloop should end in a violent pull, then you’re looping either too early or not tight enough.

Kiteloop 900
Ok, I´m not going into details on this one, it would require a few pages of text probably… I assume that you already know how to make a Kite Loop.
What you have to do in order to perform the kiteloop 900 trick is to add a few thing…
1. Add a 360 rotation with a handle pass.
2. Add another 360 handle pass rotation.
3. Make a 180 rotation and land toeside.
Do these 3 moves while the kite is looping and you´ll end up doing a kiteloop 900!
From where do you get the 900? 360 + 360 + 180 = 900
The kiteloop can of course be made in variations. It´s probably a smart thing to start by doing a kiteloop 360, then a kiteloop 720 and so on… Havn’t yet seen anyone making a kiteloop 1080, but perhaps will Youri Zoon make one year 2012 or later. Here is he at least doing a kiteloop 900, watch and learn!
Back Loop From Toeside To Toeside
Back Loop From Toeside To Toeside
This is a nice trick similar to the Hooked Backroll but a little bit trickier. anyway, here’s how to perform it:
- Approach with decent speed, kite at 11 o’clock. Send the kite hard but short with your weight back and throw yourself up and around, lifting your right shoulder and turning your head.
- Half way around the backloop, keep the bar in and your knees up. Your kite should be redirected forward to give yourself some momentum and to prevent any uncontrollable spin.
- As you see the water downwind of you pull on your front hand to dive the kite down, which will stop your rotation.
- To be able to turn toeside keep your knees up.
- As you drop down turn your head to look forwards toward where you’d like to go.
- You can now bring your back leg up and through.
- As you do this drop your front shoulder and bring your hands and hips towards each other
- In preparation for the landing keep your front foot up and extend your back leg, aiming for a tail at first landing.
- To help with balance and to guarantee a decent toeside landing with speed, release your front hand which enables you to get some more weight forward.

Common problems
If you’re spinning under your kite and over rotating past toeside and then falling backwards. This is a sure sign that you have your kite too high. Bring the kite forward as soon as you take off and start to dive it down as soon as you can see you’ll land.
If you’re bouncing and stopping when you land. This means that you need either more forward speed and/or you need to get a bit more weight forward as you land. Once again taking off and landing with speed is key. And with the kite lower when you come down you’ll be able to pull yourself forwards on the bar for a balanced and trimmed landing.
Here is a video that shows a perfect Back Loop From Toeside To Toeside
Back Mobe
Back Mobe is an unhooked back loop followed by a handle pass in the same direction as you travel. So in essence you´re doing a 720, two full rotations from the carve. The major problem people have when they try to perform this trick that they´re not sure if they are doing one spin, two and a half spins, one and a half spins or two spins, it can all become a bit confusing in the air.
Knowing this the fundamental behind a back mobe is a decent pop with a slow rotated back loop. The image below shows what we are aiming for.

I t doesn’t matter if you land toeside or heelside. Your aim is to end up with your hands and hips together and your body fairly horizontal as you complete a full rotation. The key elements here are to keep your arms bent and bring your knees up. However there are many building blocks which don’t all follow the same path, so lets have a quick look at two of the most popular roots.
The back to wrapped. A great move in its own right and a potentially good lead into the back mobe. Only thing going against it, is if you are deliberately keeping the kite low to help you around the rotation, you will be throwing yourself around, trying to over rotate in order to land wrapped, which will do nothing for your pop or kite control. On the positive side it teaches you to hold onto the bar once you´ve released your back hand – this is a good thing!
The back to toeside. Yet again this can be a great step up to the back mobe but only if you see the toeside landing as a comfy alternative to a heelside landing. It´s very tempting to keep the kite low, say around 45 degrees and really throw yourself around. Once again you won’t be working on pop or controlling your rotation.
We want to try and get some elevation with our back loop from our back leg and we want some time in the air. To make this all a bit more achievable you´ll need to have your kite just under 11 or 1 o’clock, about 75 degrees if you´re into angles. The danger is now that you´ll spin under the kite so you need to work on how you rotate, the axis, and this is what takes the practice. By looking at the individual parts of the back mobe we’ll hopefully uncover how to get there in a controlled fashion.
So lets guide you through the steps.
 1. The Approach.
The single most important part of the set up to a controlled unhooked popped back loop. To bear away off the wind and unhook you must bend your back leg and really move your hips towards the tail of the board, pushing the nose off the wind. This way his weight is already where it needs to be to get a tight but quick carve upwind. Try not to carve off the wind on your toes as this will move your weight forward, making it much harder to resist against the kite and pop. But do make sure you go off the wind enough before carving up as otherwise you´ll take off too late, spin too quickly, and won’t have time to think.
 2. The Carve.
Carve hard upwind to initiate the back roll. Note that the front leg is fully extended, toes up to keep the front foot from pulling out of the strap, whilst your back leg is flxed and ready to pop. Even though your shoulders are leaning back into the rotation which will help you get horizontal, your hips are twisting upwind to allow you to resist against the pull of the kite, which keeps the board in between you and the kite and will let you pop off the back leg.
 3. The Take Off.
Firstly getting some up from the pop. Having initiated a good carve as in picture 2, kick down of your back leg before you get pulled over the board and it turns through the eye of the wind. Secondly keep your arms bent. This will allow you to rotate your hips towards your hands. If you had straight hands you wouldn’t be able to get your hands and hips together by the end of the back loop as the distance between them would be to great. Finally keep your head firmly between your shoulders and look forward. By not looking over your front shoulder you should rotate at a controllable pace, using the momentum from the carve to turn you. This means that you can save the energy from your head and use it slightly later on when you´ll need it.
 4. End of The Back Loop.
At this picture you are just about to finish your back loop. You can see that because your arms are bent the bar is not to far away. Imagine where the bar would be with extended arms… yup, no chance! This is where the practice pays off, as you need to anticipate this moment just before it happens. The more slow rotation back loops you do with bent arms, without trying to pass, the more time you will have to think as it seemingly happens slower and slower, and therefor the greater chance you have of pre-empting this moment.
Just as you approache this moment, you throw your head and shoulders down and around, which has the effect of rolling your hips up towards your hands. By keeping both hands on the bar you will have the strength to roll your hips up to the bar towards your hands as your head and shoulders go down, which in turn starts to twist the bar around behind your ass. Its really important that you don’t pull the bar into your hip with your back hand as the kite will rise and pull the bar away from you when you go for the pass.
 5. Letting Go.
You will know when to let go because you´re arm will be in the way! The main difference between learning the back mobe and watching the pros do it, is that they will be letting go so much earlier than you´ll get away with at the beginning. If you´re a bendy kid your limbs may let you pass some distance for your body, but if you´re a grown adult, keeping the bar in close for that little bit longer makes life considerably easier. You can see here a similarity between the secret of many pass moves, the bar is already twisted enough to grab as you let go. This allows you turn more, and more quickly and means that you don’t have as far to reach with your free hand. You can help yourself here by keeping your knees bent which will stop the board from dropping and dragging you away from the kite.
 6. The Reach
Nothing too complicated here as the bar is waiting for you so you don’t let go. Keep both hands on the bar for a split second. By holding on you can rotate around your arm and therefor keep the bar nearer for your reaching hand. If you let go a fraction too early the bar will ping away and you´ll miss it. However the speed ay which you reach around to grab the bar is the key. You want to take the shortest and quickest route around your waist with as little movement as possible. If you’re already claiming Shifty 3s you should be used to this, but if you´re new to passes practising passing a bar behind your back on dry land will serve you well.
 7. Stomping It.
As you can see in the picture, the front arm is bent. Its all good and well passing the bar with wnough height to land, but it won’t mean jack shit unless you sail away. A nearly will give you confidence but a landing lets claim it as in the bag. By keeping your arm in after passing, the kite will pull you around enough to land comfortably at speed on a flat board. If you let your arm pull out straight the chances are you just won’t turn enough and you´ll get pulled over the nose of the board when you land. This can be the most frustrating part to conquer. After you pass try and bend your arm from your elbow so that your hand comes towards you shoulder rather than pull your hand in towards you.
Top Tips
Once you´ve obsessed about back loops with a slow rotation and are ready to go for the pass, really try to visualize the movement of one slow back loop followed by a second very quick off axis rotation. As Walt Disney said, “if you can dream it you can do it”.
If you have a tendency to list the kite as you go to pass try pushing down on the bar as you turn your head down. With the bar twisting down towards the water this pressure will stop the kite from moving.
Summary
- With the kite around 11 o’clock and weight well back over, carve hard into wind with your hips and shoulders, explode up from your back leg into a slow back loop.
- Keep your arms bent and hands close as you leave the water. Look forward.
- Bring up your knees as you start to rotate.
- Three quarters the way around your back loop it’s time to start use your head.
- As the back loop is completed, throw your head down and around towards the water to initiate the pass, but hold onto the bar with two hands, twist it around you so that you can roll your hips up to the bar.
- As your hips rise and meet your arms, release the bar with your front hand.
- Swing your free arm around and in front of your waist and continue to twist the bar around behind your back.
- Reach back around your harness.
- Rotate around your back arm until you can grab the bar with your front hand.
- Once the bar is grabbed release your back hand.
- When you drop lift your head to keep your weight over the board.
- Lift your left hand towards your shoulder to stop your arm from extending and pulling you off balance.
- Land over a flat board, reach around to grab the bar and sail off.

Common Problems
Your kite drifts up fast as you try and bring your hips up.
This is most likely caused by you trying to pull the bar down to your hips rather than bring your hips up to the bar. Try hold the bar with both hands and use the movement of your head and shoulders dropping to pivot your hips up.
That said splitting the fingers of your back hand over the centre line will help to keep the kite from moving up as you go to pass. And if you feel you must pull the bar in make a conscious effort to steer the kite down with the front hand as you pull.
You land on your board still moving, but you didn’t manage to grab the bar. This is a classic for riders getting into the mobe.
The reason for this is likely to be that you are trying to throw a double rotation, rather than control a back loop and then pass. As a result you are spinning on a more vertical axis, your hips won’t roll up and you have no chance to get near the bar. If this is happening to you, go back to the slow back loop and try to separate the two rotations.
You always pass, land and then fall.
This was a personal favourite and has everything to do with not holding the bar in once you´ve passed it. If your arm just extends like rubber you´ll get pulled off balance as the board brakes on impact. By keeping the hand nearer to you with tension on your front arm you and the board will move forward on touch down.
Keystones
- Carve hard with weight back to initiate back loop.
- Look forward for a slow rotation.
- Head and shoulders at end of first rotation.
- Hold on with both hands until hips up.
- Hold on with back hand until you grab the bar.
We end this article with a nice little video from Progression Me
Foot Air Gybe
Foot Air Gybe
We all like to show off now and then and sometimes the simplest of things look and feel good. The Foot Air Gybe is one of those tricks and besides a trick that you can learn without being afraid of ending up doing a face plant.
Before you start trying making a foot air gybe it’s recommended and somewhat taken for granted that you already master the air gybe. It´s also a bonus, but not a must, if you already have done your first one foot jump. The advantage of having done some one-foot jumps before is that you know the necessary movements to get your foot in out the foot strap and still land with control.
Before we go through the key parts of this move let’s make sure that you understand what the foot air gybe is all about. Coming into an air gybe you take of as usual, then release your front hand, grab the heelside edge of the board at the back of your front foot or wherever you find it comfortable, slip your foot out of the strap, before then turning to face the other way, replacing your foot and diving the kite and sailing off in the opposite direction.
Approach and take off
This part of the air gybe differs from that of a normal jump because you don’t want to be flying through the air at high speed. If you do you´ll end up pendulum under the kite and it will be very difficult to land and travel in the other direction.

In picture A you can see how you should carve up in preparation for the take off, similar to a jump. The difference is however that before you send the kite you have already carved up against the wind. By doing this you kill off any unwanted speed, so that when you jump you will only go up, not forward.
Also make sure that your back leg is quite bent so that you´re ready to go early and up as soon as the kite starts to lift. Finally be sure to put your hands close to the middle of the bar, so that you´ll be able to steer the kite with one hand.
You should still approach the air gybe on an edge and with some speed as you need power in the kite. The kite should be positioned at around 11 or 1 o’clock. Then carve hard into wind by looking over your front shoulder, twisting your hips upwind and pushing down on your back foot.
Even though you send the kite hard you need to pre-empt the take off rather than wait to be lifted up of the water. So once you have sent the kite, as soon as you feel it starts to lift, rather than resist more, jump up off your back foot to get in the air. As you do this you can then bring your hands to your hips, which not only gives you some extra lift but also brings the bar parallel with the water, which stops the kite flying too far past 12 o’clock.
Grab and Fly
In order to be able to reach the board with your hand you need to bring your front knee and foot up as soon as you take off. At the same time you need to maintain the float from the kite by keeping it above you, with tension in the back lines. This would be the same as getting into the big chill position of a normal air gybe, where you bring the knees up, pull the hands down and keep looking forward in the way that you were going.
In picture B you can see that the jumper has brought his front knee up so that the board is within easy reach. You can also notice that he hasn’t brought up his back leg as much, this way the board is angled up towards, making it easier to grab. He also looks at the point of the board where he intends to grab the board, which will make the process quicker. You can also see that he has his back hand right up close to the chicken loop. In this position you can pull down on the hand to keep the kite above you in the big chill position. The final thing to take notice off is the fact that the jumper has kept himself upright and has not rolled back to get his feet back.
If you roll back it’ll be hard to keep the bar in and hard to get your foot out, meaning that you´ll drop quicker and struggle to have the time for any fancy footwork.
Slipping Out
The simplest way to get your foot out from the strap is to push the board away from you, so that your arm is doing most of the work. The benefit of watching your foot also enables you to keep looking forward, which is one of the most crucial ingredients for a good air gybe.

In picture C you´ll see that the rider has pushed the board away from his foot by extending his arm. At the same time he pulls his foot back towards his bum and bingo, out slips his foot. At first this is all you should aim for, a quick out and in. If you look at his bar you can see that the bar is still pulled in, so the kite is still supporting him even though it has drifted slightly past 12 o’clock.
Hang Time
Once you have confidence you can go for a bit more extension, just to make sure that everyone and anyone can see that you’ve ditched the foot. As long as you have the bar in and the kite is still relatively above you, you’ll be supported and have time for such showmanship. Keep your board arm extended as this will make getting your foot back in easier.
To increase awareness of this move you can see in picture D that the rider has straightened his leg. Much like a 1 footed jump if you try and push your leg down towards the water it will straighten easily.
Putting your foot in it
Throughout this move, unless you’ve been trying to stare into a camera lens or catch the eye of someone special, you’ve most likely been staring at your hand and the footstrap. By looking this way it will help to stop you drifting the kite too much behind you and it will make sticking your foot back in a synch. Use your hand and arm to pull the board back onto your foot.
That said if you look at picture E you can see that the riders kite is certainly starting to drop the other way. However because he has kept the bar in the kite will pull rather than flutter down the edge of the window. When you feel the kite start to pull from the other side it is a warning that you need to get your foot back in and you need to dive the kite hard to pull you out of the trick.
As soon as you feel that your back foot is going into the strap, start to pull on your bar hand hard to dive the kite.
Touch Down
Now just like landing anything your aim is to get power in the kite so that it’ll pull you down wind, enabling you to land on a float board, off the wind and with some speed.
Tips
As always before performing a new trick, refresh your body memory by making a few good air gybes in preparation for the one foot air gybe. Once you’re comfortable with the air gybe move on to some grabbed air gybes and finally slip out your foot. One good thing is to wiggle your foot a bit before you settle in for the foot air gybe, just to make sure that you can easily slip out when it’s time.
Good Luck!
Unhooked Jump
Jumping unhooked requires all the same core skills as jumping hooked in. In a way it’s a great method of finding out your strenght and weaknesses and to some degree it may improve your hooked in aerial adventures.
The most obvious and main difference is the take off. Without the ability to sheet the bar out as you approach there is a possibility that you´ll get overpowered before you have the chance to stelle into a nice strong edge against the pull of the kite. To make matters worse, if in anticipation of this overpowered-ness, you trim your kite just a bit too much you´ll end up with no power and not a hope in a hot place of flying.
Anyway, let´s move on to the technique!
- With the kite around 11 o’clock and with good board speed you push the nose of the board off the wind. Extend your front leg and let the kite pull you up over the board. Now that the board is pointing at the kite there should be some slack in the lines so you can unhook.
- Push the bar down so your chicken loop can fall free (remove the donkey dick if you havn’t already done that). Don’t look down since this can make your shoulders come forward.
- Now send the kite back and drop your weight back over the trailing foot, pushing the board away from you.
- Twist your shoulders and hips upwind and drop the body weight upwind of the board, resisting the pull of the kite by pushing back with your feet. Your front leg is still extended and try to keep your elbows in near your waist.
- As your arms get pulled up it’s time to get airborn or you’ll just be pulled over the board.
- Explode up off your back leg, pushing your heel hard against the edge for that last bit of resistance.
- The kite wins and you are plucked into the air. As you rise pull down hard on your front hand to redirect the kite and stop any unwanted pendulum activity.
Alright, so we are now airborn. Let’s move on to the next steps.

1. Concentrate on redirecting the kite with your front hand. This is very important and requires much more effort than you can imagine.
2. Still on the way up start to lift your knees whilst steering the kite back above you.
3. Now you should have the board in front of you and you should start feel more balanced and in control.
4. As you approach the apex of the jump the kite is not lifting so much so you can start to pull down on the bar.
5 & 6. At the very top of the jump you should now have managed to pull the bar down to you and from here you can focus on the landing.
7 & 8. As you start to descend try to bold your position and keep the kite flying forward.
9 & 10. Drop your legs and start to hang off/pull on your front hand to get the kite diving down.
11 & 12. Just before the landing point your board and drop your back leg (eg. whilst still diving the kite down with your front arm. Yet again you’ll need to put a lot of effort into the dive, as the kite will not respond like you’re used to)
A perfect landing off the wind. Now you can gather your thoughts, hook back i, carve the board up and across the wind and fly the kite.
Common problems
- The first most common problem is getting pulled off your edge during the take off. If you look at the kite, it twists your body back across the wind and results in you being lifted over the board and loosing your edge. Try to get really low and keep your elbows tucked in. This will be easier if you lean your weight back as you bear away to unhook, as then when you suddenly carve upwind your front leg will be straight and your weight will be low. Once you feel your arms start to extend pop up, as this is definitely the last moment possible to slavage your jump.
- Redirecting your kite when you take off and diving it as you land is much harder hanging from a bar with your hands in the middle. As a result you may find that on take off it’s very hard to get the kite back above you, so you pendulum and drop. If you hold your edge and jump before you get pulled forward this will help. Try using both hands to steer. So if you want to pull on your front hand, push away with your back hand. The result is a turning of the wrists, which will make lfe considerably more pleasant.
Down Loop Airgybe
The down loop airgybe is a pretty easy trick as long as you can jump and how to make a down loop with the kite. Just make the two tricks simultaneously and you will make a down loop airgybe.

Let’s go through in detail what we´re doing here.
- Check that there are plenty of room down wind and approach with somewhat more speed than for a normal airgybe since the speed will help you to down loop more smoothly.
- Send the kite back to 12 and edge hard upwind to get some lift.
- To help yourself get airborne bend your back knee a bit as you would anticipate a jump.
- As soon as you feel the lift, do two things. Spring up off your back leg and start redirecting the kite from the side where it was coming. By getting the kite moving forward early on the downloop will be smoother and the kite will be ready for your command.
- As the kite lifts keep the bar in and wait.
- When you feel that you´re reaching the apex of the jump, move your front, right, hand to end of the bar. Or even better is if you can move your hand to the end of the bar as you get lifted to the apex.
- 8. 9. Now when you reached apex, pull like a mofo with your front hand and keep the bar sheeted in, don’t let go whatever you do.
10. As the kite loops it will pull you downwind. Keep yourself balanced by bringing your knees up, which stops your feet and board from being “left behind”. Keep the bar in and turn the kite.
11. The kite has now come through the bottom of its turn and is on the way back up, which means that you will start dropping down towards the water.
12. As you come into landing stop pulling with your right hand, but make sure that you keep tension in the lines. Spot your landing.
13. Just before touchdown, drop your legs and board underneath you, absorb the landing and point the board downwind. If you land with to much speed you might get to close to the kite which lines might start slacking. Be ready to sheet out the bar to get tension on the lines again.
14. A good landing will soak up the speed but be ready to dive the kite down to the left to catch up more power.
15. 16. As you land carve back upwind to regian control of the kite and get back on the edge. As already mentioned spendning to much time running downwind will shorten the distance to the kite and the lines will slacken.
Front Loop Transition
Before attempting to learn the front loop transition it is wise to first learn the air gybe. If you also know how to make a front loop, this should be a piece of cake for you. Here are the steps to complete a front loop transition.
- Approach as for a normal air gybe. Ditch some speed by carving hard into the wind and then immediately send the kite back aggressively, keeping the bar on the sweet spot. Keep your weight over your back foot, extend your front leg.
- As soon as you feel the kite lift, explode up your back leg and level the bar out by pulling both hands down towards your hips.
- Throw yourself into the front rotation by dropping your leading shoulder, turn your head and kick off the back foot.
- As you start to rotate redirect the kite with your front hand in order to get it back above you.
- Lift your knees, making yourself smaller to help the rotation and to keep your balance in the air. Keep the bar in so you can feel where the kite is and keep tension on the lines, which in turn keeps you up and floating.
- Look over your back shoulder and wait until you see a potential landing spot. With the bar still in you can feel where the kite is, and in this case it’s now above you so you level the bar out.
- Now at the apex of your jump keep the bar in so that the kite will be responsive once you need to dive it. Still look over your back shoulder, waiting to spot your landing.
Keystones:
- Carve then send
- Keep bar in
- Go early
- Redirect kite
- Dive kite really hard

Airgybe to Toeside
The airgybe to toeside is a trick that makes turning much more fun. Instead of just stop and change direction, you jump and fly around in a U-turn.
When you do this trick come in with moderate speed, since it will be damn hard to take the landing in high speed. Keep the kite at 11:15 or 14:45 and to make sure that you come in with to much speed, carv hard up wind, so when you pop out of the water you fly up and not forward like in a normal jump.
Once airborn let the kite pull you upwards and keep the bar close to your hip. When you feel that you´re on your way down, steer the kite aggressively in the opposite direction at the same time as you rotate your hip. Spot your landing, point the board downwind. When you land carve upwind on your toeside edge, that’s it!

Pop Back Loop
The pop backloop is often the first kite trick that kiters learn and once you master it you’ll be eager to learn more advanced tricks.
To perform this trick there are a few key points you must follow:
- Speed. You need speed or else the board will stop in the water when you edge hard upwind.
- To gain speed you’ll have to momentarily point your board downwind, just before you start edging upwind.
- You will be physically jumping up off a coiled back leg, whilst edging the board, corking yourself up and out of the water.
- You will not use the kite for a lift, so park your hands close together on the bar. This means that you’re sailing with kite at 11-11:30 or 12:30-13:00. Having the kite heigher will give you more lift.
So, you’re are mentally prepared and you’re ready to start the backloop pop. Now follow these steps.
- Ride upwind.
- Relax your legs, so that you’re not pushing the board away from you and kite downwind a few meters.
- Once you gained enough speed, start carving quick against the wind, up to almost 45 degrees across the wind.
- At this point push the board away from you with your legs and turn your shoulders back up the wind. This will initiate the rotation.
- Keep turning away from the kite and you’ll continue the rotation in the air and hopefully land nice after turning about 270 degrees (the first 45 degrees are performed with the board still in the water).
- That’s it.

Unhooked Railey To Toeside
The unhooked railey to toeside is a slightly modificated version of the original unhooked railey and the tricks look the same in an initial phase, but you must twist your body to be able to land on your toeside. Here comes the secret:
- As for all railey tricks, come into the trick with speed and power.
- As always when performing railey tricks, keep your kite at 45 and your hand in the middle of the bar.
- Edge hard, pop out off the water, throw your feet back away and up towards the sky, you know the drill =)
- Keep your head looking forward where you want to land.
- When you feel yourself start to come back down, pull your legs back underneath your body twisting from the waist to initiate the turn to land toeside.
- Spot your landing, bend your knees and point your board… yes, downwind is correct =)
- That’s all, if you didn’t crash just continue your ride.

Tips! As for all railey tricks, trim the kite for unhooking before you start the trick. Practice to ride unhooked if you havn’t done it before.
Unhooked Railey
If you already master the hooked railey, then you might wanna go a bit more crazy and try the unhooked railey which basically is the same trick as the hooked railey, just one thing differ, guess what… =P
Anyway, to perform the unhooked railey, just follow these steps:
- Ride with speed and power.
- Make sure that your kite is tuned for unhooking, so that it does not back stall.
- Keep your kite at 45 degrees and your hands positioned in the middle of the bar.
- Unhook and keep your elbows bent.
- Edge hard and leap out off the water, try to throw your feet away from you, behind you and up at the sky.
- Once you are extending, then you can let your arms stretch out. When you feel yourself coming back pull your legs back underneath you.
- Spot your landing, bend your knees and point your board downwind.

Tips! Practice riding unhooked before you try to make unhooked tricks. Trim your kite for unhooking.
Hooked Backroll
For many kiters, the hooked backroll is their first real kite trick to master. It’s easy to learn and you don’t rip yourself apart and together if you fail and crash, so the hooked backroll is a good trick for beginners. So, how do you perform it? Easy, just do like this:
- Keep your kite at 45 degrees and enter the trick with moderate speed and power.
- Edge very hard and pop out of the water and throw your feet at the sky above your shoulder.
- Just as you come of the water turn your head and try to look over your shoulder in the direction of the spin.
- Keep looking over your shoulder until you spot the water.
- focus on the spot where you want to land.
- Bend your knees, point the board downwind and land.
- Continue your ride!

Tips! Keep looking over your shoulder, if you stop looking you will stop spinning. Keep your hands in the middle of the bar. Stay relaxed, if you spin to hard, it is going to be very hard to land without slipping out. At first if you cannot get the full rotation, then try to bring the kite lower.
Hooked Front Roll
The hooked front roll is harder to perform than the back roll. The trick is however quite simple compared to many others. Here is the steps you should follow to master this trick:
- Come into the trick with even speed and power.
- Keep your kite at 45 degrees and your hand in the middle of the bar.
- Jump off the water, once in the air, tuck your front shoulder and turn your head over your back shoulder.
- Keep your head turned in the direction of the spin.
- Once you see the water, bend your knees and spot your landing.
- Point the board downwind, land and ride away.

Tips! keep your hands in the middle of the bar. Relax, don’t try to spin to hard. At first try sending the kite a little to get some lift.
Nuke Grab
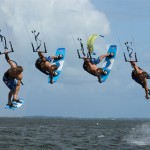
The Nuke Grab requires a body that is a somewhat flexible. You don’t have to be a gymnast, but this trick might be a bit difficult if you carry on to much load in form of a beer belly… anyway, if you can reach your own toes, then you’re probably fine to perform this trick, just do as I say =)
- Come into the trick with moderate power and speed.
- Hold your kite at 45 degrees with your hands in the middle of the bar.
- Unhook, edge hard and pop off the water.
- Once you come off the water, bend your front knee as you twist your lower body.
- Bring front foot up to your body and grab the nose of your board with your back hand.
- Hold the grab and keep your head up while you look forward. This will extend your body upwards.
- As you start to come down release the grab and bend your knees.
- Land and ride away, that’s it!

Tips! Position the kite lower makes the grab easier. Don’t reach for the board, bring it up to you. Concentrate on twisting your lower body. This helps bring the board closer to you.
Hooked Raily
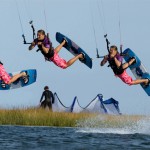
Hooked Raily! This trick is similar to a straight forward jump, but with the difference that you rather fly than jump through the air. This trick is not to complicated and suited well for those who just began to master simple jumps and wants to start make some tricks. Just follow this guide:
- Come into the trick with speed and power.
- Keep your kite at 45 degrees and your hand in the middle of the bar.
- Edge hard and pop off the water, try to throw your feet back away from you and up towards the sky.
- Keep your head looking forward where you want to land.
- Spot your landing, bend your knees and point your board downwind.
- Land and ride away.

Tips! Trim your kite for good line pressure. Adequate line load is key to a good railey.
S-Bend
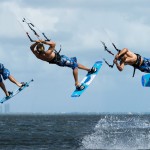
S-Bend – a pretty easy trick, but still impressive!
- Come into the trick with moderate speed and power like you do for a raley.
- Have your kite at 45 degrees with your hands in the middle of the bar.
- Unhook, edge hard and pop of the water.
- Once you are extended in your raley, tuck your front shoulder and look around your back shoulder.
- Keep looking until you spot your landing.
- Bend your knees and absorb the landing.
- Hook in and ride away, piece of cake!

Tips! When you go into the spin bend your front knee to help initiate the rotation. When you start the rotation, “snap” your whole body in the direction of the spin. At first it helps to have your kite higher.
Slim Chance
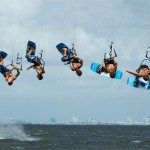
Slim Chance! This is a cool trick that you must have in your repertoire! Just follow these “easy” steps =)
- Come into the trick with moderate speed and power.
- Position your kite at 45 with your hands in the middle of the bar.
- Unhook, edge hard and pop of the water.
- Once you come off the water, roll your body like you are going into an S-Bend by tucking your shoulder and turning your head. It helps if you have mastered the S-Bend first 😉
- As you go into your S-Bend, start to pull the bar to your back hip.
- when the bar is at your hip, snap your head in the opposite direction to initiate the spin.
- Pass the bar from your back hand to your front hand.
- Once you pass the bar, let your body fall as you spot your landing and ben your knees.
- Land, hook back in, and ride away cleanly.

Tips! Turning your head is the trick! Pull the bar to your hip hard. The more inverted you get the easier the handle pass.