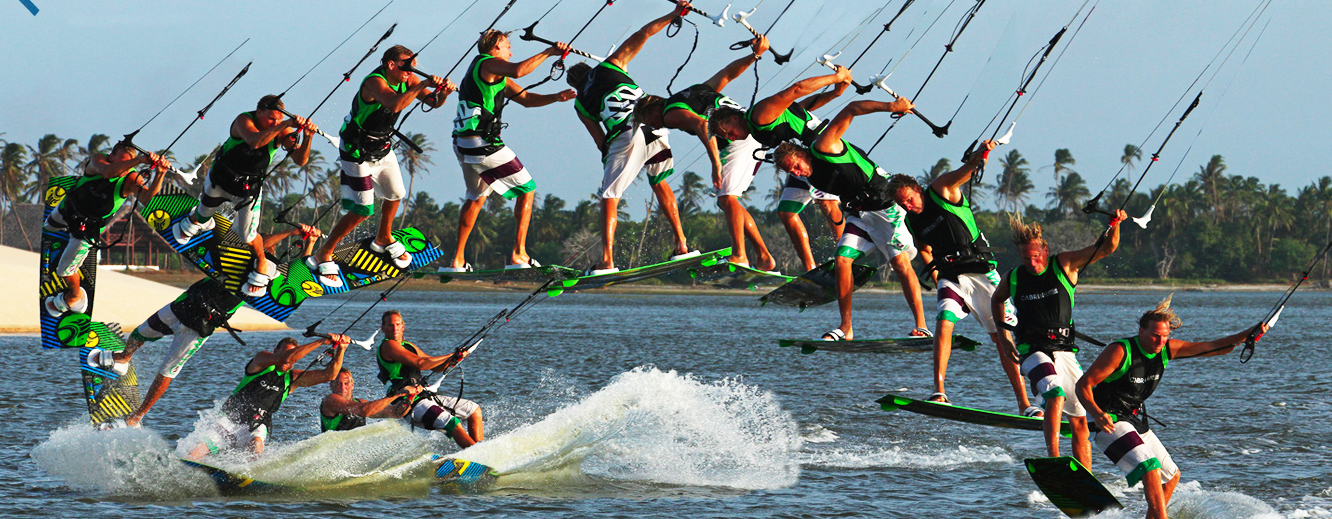
Blind Judge 3
We’re expecting that you can already stomp the blind judge, and therefore we’ll tweak what you have to move you towards the full monty. In tech terms, considering that you should land a blind judge pretty much down wind, you’re only going to have to turn just over another 90° to claim this one, but that’s a bit like saying you only have to pass the bar in the air to convert the blind landing into a judge, only. It may not sound like much but it’s worth the effort, as it will quite literally feel stunning to land back on your heels – boom! We’ll walk you through the bits that we think make the difference and get you all the way around.
The Approach
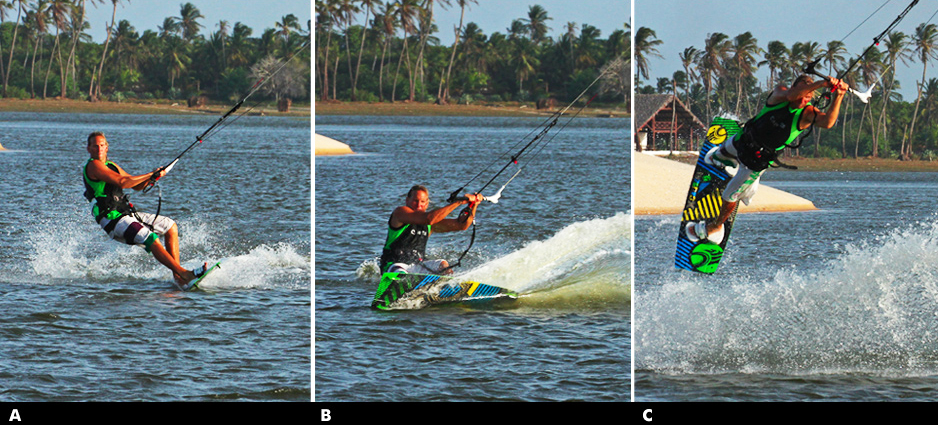
Yes once again if you don’t start this right you’ll be emptying your bladder into the wind, whilst banging your head on the proverbial brick wall. First things first, where you start is where you’ll finish, so if you want to land heel side pointing downwind you better bear away so that you’re pointing very downwind before takeoff to help your chances. If not even if you rotate all the way you’ll land on an edge and butt check at best.
Finally and looking at Pic A. you’ll need to get your body and weight into the right position to control the speed and pop. This should be nothing new but you can see that the rider has his hips back over the back of the board, his front leg extended, his shoulders behind his hips and his elbows is This is only possible if you bear away in this position so don’t carve off the wind and bend your front knee!
The Carve
You need to be super aggressive here to get maximum pop, so fight for it if this was a close up you’d see the rider’s rather pained kite face, there’s some effort involved.
Pic B. From the good approach position the rider was able to quickly carve back onto his edge by turning the board back up wind. To resist sufficiently the rider does not allow his back leg to bend more than it was before he carved – you can only use the bend that you have to pop. At the same time the rider’s front leg remains fairly straight which keeps his hips back and low. The final battle is to keep his front elbow in to stop the kite rising as he carves against it
Pop and Flick
This is definitely one of the most influential moments in learning this move, the flick which follows your pop.
Pic C. By resisting hard, carving hard and popping hard but late, the rider’s board flicks around behind him, turning his waist and shoulders upwind, so that the board is more vertical than horizontal behind him.
To prevent him from rotating the rider keeps looking forward and keeps his arms in, but he doesn’t resist this movement as it is the coiling of the spring! In this position the rider’s legs are straight, he doesn’t let his knees bend and feet lift. If you’re used to letting your knees bend your feet up behind you, you need to work on this straight flick. From here you can use gravity to gain maximum speed to spin effectively. If the feet go up you only have your knees travelling a short distance, as opposed to the weight of the board coming from far behind and one side to the other.
Pull and Turn
The flick is only transient, because no sooner is your board behind you than you need to get a move on and throw the 3.
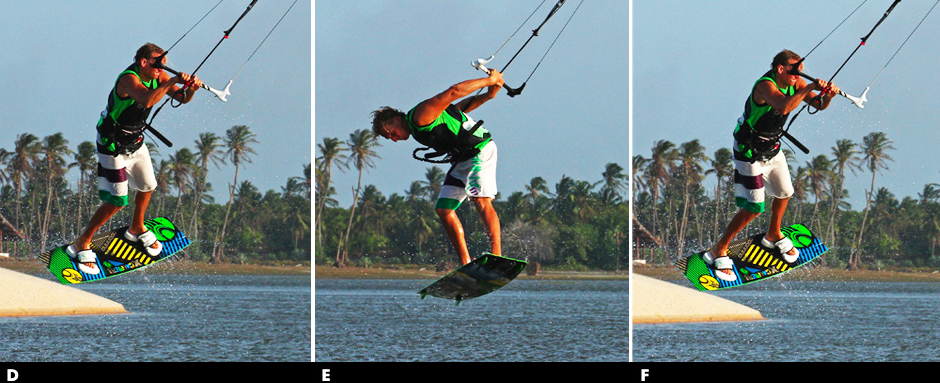
Pic D. As soon as the rider can, he pulls hard on the bar to get his head and shoulders above it and swings the board forward. With the board and his body coming from that turned upwind position, it starts to turn the rider as soon as he moves. Worth noting as well that as the rider pulls on the bar with both hands he is already twisting it around ready for the pass. In comparison to a blind judge the rider does throw himself into the rotation, committing to a full rotation from the off. Think of it as a full flat rotation as opposed to a blind judge with a heel side landing. The basic difference here is that if your board is horizontal it swings forward and down as you pull. From the flicked position, as soon as you pull you automatically start to turn and therefore build up momentum for a full 360°.
The Pass
Hopefully the extra pop and direction of spin created from your flick will allow you to keep two hands pulling on the bar for longer whilst still allowing you to turn. This should then allow you to pass the bar nearer to you, whilst you remain more upright with the board underneath you. If you’re comfortably landing blind judges, then concentrate on passing the bar later, allowing your body to turn further before reaching for the bar. Pic E. You can see in the picture that the rider’s hips are over the board, so he is rotating with the board. The rider achieves this by keeping his head more upright, so don’t tuck your chin into your chest. You can also see that at the moment of passing the rider’s head is turning to look forward, keeping the rotation alive. Finally the rider’s trailing leg is bent.
You must keep this leg, your front landing leg bent so that it doesn’t drop down away from you, preventing you from completing the full 3.
Getting it round Pic F.
The final hurdle. You can see that as the rider releases his front hand he keeps his back arm bent and the bar close. This will keep him moving towards the kite and prevents him from dropping down. The rider’s head is still turning to look for the landing, bringing his shoulders with if now whilst holding the bar in close the rider lifts his front knee through with the rotation and twists the bar around in front of him, so that the bar will lead him as he comes around, bingo.
Top Tips
- They’ve all been mentioned, but start well off the wind, go for the flick and pull early. Really spin into the rotation, committing for the full 360 and pass the bar late so that you turn further, leading with your head held high.
- Once you pass the bar keep your knees and board up, and the bar in close, so that you can roll your front shoulder towards the bar waiting in front of you…. To get yourself in the mood and your head around it, try to get the full 3 without passing the bar, so let go when you should pass but aim to get your body and board around.
- Don’t however practice this method too much as you don’t want muscle memory to remember the letting go.
- You will need time and height to land this, so as well as going early you can sneak the kite up a fraction as you pop, but don’t wait to see if it’s enough, as then you’ll be its late.
Keystones
- Flick from take off.
- Immediately pull and turn.
- Head and knees up.
- Pass later in your rotation.
- Keep bar in close and lift
Shifty 5
Everyday small progression in kiting is an important thing and also the most rewarding challenges. In freestyle the possibilities seem endless, moving from a blind landing with surface pass, to an air pass blind judge and then adding that extra bit tars blind judge three and then a five and then a seven – one can but dream or admire those that actually can.
Anyway the point is to those non-freestylers it all can look a tad uncontrolled with a lot of splashing, but if it’s your thing then every extra 90° or so means s00000 much. Taking your Shifty 3 and moving it on to a 5 is a highly rewarding yet achievable challenge – so here’s how.
To make that extra turn to toe side you’ll need more time. There are a few options available to you here. You could put your kite higher, which will help but the higher it is the more strength and effort you’ll need to pass, which may slow down your rotation.
You could go for the pass much earlier and therefore have more apparent time at the end to get around that extra bit although if you don’t kick the back leg it could make the pass trickier. And you could pop as hard as you’ve ever popped, although if you pop too hard you might get extended and pulled out which could also make the pass a tad more difficult. Realistically a subtle combination of all three is needed, with an awareness of how each will affect you. The one exception to all of the above is if you happen to be one of those people who can spin so quickly that you’re not sure what all the fuss is about
Getting Up There Pic 1
From the above you can check that rider is not coming into this with his kite at 45°, but as so often it won’t be above 11 o’clock as you must be able to edge against it, and any higher it’ll be lifting you – 10.30 is perfect.He’s come in with good speed and the kite parked still, with all his weight back over the tail of the board. He’s carved up hard and low and at this point has popped aggressively by stamping against the board, allowing his legs and body to fully extend upwards in an effort to get as much height as he can with this kite angle. His effort is focused ontwo things simultaneously, pop for height AND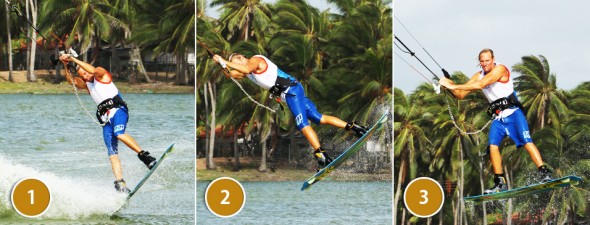 keep the bar as close aspossible. You don’t want your arms getting pulled out straight.
The Leg Kick – Shifty Pic 2
As you’ll no doubt know from your Shifty 3s, kicking the back leg out is to help with your rotation and if you happen to have a stylish shifty it’ll look better too. As soon as he is free of the water the rider kicks his back leg out, winding up some energy for his rotation and pass whilst keeping his elbows and hands in. This way he’ll be able to pull harder and swing his leg further.
Swing and Pull Pic 3
This is a crucial step as the closer you get yourself to the bar, the earlier you’ll be able to pass it and more importantly the less it will pull away from you once you have passed it. Remember that your airs is to go a little earlier so as soon as you have kicked your leg back, pull and go. You need to pull yourself up and over the bar whilst swinging your front leg under your elbows to get you rotating. This is a kite face moment as the effort should be extreme maybe even allow yourself a little grunt!
You can see that in comparison with the last picture where the rider head was level with the bar, he now has the bar coming in and down below his chest. And even though he has swung his back leg through and has started to rotate he still has both hands on the bar as he is still pulling himself up to it.
The Pass Pic 4
The passing action will be similar to your 3, that is to say you’ll be leading with your head and shoulders, turning yourself down and around, away from the bar, releasing your front hand, twisting the bar and then immediately hunting for the bar on the other side. If you popped hard enough and pulled hard enough you should get some slack here from the kite, which will help as the bar won’t get pulled out from you.
That said the main difference here to the 3 is if you look at the rider, you’ll see that his back leg is lifted with his knee coming up towards his chest. This is the precursor to getting the toe side landing, you really have to commit to this during the handle 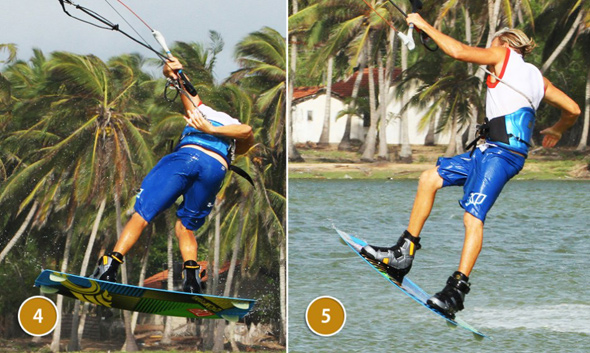 pass, otherwise your feet and the board will drop away from you and you’ll have no chance to go that little bit further.
Head, Hand and Knee Pic 5
And here is the result of bringing that knee up. With the knee up the rider can then bring it through towards his hand. The action is similar to that of a back roll to toe side, even though your adding the toe side on at the end you have to finish the roll with your back knee high so that you can push it through. It’s also important to keep the bar close, by that we mean don’t let your front arm fully extend as then you’ll used to Shifty 3s the chances are your muscle memory will encourage you to just drop out of the pass. Here you must keep your head turning so that it’s looking forward as this will allow you to turn your shoulders further so that your legs and upper body are moving together.
Just think how you learnt the side by taking the front hand off so that your shoulders could twist around. Here you can’t let that hand go so you’ll need to turn your head.
Get the Back Hand on Pic 6
This is almost THE top tip as well as being the final thought to ponder, 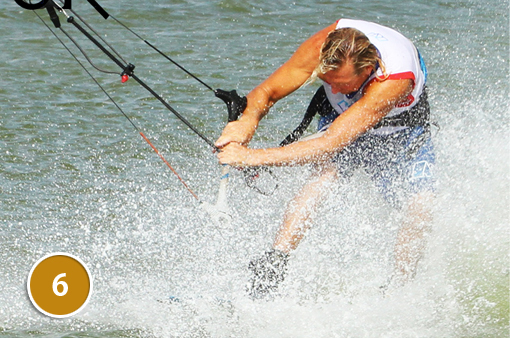 as once you get your head around what is going on, aiming for this from the moment you think about passing will help you get the 5.
If you fry your damnedest to land with both hands on the bar it will make you turn your shoulders even if it doesn’t get on until you splash down, as is the case with our rider here in image.
Top Tips
- You’re going to need power, pop and height, but don’t confuse this with having your kite trimmed too far out, or should we say powered up in old
- If you do the kite will pull all through the move and it’ll be twice as hard.
- If you can think of only two elements of this move, they are to lift that back knee as you pass and fry to land with two hands on the bar.
- Have a gander at the full Sequence and Videos and try to see the early pre-empting of the toe side turn during the pass


Common Problems
- If you’re dropping down out of the pass as per normal for a 3, take time to visualize what you’re aiming for.
- Then give it another 30% on your next try and think about bringing that knee up and landing with two hands.
- If you’re getting around but then fall on your back once you land. This means the kite is pulling you too much once you’ve passed, so either trim a little more or pull harder into the pass.
- If you don’t have time, go earlier and try to get some more height with help from the kite.
Keystones
- Come in with power and speed and pop super hard
- Shifty as soon as you’re off the water
- Then immediately pull up to bar and swing back leg through
- Lift back knee up and through as you pass
- Land with 2 hands on the bar