Kite Loop

 The kite loop is an extreme kite trick and you really need big balls to even dare try to perform this insane trick! As an “advanced” kite surfer this is however a trick you most likely will try to perform at least once! If you’re unlucky you might hurt yourself quite bad and will probably not be so keen on trying again! So a good theoretical knowledge about this crazy trick is an advantage before you try to do it practical. Follow this guide and you minmize the risk to crash, but first some ground rules.
- Make sure that you are over powered to the limit using a relative small and fast(!) kite, 5-9 m2 is ok. I use a Royal Era though most new kites are fast enough.
- Be sure that the water is deep enough to not hit the bottom in case you crash.
- It’s best to start doing kite-loops with longer lines, don’t go below 20 meters during your first attempts to make kite loops.
- Have a stand by rescue buddy within reach!
Ok, so the preparations are done and it’s time to loop! Follow these steps:
- Jump as high as you can and when you’re just about to reach the peak, twitch the bar’s back side (if you going left, pull the right side)
- The kite will pass twelve and begin to loop.
- As the kite is about 270 degrees through the loop you will eventually start to fall and the lines might slacken a bit. Now don’t freak out. As you fall the lines will apperantly become stretched again and you´ll now be able to fulfil the last 90 degrees of the loop and the kite will catch you again.
- When it comes to landing, point the board fully downwind!! You´ll land with high speed and will not be able to land with your board pointing a upwind. Doing this can result in a twisted knee or two. Looking over your back shoulder as you loop will help you twist your hip and get you prepared for a landing with the board pointing downwind. Also avoid land on choppy water.
- That’s it! If you done everything correctly you should now be back in the water in one piece!
Good luck and don’t underestimate the use of safety equipment when you´re doing kite loops! Helmet and impact vest can save you months of boring rehab!
Kite Loop Handle Pass
The KL3 is a genuine pleasure to tame. Having a bit of pull from the kite and chucking a pass in to boot should get you cheering yourself on even without witnesses. Best bet before trying this would be to get your shifty 3 down, as that way you’ll be used to the rotation and muscle memory should prevail when you pull the trigger. For the more cautious amongst you, the progression step before this is the kite loop to wrapped, which we covered in Issue 21. It goes without saying, we hope, that at the very least you can comfortably and confidently stomp your unhooked fish polled kite loops!?
Approach and Pop
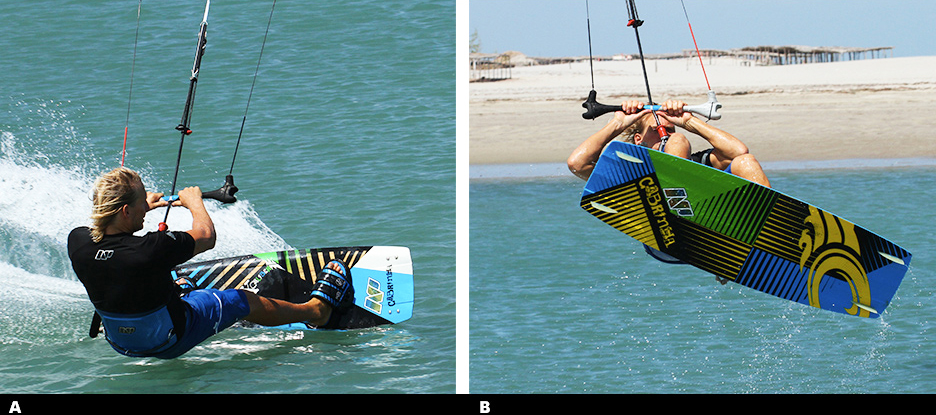
Perhaps a slight recap is necessary as your parting with water moment should be bang on to give you maximum hope of adding a pass and landing. Firstly you’ll need some height and therefore some up pull from the kite, not just some mad demonic downwind tug. Starting with your kite high, near as damn it to 12 o’clock will make all the difference. Trimming your bar down is also essential as not only will this make unhooking with your kite high possible, but it will also encourage your kite to loop, rather than spin on its axis. In Pic A. The rider has already set his kite at 12, flattened the board off to unhook with his hips up.
Lift Off
As you get launched into the air you must be ready for the put as the kite starts to turn. Having popped up hard you will be extended, but in order to take the power and still be able to rotate you must brace and balance yourself.
Pic B. As the rider explodes up off his back foot he puts all his effort into 2 things. Firstly he keeps his elbows in as tight as possible, so that his arms won’t extend too much as the kite pulls, which in turn will keep his body closer to the bar and ready for the pass. Secondly he pulls his knees up, making himself small, so that his legs and board don’t get left behind, and therefore have a chance of coming through and under the bar when he rotates into the pass. In short the rider is trying not to let his body extend into a Raley position. Flick and Kick those of you familiar with the shifty 3 will be aware of the spin that your back leg can create as it comes towards the bar for the pass. The KL3 is no different in that you’ll spin more quickly if you can “involve” the back leg. In fact here it is almost easier as rather than having to kick it out behind you, the whip from the kite will tend to flick your back leg out, so just concentrate on keeping the front leg in and your back leg will be poised and ready to strike.
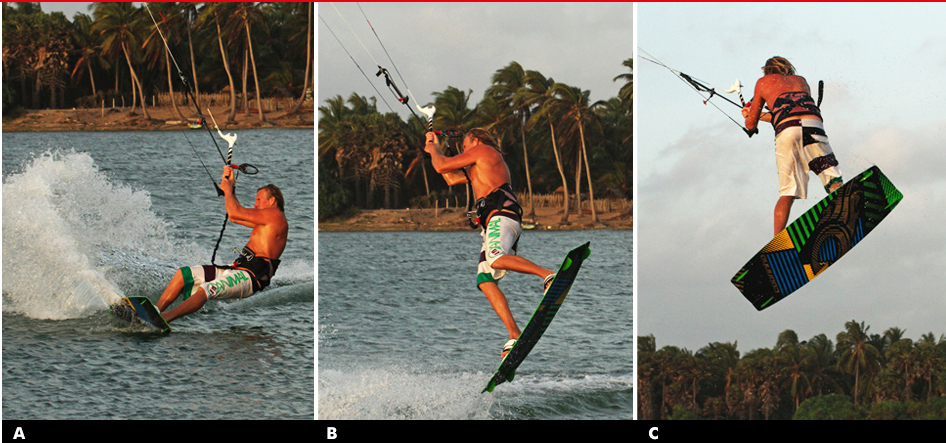
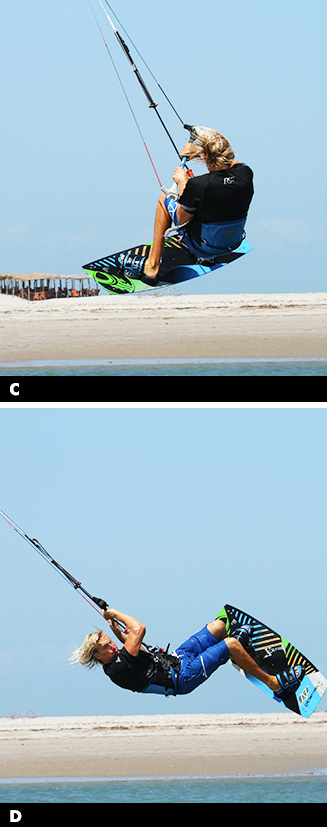
Pic C. At this point the rider is watching the kite as it goes through the bottom of its loop and starts its journey back up. Keeping his elbows and front knee in the whip of the kite pulls him towards it, which conveniently flicks his back leg out, ready for the pass.
0 – 60!
As well as physical effort the timing of the pass will make or break this move. Although feeling is generally preferred, watching the kite during its loop is no bad thing as you need t “go” before the kite climbs back up in the window, as this will be the moment of least pull and the bar will be light and not pulling away from you. Pic D. As the turbo drops off, the rider pulls the bar down and back towards his trailing hip hard with both hands, so that his upper body comes up towards the bar.
Simultaneously he pulls and swings his back leg up towards the bar, which not only helps him lift the board but also generates the momentum for the pass. You can see how close his body is to the bar now.
The Pass
No rock& science here, as all the usual rules apply. Assuming that you went early enough the kite will not be pulling the bar away from you, so the key is committing. Therefore as your back knee comes through you must release your front hand and turn your head and shoulders so that you don’t block the rotation. Also you must hold onto the bar with you back hand until you can reach it with your free hand behind you. By holding onto the bar you can rotate around it, making the pass more achievable.
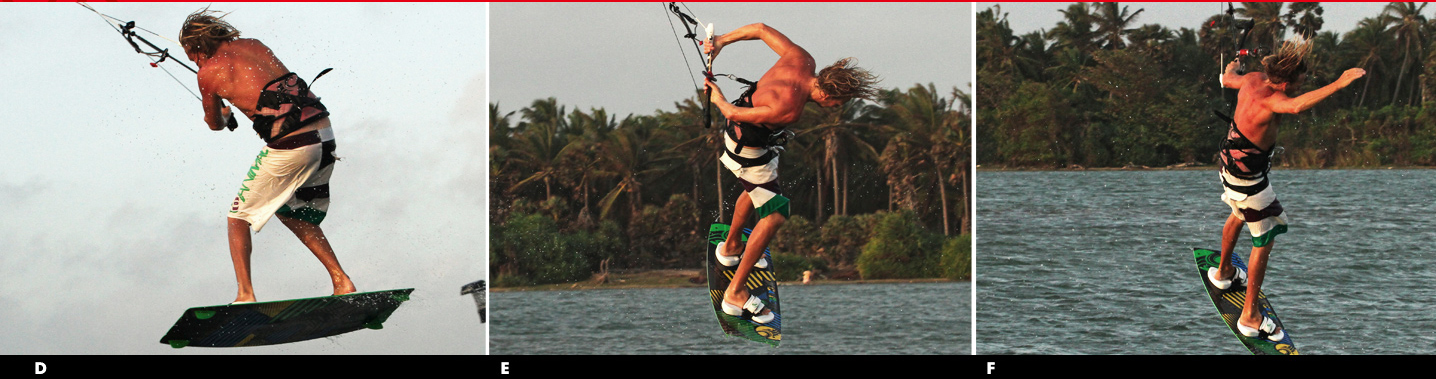
Pic E. You can see that the rider has twisted the bar behind him, which allows his shoulder and therefore body to rotate further around, almost rolling around the bar. This makes the pass simpler as by rolling onto the bar, it places the bar easily within reach of the searching free hand. Hence the progression from wrapped, as realistically you are first wrapped in the air, before passing.
Claim it
Once you’ve passed the bar preparation for landing is key. You need the board underneath you and your head looking forward and held high, whilst keeping your arm in as close as possible so that you complete the rotation sufficiently to land with the board heading down wind. Pic F. The rider has dropped his under carriage so that he’ll land on the board. Chances are that this will not be the softest of landings, so he’s lifted his head so that he can stand up and take it, whilst his elbow holding the bar is bent so that his body will follow the kite downwind and complete the rotation.
Top Tips
- As is so often the way the fundamentals are key, so hammering out a few unhooked kite loops first will acclimatize you to the wind and more importantly the kites arc.
- Watch the kite and feel for the flick as the kite whips.
- This way you’ll be able to anticipate the dead point, where you’ll have the slack to pass. If you it for it you’ll miss the moment.
- It will make good sense to learn this with less power and build up from there. If you can nail a pass on a low fly by just before landing it counts and the consequences of it not working are just a splash.
- We won’t be adding any common problems for this move, as it is a matter of concentrating on the relevant skills and putting them together – a comfortable kite loop with an explosive rotation.
Keystones
- Pop early
- Elbows in, Knees up
- Pull bar and swing back leg immediately after whip
- Hold on with back hand to roll around bar
- Get upright for landing and hold in front arm
Inverted Grabbed Front Loop
Funnily enough some of the most pleasant to watch and pleasing on the eye kiters are not necessarily the most radical, but simply the most stylish. Obviously there are the golden few who combine both and have as a result forged a decent career out of kite surfing. So with that in mind here’s another way of adding the mustard onto a move that you can already do, the glorious front loop. For this very reason we won’t be delving into the finer details of the front loop, as we’ll assume that you have them dialed, but rather concentrate on the required aspects of pimping your FL, polishing and adding to the bits that matter.
The Take Off
Your approach and take off should be as normal. Coming into the front loop you’ll need to be thinking ahead so it’s best not to change the way you get off the water, but for one thing…
In Pic A. the rider has already committed to her forward rotation as per normal, she’s sent the kite and kicked off her back foot to push into the rotation and has the bar in with tension on the lines to control the kite throughout the move. The important exaggeration is in her head movement. In an effort to create a more inverted rotation the rider has really thrown her head forwards towards the nose of the board. This will rock her weight and centre of gravity forward of her harness hook and literally tip her upper body forwards, lifting the board behind her.
This is in preference to turning her head back and spinning under the kite and around her lines. Also note that her bar is close to her and her hands are not above her. If your arms are straight and the bar is above you, you won’t be able to throw your weight forwards. The resultant tipping from your head on your front shoulder will give a more horizontal body rotation, but not an inverted one – for that we need more. On the way up get the kite close to 12 o’clock so that it is in position for the rest of the move.
Arch de Triumph
Getting your feet up once again relies on some head work. This is potentially the most confusing and disorientating part of the move, as it is very different from what you will have done before.
Pic B. Once the rider feels that she is rotating and has brought her knees up towards her body she initiates phase two of the inversion, most likely just before the 180° mark. To get the extra purchase on the inversion the rider now throws her head back, as if she were trying to see the water underneath her, in a back arching type of movement. It’s very important at this time to keep the bar in and tension on the lines, as you will need to apply some pressure through your hands to help. With her head on the way back and down, the rider’s knees, feet and board will rise further.
It is at this point in a front loop that you would most likely turn your head further to see where you are going, and it will take some concentration to override your muscle memory! Also as you throw your head back don’t be tempted to correct the kite, as strangely once you’re upside down you may well get confused as to which is your front hand. Not to worry though as the grab will sort that bit out.
Show Your Board
Pic C. As soon as the rider threw her head back she released her back hand and went for the tail grab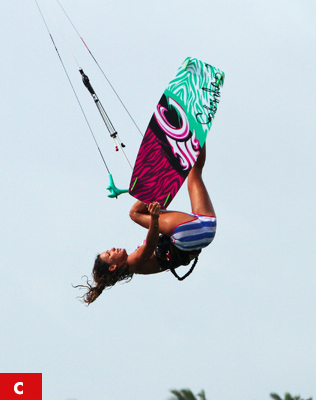 . From this moment on you are committed. Holding the grab the rider has pushed and extended her legs to get the board up. By pushing her feet away whilst holding the grab with her back hand the rider is able to “bone” the grab out. You can see that the rider is looking up at her back foot, but with her head still back.
The good news is that because you throw your head back rather than look for your landing it should slow your rotation down so that you can hold the grab and inversion for longer. Do beware though that if you’re on a small kite, whilst you freeze in this pose the kite might well start to move forward and pull you downwind.
Coming Down
At first you’ll most likely prefer to come down the right way up, upright, and set up for your landing.
Pic D. To get the board down and her head up, the rider uses gravity.
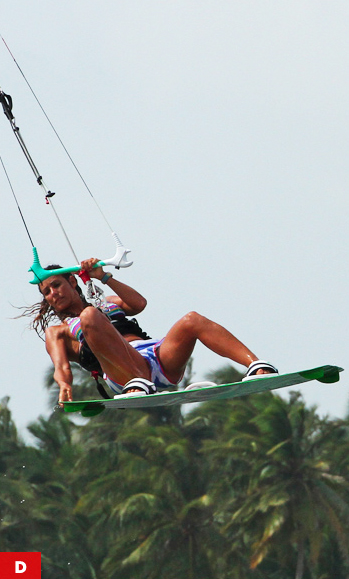 Simply by lifting her head, moving her chin onto her chest, she rolls forward as the weight of the board pulls her feet down. With this new view the rider can focus on where she’s going to land and act accordingly. Here the rider holds her grab whilst diving the kite with her front hand for touchdown. However if you feel that you’ve already over cooked it on the front hand you may have to let the bar out to avoid a super fast reception.
Once you’ve got this nailed and your confidence up, you can hold the inversion and grab for as long as you like, suddenly releasing and turning in time to land.
Top Tips
- For your first attempts just site it all down, be gentle and don’t jump too high. Ideally we’d recommend leaving the grab out and just concentrate on getting the board up. It’s stunning how going upside down can and will disorientate you.
- If you get it wrong taking it easy there’ll be no consequence. However once you have the movements and develop some special awareness we’d recommend sending the kite well on takeoff for two reasons.
- With a front loop you are likely to release the edge early and therefore need the extra oomph to get the height. Secondly as you’ll be hanging off your front hand whilst you grab with the other, with the kite further back to start with you are less likely to overdo it and come in lit.
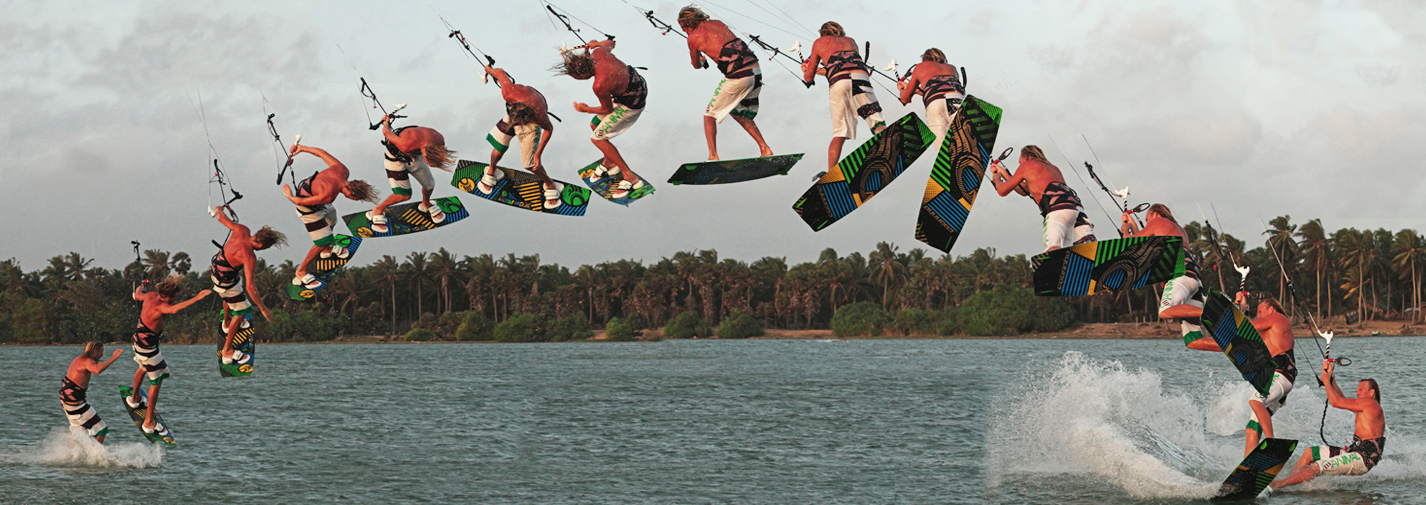
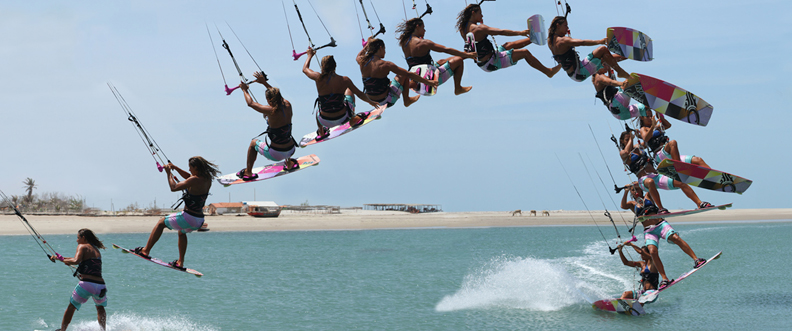
Following Sequence 1.
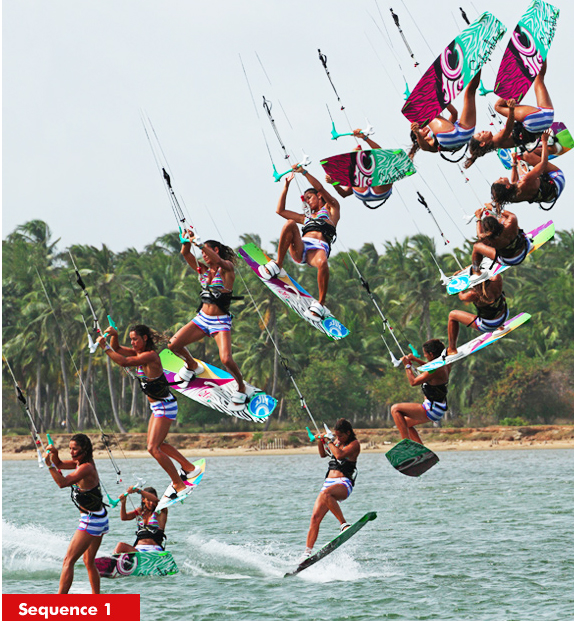
Pic 1. The rider approaches with her kite at 11 o’clock, good speed, hands centered on the bar, a fine edge and the sends the kite as per front loop.
Pic 2. The rider kicks up and into her front loop off her back leg, but really concentrates on throwing her head forward towards the nose of the board to tip her forward into a more horizontal rotation.
Pic 3. As she leaves the water the rider brings her knees up, and gets the kite back up, with the bar held in to keep tension on the lines and aid with the inversion.
Pics 4 & 5. Coming around towards the 180 mark with the board rising the rider throws her head back, arching her back in an effort to get her feet above her.
Pic 6. With her feet up the rider releases her back hand and reaches for the tail grab.
Pics 7 & 8. Grabbing the board the rider pushes her feet up, extending her front leg to bone out the grab and get her sumptuous new board on display.
Pic 9. As she comes around the loop the rider drops the board down by lifting her head, so that gravity can take over and looks towards where she’ll land.
Pics 10 & 11. Releasing the grab on the way down the rider reaches up to get her back hand back on the bar.
Pics 12 & 13. With two hands on the be the rider dives the kite, drops her legs and sets up for a down wind landing.
Common Problems
- If you’re not getting enough inversion don’t look for the grab with your head, but rather lift the board with your legs until you can see it once you’ve thrown your head back. Remember to keep your bar in as you throw your head forward.
- If you’re under rotating and not completing the front loop, drop the grab and board sooner, and then turn your head hard to bring your shoulders around.
- If you’re landing with too much speed and the kite diving hard. Make sure that you send the kite enough, that your front hand is butted up to the chicken loop and that you’re not trying to pull yourself around the site front loop on your hand.
Keystones
- Bar in on take-off
- Throw head and weight forward
- Lift knees
- Throw head back and arch
- Push feet up
Double Back Roll Kite Loop
Hey guys! This week lets rock with double back roll kite loop and find all the possible way to complete this trick.
This one harks back a bit, watching some of the early adopters pulling the trigger on one of these back in the day was a sight to behold, large kite, no depower, heavy mutant strapped to their feet, and serious landings! Fortunately things have moved on and tricks like this are open to anyone and everyone, so certainly worth a bash and a lot of fun – possibly feels better than it looks.
As a prerequisite we would advise that you have a decent back loop, so that you can control your rotation and you know where your kite is, and some experience with looping the kite as you’ll be happier if it turns. Other than that as long as you’re not maxed it’s game on as this move is more about commitment and timing than finesse and technique
The Approach
Pic A. This is a sent back loop, so you’ll need to come in with good speed on a solid edge and your kite no higher than 1 or 11 o’clock. With a good edge you can confidently send the kite hard enough to get sufficient height, happy in the knowledge that it won’t drift too far behind you because the lift will come early. For this same reason you must keep the bar in on the sweet spot when you send the kite. If you let it out the kite will drift further back before taking you up, and the result will be a low and slow kite loop – not ideal.
You can see in image that the rider has speed and is low on as much edge as possible, driving through his back foot to resist the extra pull from his send. This will give plenty of up and keep tension on the lines during the back rotations – important for the moment you pull the bar to loop the kite. As for a normal back loop you should aim to take off with a bit of upward stamp off the back leg as this will also keep the kite above you.
 The Rotation
Pic B. Although this is a double back loop, you don’t want to be throwing a super fast spinning rotation. For those of you who can already pull of a single back loop kite loop, it’s a similar theory. In the single version you only perform half a back loop and the kite does the rest.
Here for the double if we can get one and a half the kite will do the rest. Otherwise you run the risk of over rotating when the kite pulls, which won’t be the most comfortable of landings. Your aim is to rotate at a speed that will get you around 360° by the time you get to the apex of your jump, the higher you go the slower you need to spin. So give the take off a bit more than you would for your normal back loop. Even though you don’t want to overdo it, you do need to get yourself into a position from which you can rotate and maintain balance. Here the rider is already half way around his first rotation. He’s tucked up small, knees up, board close, so that he doesn’t stall or slow down. However his head is still looking through his arms, he’s not thrown it into the rotation. And he has the bar leveled and pulled into the sweet spot, to keep the kite from drifting back and also keep tension on the lines, so that the kite is primed.
Do It
Pic C. Assuming that your kite hasn’t drifted too far back you should still feel it supporting/floating you as you come around your first rotation. This is the moment to pull the trigger and loop the kite. If however you feel that the kite is way behind you and that you are already starting to fall, it’s best not to pull. The rider’s momentum is taking him into another rotation. He still has the bar in and is tucked up, so all he has to do is pull in hard on the back of the bar and push away with his front hand. As fun as it is to get as much power out of the • loop, when learning you want it to get around fast so be positive with your bar movement. You can see that the rider has his back hand slightly down the bar, whilst his front hand is near the centerline. This means he can pull easily on the back, and keep the bar on the sweet spot with the front.
Turbo
Pic D. Once you pull be ready for the kite’s power to pull you around. Here the rider has now turned his head to look over his front shoulder. This will help him “go with” the kite as it loops, meaning that he’ll turn slowly as the kite pulls him around. Once you’ve got here you are fully committed, so keep pulling and don’t let the kite pull the bar out and away from you.
Around to Land
Pic E. As the kite goes through its loop and starts to climb, keep the bar in and the kite turning. As long as you keep looking, keep the bar in and keep the kite moving you’ll come around. Once you can see your landing as the rider can here you know you’ve made it. Only thing left is to land downwind and then get back on your edge quickly to get tension on the lines and get the kite back under control.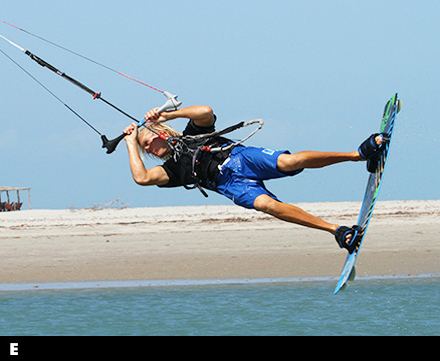
Depending on your height and the speed of the loop, you may need to dive the kite hard to prevent it from overflying behind you!
Top Tips
Before bashing on with this, definitely bang out a few back loops to work out how hard you should send the kite and how fast you should rotate, then you can amp up the rotation a little bit and add the loop.
This move is all about timing. As long as you don’t let the kite drift too far back on takeoff, and pull for the kite loop as you start your second rotation it will work. We’d recommend not trying this too powered up to start with, work your way up in steps, both height and power, as you don’t want to be coming in on your side or back!
Common Problems
- Kite drifting too far back during first rotation. Chances are that you let the bar out as the kite started to lift, and/or you didn’t send the kite hard enough.
- If you want to tone it down it is better to give a hard but short yank on the bar than to slowly drift the kite.
- If you’re over rotating and starting a third back roll you are either pulling for the loop to late, or spinning yourself into the first rotation with too much energy. The quick his is to make sure you pull on your back hand as soon as you start the second rotation as the kite will pull you out of it foss down wind landing.
Keystones
- Approach as for a jump
- Good send with bar held in
- Make yourself small
- Pull hard as soon as you start 2nd rotation
- Keep pulling and turn head as power comes on
Back Loop One Foot
Kite surfing is an grand sport and also proven one of the best exercises for your body & your mind. Being a pleasurable, social sport, kitesurfing can increase your levels of health and fitness with no doubts.
Hopefully you did your boned back loop grab homework! Here is the natural progression, once again based on the humble sent back loop, grabbing the tail but adding a stylish one foot into the equation!
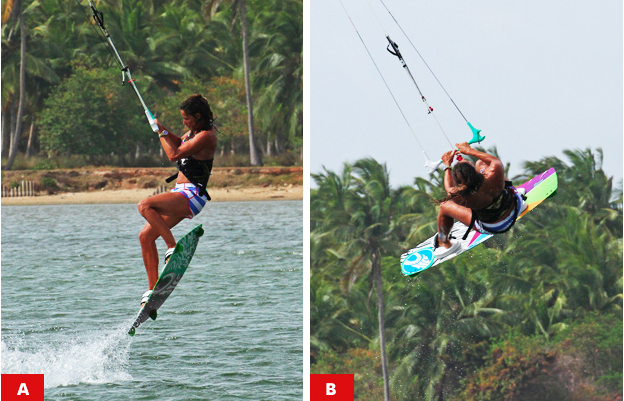
The Approach Pic A.
To have the time in the air to get a foot out and still land you’ll need to perform a dos, and floaty back rotation. Approach wise you need to be coming in on a good edge with the kite parked at either 11 or 1 o’clock. Get your weight back by extending your front leg and dropping your bum over the back foot, whilst still resisting. You can see that the rider is low to the water and edging hard upwind. From here she can send the kite aggressively with both hands for a decent floaty jump.
The take off Pic B
This part will really decide how much time you’ll have and how slowly you’ll rotate. Having sent the kite hard against a good edge the lift from the kite should come early, once the kite is around 12 o’clock. As soon as the rider feels the pull she stamps up off her back leg, extending her entire body up in a popping motion and simultaneously pulls the bar in, both for extra lift and to stop the kite moving any further back in the window. By popping up the rider is carving up into her rotation but she isn’t turning further into wind and therefore she won’t spin uncontrollably. All the while the rider keeps her head looking forward through the bar, again making sure that she doesn’t rotate quickly so that the grab and one foot will be simpler.
Go Early Pic C.
Just the same as the grab, you must go early, but only after you have extended up into the rotation.
As soon as she has left the water she is looking for the grab and already bringing her back foot up towards her extended back arm. The earlier she gets hold of the board, the more time she’ll have to grab and concentrate on getting around smoothly and landing softly! Go for the grab just as you have practiced so whether you grab the heel side edge of the board or the actual tail doesn’t matter, whatever feels comfy and natural.
Slip It Out Pic D.
It will be easier to get your foot out if you have the board edge up, as opposed to flat.  This way gravity will help and with the smallest of encouragement you should be able to get your pinkies free. You can see that the rider is still looking at the board, she looked for the grab and then focused on the foot strap so that she can see what she is doing and this also has the added benefit of keeping her head from looking over her shoulder, and thus keeps her rotation slow, giving her plenty of time for the one foot. The rider can now hold the board up whilst she pulls her foot out and down, easily releasing it from the strap. If the board is held flat it will be harder as you will have to pull your foot out towards you, which requires more flexibility or longer arms. On your first attempts aim just to get your foot out onto the pad. Once you’re confident you can extend your leg, pushing your foot down towards the water for extra style and look at me points. Final point to ponder here is that even though the rider is flying the kite with one hand, she still has the bar pulled in. This gives her support and float, whilst keeping tension on the lines, meaning that the kite is ready for the eventual landing.
Back In Pic E.
At first keep your back foot close to the strap when you take it out. This way you can literally pull your foot out and leave it resting on the pad, so to get it back in you just need to push it. As you gain confidence start to extend your back leg once you have taken the foot out take the foot so that it is more obvious. You’ll need to keep your eyes on the prize, 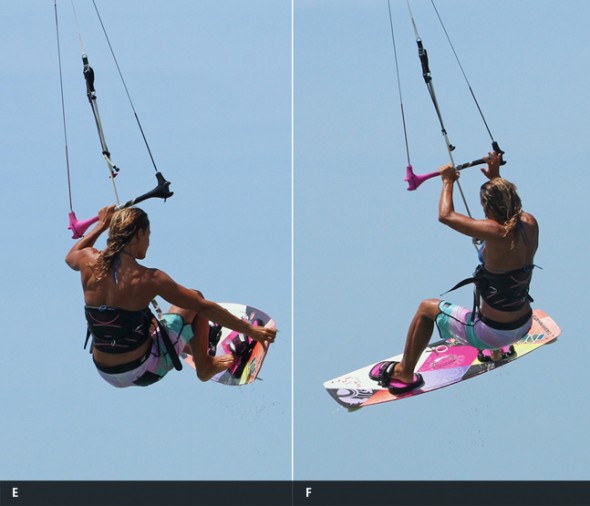 so watch the strap and aim your foot back in. Once your toes are in, use your grab and push your foot and/or pull the board to make sure that your foot is properly in.
This is not essential but it will make the landing considerably easier. If only your toes are in you’re more likely to trip over your toe side edge when you land.
The Grand Finale Pic F.
Once you have your foot safely back in the strap it’s all about preparing and conquering the landing. Your first job is to make sure that you finish the rotation, so turn your head and look towards your potential landing zone, which should be in front and downwind of you. Don’t be tempted to look too far around as this will encourage you to over mists. Job number two is to get two hands on the bar so that you can comfortably pull the bar in and dive the kite, which will both pull you out of the rotation and pull you downwind for your landing. You can see that the rider is looking downwind whilst reaching up for the bar. From here on in she’ll dive the kite and land with the board facing down wind, claiming the one foot.
Top Tips
- Assuming that you’re happy with your slow rotation the most important part to concentrate on is getting the grab early.
- If you do, then you will have more time to get the foot out and then back in.
- Do concentrate on looking at the foot strap to get your foot out; making sure the board is edge up.
- Finally do wiggle your back foot out of the strap a little before you take off, or even loosen the strap so that it is easy to slip in and out.
- Now have a good look at the Sequence and the get the grab early and don’t use your head. Videos for a full step by step guided tour.
Common Problems
- Most of the potential problems will be the same as for the grab, so over rotating or flying the kite forward too much when you grab.
- If it’s not working make sure that you take off up into your back rotation, If the kite pulls you forward in the air, causing you to lose balance, land nose heavy or crash, send it a bit more for the jump so that you’re flying with the kite just behind 12 o’clock.

Keystones
- Good solid edge with back leg resisting
- Send kite positively
- Pop up into the back roll
- Grab early and tilt the board edge up
- Look at strap to get foot out and in
Front Loop Transition
Before attempting to learn the front loop transition it is wise to first learn the air gybe. If you also know how to make a front loop, this should be a piece of cake for you. Here are the steps to complete a front loop transition.
- Approach as for a normal air gybe. Ditch some speed by carving hard into the wind and then immediately send the kite back aggressively, keeping the bar on the sweet spot. Keep your weight over your back foot, extend your front leg.
- As soon as you feel the kite lift, explode up your back leg and level the bar out by pulling both hands down towards your hips.
- Throw yourself into the front rotation by dropping your leading shoulder, turn your head and kick off the back foot.
- As you start to rotate redirect the kite with your front hand in order to get it back above you.
- Lift your knees, making yourself smaller to help the rotation and to keep your balance in the air. Keep the bar in so you can feel where the kite is and keep tension on the lines, which in turn keeps you up and floating.
- Look over your back shoulder and wait until you see a potential landing spot. With the bar still in you can feel where the kite is, and in this case it’s now above you so you level the bar out.
- Now at the apex of your jump keep the bar in so that the kite will be responsive once you need to dive it. Still look over your back shoulder, waiting to spot your landing.
Keystones:
- Carve then send
- Keep bar in
- Go early
- Redirect kite
- Dive kite really hard
