Unhooked Popped Front Loop
In continuation of out front loop fest, we thought it high time to introduce and familiarize the baby brother of the much respected S-bend, the Popped Unhooked Front Loop. Not only does this move dazzle, but also it is a foundation for a whole other world of kiting techniques that may or may not intrigue you. In addition to that, all this unhooked malarkey (if you’re tempted) is just as well practiced on those underpowered summer days, so give it a shot.
Popping, front looping and a basic unhooked Raley would be a small requirements, along with a modern safety system that lets you both spin and unhook without risking any third party members of the public or kite surfing community.
To help you learn all the important ingredients of an unhooked popped front, we’ll take another look at unhooking, a little glance at popping and way up the differences of popped front compared to a sent front loop.
DETACHMENT
The simplest way to make unhooking controllable is to understand how your kite is trim, thus your bar position will effect what’s going on.
For unhooking, it is vital that you use the strap to trim your bar’s sweet spot so that it rests just above the chicken loop. This way, the bar will feel light and the kite will drift forward, allowing you to be powered up yet in control. Every kite is unique, but it’s more time consuming getting it right. If you don’t trim the sweet spot down, your kite will most likely flare, pulling you off downwind, falling out of the sky in the calms and making kite surfing in general fairly unkind.
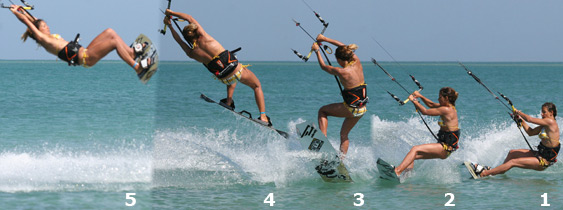
Pics 1 & 2. You can see that the surfer is sailing along hands centered with bar trimmed down, flattens the board off by abruptly standing up and almost carves, putting weight over the rear foot. This sudden change in direction towards the kite releases the tension off the lines.
Pic 3. With the tension gone, the surfer pulls the bar in and pushes it down to let the chicken loop slide out from the hook. Without looking down, as this would prevent the hips to move back and make unhooking difficult.
Pic 4. As the chicken loops drops out, the surfer must start to carve into pop before losing speed. Head positioned forward in direction as to where the surfer wishes to go, moves weight and hips right back over the rear foot and straightens the front leg, while dropping upwind off the board to get it back on an edge.
Pics 5 & 6. The surfer tries to maintain shoulders, back and front leg straight when carving hard against the pull of the kite. The goal is to explode up off the rear leg once it gets unstable, must also try and maintain equal pressure on both hands, as it is easy to pull on the back hand and hurl the kite up.
HANDS OF TIME
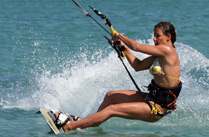
 It is essential that you provide a good pop, as this will give you enough time to complete your spin. Your body position in the last stage of the carve will either offer you the chance to explode up or let you be dragged low over the edge which you do not want. In the picture to left, you can see that just before take-off, the surfer positioned the buttocks low to the water, shoulders have not been pulled forward the hips, front leg is extended to keep the edge and push the weight back over the tail of the board, rear leg is flexed in preparation to explode and is looking forward, which will prevent carving too far into the wind.
A PLACE IN THE SUN
To support this, don’t park your kite at a 45 degree angle, that’s for some time in the future. You need to catch a comfortable height where you are comfortable edging like this, without the kite providing too much lift, but which will also give you a tad of extra bounce off the water. 11 or 1 o’clock would be a decent place to begin.
THE DIFFERENCE IS WHY
 Your pop is going to spring you up off the water, and thus your front rotation needs to compliment this. In a standard front loop when the kite is utilized for height, you’re more than likely to throw your head and shoulders down and around to start rotating. This works because the kite gives you an up force.
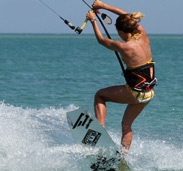
When popping, if you throw your head down towards your front shoulder, you’ll be neutralizing all the good work you’ve done getting up off the water by forcing your body weight down, and that would be counterproductive. Instead, you need to lift your chin and turn to look up and over the back shoulder as your rear leg extends, see picture on your left hand.
To some, this does not seem to be essentially wise, as you are straightening your back and turning it towards possible impact, whereas the original front loop was a safe roll as if you were crumpling up to break a fall. The second difference is your body can stay extended in a popped front loop, whereas in the jumped version, you are trying make yourself a bit compressed.
ALL IN THE HEAD
Your head is the key to completing this rotation. Half way around you are in prone position, because the kite will be pulling you forward, you will not be able to force your hips, legs and board around in front of you, while your legs are hanging behind and upwind of you.
To finish your spin, you’ll need to look over your shoulder at where you wish to go and then push your hands around to follow. By doing this, your upper body will be facing downwind and the rest will have to follow.
STEERING WHEEL
There is a tendency to pull on the back hand as you carve against the kite. This is more than normal, but it should be avoided. However, if you do find your kite drifting up, give it up a pull on your front hand and a push on the other hand as you come around your rotation. If this still doesn’t help, try pulling on your front hand as you take off.
ALL IN SEQUENCE
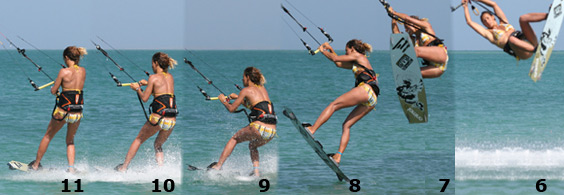
- Park the kite in 11 o’clock. Carve hard upwind for maximum pop. Put your weight low and towards the back on the board. Extend your front leg. Ride against the power of the kite whilst looking forward.
- As soon as you feel your shoulders being pulled forward over your hips explode off the water by rapidly extending your back leg.
- Your aim is to spring up and turn your head towards your right arm to initiate the rotation.
- As the kite pulls you forward continue the rotation and keep looking rounds towards your back elbow.
- You are now half way through this trick. You´re facing upwind and are fully powered so you better complete your rotation.

- Try to get a glimpse on where you´re going by spotting a potential landing.
- As your head comes around force your bar and hands around too.
- With your head and shoulders facing forward, the rest of your body follows and you can start dropping down your legs down under you.
- Land the tail first on preferable flat water, slightly off the wind. Soften the knees to absorb the landing and keep looking forward, not down in the water.
- Catch an eye on the kite to make sure that it´s not diving into the water, correct if necessary. Then keep heading towards the kite on a flat board.
- Time to take a hand off and hook back in.
BEST TIPS
Don’t take too much speed into this technique at first, as it’ll feel like you’re in a rush, yet alone rotate and land.
As you develop, you should try and start with the kite a tad lower and keep it still.
As you progress with more power, focus on popping up into the Raley first and then start your rotation.
If your kite is starting to misbehave and is hurling up away, try moving your back hand to the center of the bar with the chicken loop line running between your first two fingers.
A NICE VIDEO OF THIS TRICK


Leave a Reply