KGB
Don’t ask me where the name comes from… I can’t see any similarity between KGB and the russian intelligence, but whatever, here is the guide to perform the trick =)
- Come into the trick like you would do for an unhooked backroll. Unhook, edge hard and pop out of the water.
- Look over your front shoulder and go into a backroll rotation. When just over 1/2 way through your rotation throw your head in the other direction over your back shoulder and pull your hands hard to your front tip.
- Pass the bar from your front hand to your front hip.
- Once you grab the bar, reach around with your other hand and get them both on the bar.
- Spot your landing, bend your knees and ride away.

Tips! When unhooking always keep your elbows bent, this helps you keep a good edge. Try not to lean forward when you unhook. Keep your hands in the middle of the bar. Don’t throw the backroll to hard, it makes it hard to change direction.
F-16
F-16
WHAT IS THIS, AN AIRFORCE JET PLANE?
No, the F-16 is a fundamental nature of an unhooked back loop kite loop, a kite loop being when the kite is hurled against the direction of travel.
Its core difference from the hooked in version, or in fact the purest unhooked version is the way that you hold the bar. As we shall see both hands will be grasping onto one side of the bar, which forces the kite to turn extremely fast. This in turn means that there is very little input from the surfer once it’s all begun, and that the kite will not produce g-suit necessitating forces. A real grin and bear it move, which is well within the reach of anyone who can back loop kite loop and unhook.
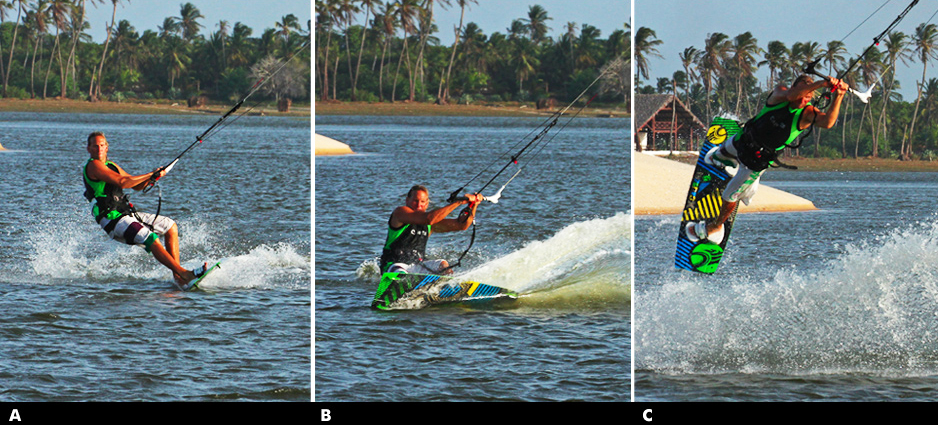
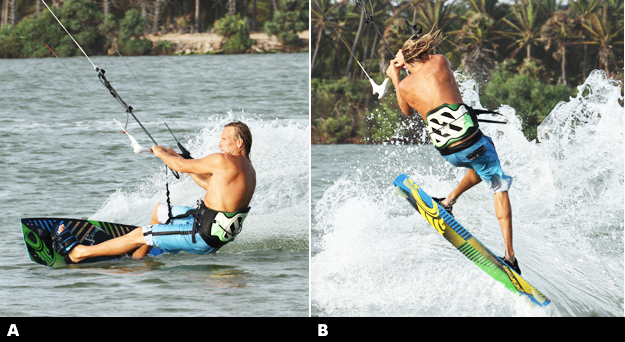
ANGLING
 Pic A. Here we can see that the surfer is holding the bar with both hands centered in normal position riding to the right side.
Now the surfer has two options, and it is up to you to see which you use. Knowing that you will need to get both hands on the back of the bar, you could either:
 Pic B. Leave your back hand
  where it is, let go of your front hand and move it.
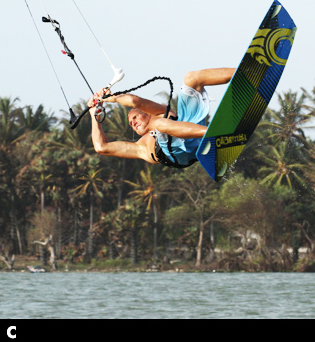
Or Pic C. move your back hand down to the end of the bar, release your front hand and grab the bar just the other side of the chicken loop in front of your back hand also with your palm facing up.
Both of these procedures work, although the first one necessitates less movement. Grab your bar and straighten your arms above your head to see which feels most comfortable.
THE KITE
The kite is very much dictating what is happening in the F-16. It will pull you up, it will rotate you and it will softly drop you back down once it finishes the loop.
It is very vital to trim your kite with the center line adjustment strap so that you are in control. Bowsexuals could leave a little more power in the kite as they do tend to turn quicker.
Doing an F-16, you will need to aim and position your kite very close to 12 o’clock above you. Like other powered techniques, starting while traveling slightly downwind will help. For the F-16, there are two grounds for this, other than the fact that it will be easier to unhook.
Firstly, once you have unhooked, if the lines are not completely tight, the kite will not move swiftly as you change your hands. This is very important especially on small kites.
Secondly, you need to do the whole rotation in the air. Most of us are used to doing the first half of a back loop by carving big time into the wind, which means that we’re already turned 180 degrees before taking off. If we do this for the F-16, we will overdo the spinning process. By cruising slightly off downwind, it allows us to carve for pop without turning too much into the spin.
THE YOU
The other main ingredient to a successful F-16 is an early take off. If you wait until the kite pulls you off the water, it will already have turned too far, and therefore pull you around too early, making landing a little wobbly or leading to a bad case of over rotation.
The best thing to do is to physically jump up into your back loop off your edge just before you think the kite will pull. By doing this, you’ll aim to finish half the spin. If you can look upwind while being at the peak of your jump, the kite will take over and bring you around for a nice soft landing. However, this may take a bit of practice to get the timing.
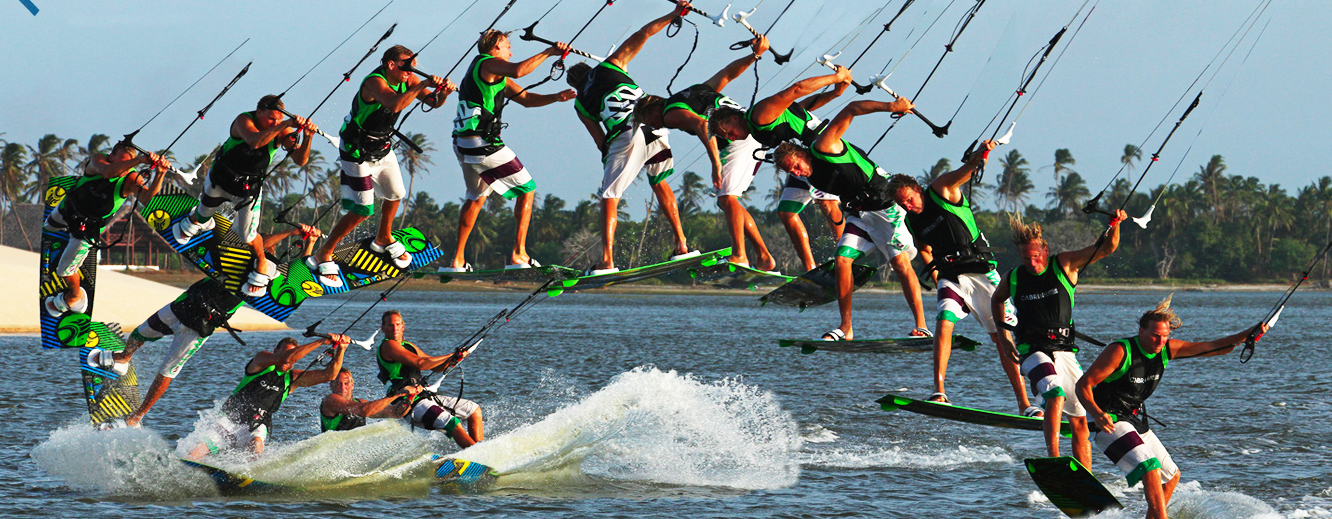
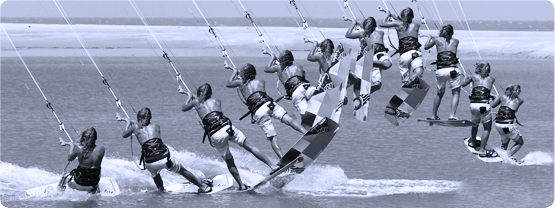
REAL TIME
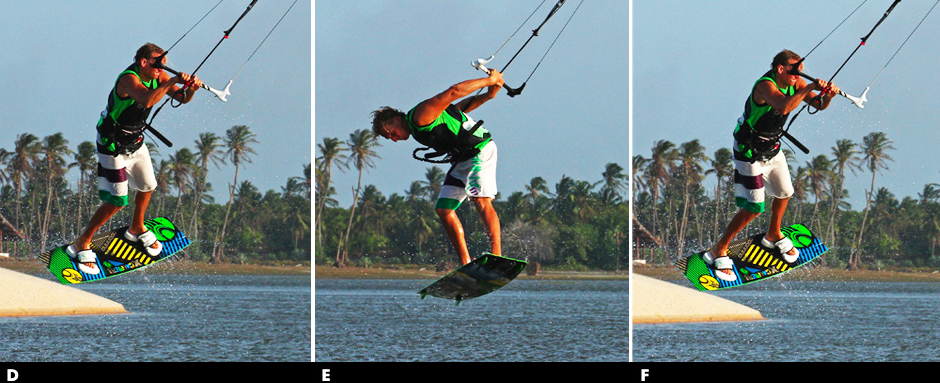
The approach for the following sequence is identical to that of the down loop s-bend. Having had a very good look around to check that the coast is clear and that you have provided yourself miles of space downwind, slowly hurl the kite up towards 12 o’clock, flatten the board off to bear off the wind slightly and unhook. As soon as you have unhooked change your hands.
1. Once the hands have moved, it’s time to get back on your edge so that you’d still have some power to pop off. Do this by dropping your weight low and getting your shoulders out and upwind of the board. The bar is now vertical, this will happen automatically.
2. Just before the kite pulls, carve hard bending the rear leg ready to pop upwards. Your head should be looking forward in an effort not to create too much rotation.
3. Pop off; jump up across the air powerfully. Keep your head equally close to your shoulders. Your aim is to do half a back loop.
4. The kite has now travelled far enough behind that it pulls up.
5. As the kite starts looping, the power will extend you. The turning of the kite should pull you around.
6. When you feel the power collapse, look over your shoulder and locate a landing spot.
7-9. Remain focused on where you expect to land. The kite will have little power, and as a result, you will drop back towards the water surface. Grab and pull the bar in towards your hips to get your legs back underneath you.
10. With your legs dropping underneath, try and focus on pointing the board downwind.
11. On landing, try and maintain your weight over the back of the board.
12. Review where the kite is. If it is not travelling forward, let it continue to loop until it is, then release you upward facing palm (original front hand), place it back on the front of the bar and then hook in.

BEST TIPS
A speedy approach will make the pull from the kite seem far less violent while it gives you more control and a smoother landing.
If the bar is getting ripped out of your hands, try not to edge too hard for too long. Go downwind a bit more.
Try to imagine the F-16 as a game of follow the leader. As the kite loops you, just follow it around one step behind.
Dropping the back hand as you come down can help slow down the spin and also makes a speedy landing a whole lot easier.
If you keep on over rotating without getting any height, try not to throw a back loop, but ease into it by jumping up.
The more power you have in the kite, the higher and harder you will go. Just take it easy when learning.
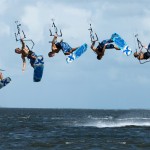
This is how it should look after some practise 🙂
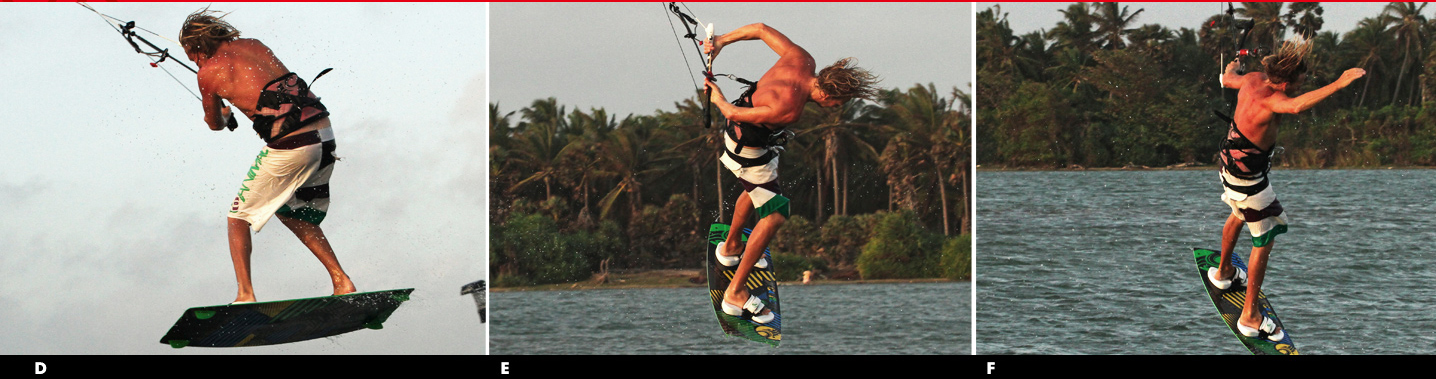
Unhooked Front To Blind Ole
There are a few takes on the front to blind, powered, unhooked, hooked, sent kite, you name it and it’s probably likely. We’re adding the unhooked Ole to the list as it serves a couple of purposes. Firstly it does allow you to go for and learn the blind with a slightly higher kite. Secondly on a big lefty kite in light winds, you will often need to have the kite a bit higher and with the resultant upward pull on the bar “Oleing” out is a health conscious option – oh yes and it does have a different look and feel to a standard bar pass ending. Before you attempt this we’d suggest you can pop front roll, and preferably relay to blind, but if you’ve got the hooked version down then this is a mere step away. Following are a few points worth more than a moment’s consideration.
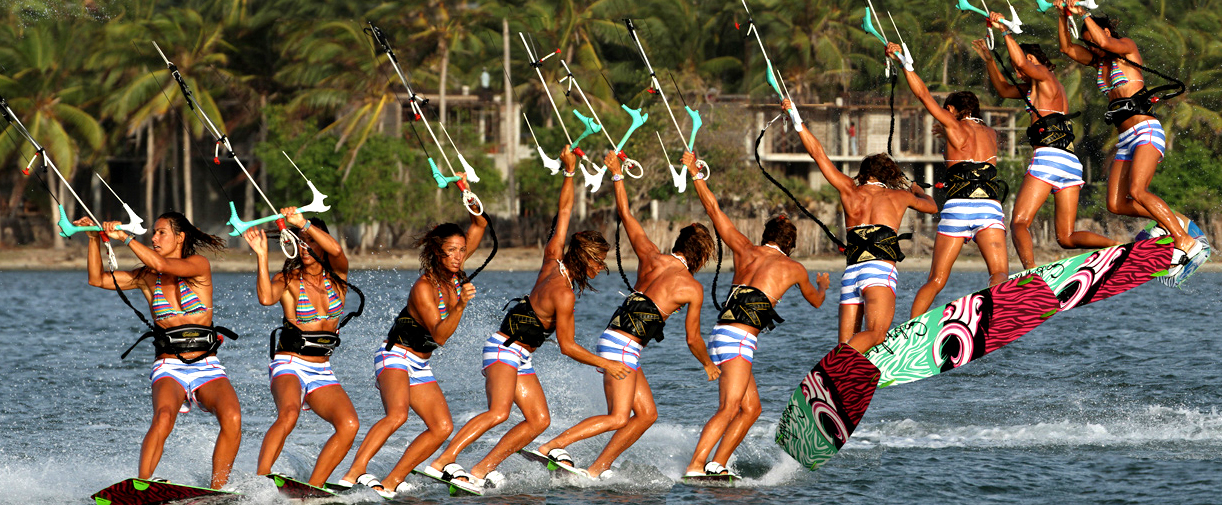
- Take off, pause and rotate Pic A.
As with all things unhooked and popped we’ll assume that you’ll have the bar trimmed correctly, hands centered and approach with good speed before bearing off with your weight back to unhook, dropping low and edging hard into your pop, stamping hard to get the height without a cheeky kite send. If you use your kite you’ll lose forward momentum and the landing will be difficult to pull off.
For extra lift when learning you can have your kite positioned higher, just above 11 or 1 o’clock – but don’t move it up. Here the rider has her kite parked at 11 o’clock and has just popped hard to get up off the water. What’s clear to see is that the rider has not yet started her front rotation; she is still looking forward to where she’s going. You too must separate the movement, even if only by a fraction of a second, but you need to pop before throwing your head and shoulders down and around. As a result you’ll get the height, if not you’ll be diving yourself down into the water and onto your back.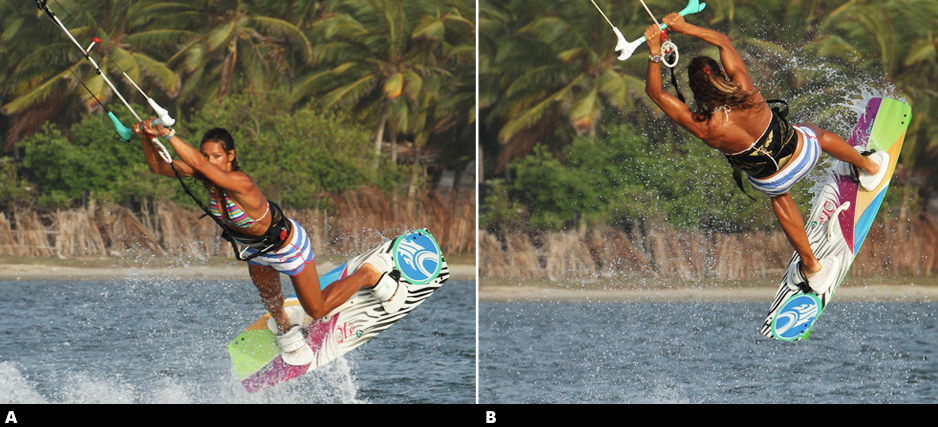
- Front Hand Pic B.
Whilst rotating around, especially if you have the kite high, it will be very tempting to lean on the back hand, and also very natural to have pulled on it whilst edging to pop. Therefore as you spin around it is very good form to keep applying a bit of pressure onto your front hand as this will both stop the kite from floating up above you, and it will keep the kite moving forwards, which will make the landing easier as you’ll have momentum. The rider is only just into her rotation but she is already “leaning” on her front hand. This means that when she finishes her rotation she’ll be able to pull herself towards the bar to throw the blind – if you end up hanging under the bar you can only spin to blind, which won’t offer you any consistency.
- Look Pic C.
We’ve said this before but whether it be a hooked front to blind or an S-bend pass the principal is always the same, another very brief pause between finishing your rotation and throwing the blind. This prevents you from over rotating and you have much more chance of keeping the kite in the air, rather than releasing one arm and starting the mother of all down loops.
Here the rider has rotated the full 360° and is focused again on where she’ll land. This momentarily slows her down, almost pauses the rotation, enabling her to set up for the blind. If not she would be spinning under her kite. From here she can now pull on the bar hard with both hands and throw the blind. With her head, hands and bar leading the rider can throw the blind and swing her legs through to turn far enough for the landing.
- Landing Pic D.
Landing blind for an Ole or pass needs to be flat on the board, downwind, not on an edge across the wind. This way you’ll be moving toward the kite and therefore there won’t be any tension on the lines.
Sc bearing away into the move is important, as this leads to a more downwind landing, and pulling hard before committing to the blind will also help. In the photo the rider’s board is off downwind so her momentum will keep her moving towards the kite. Now what differentiates an Ole from a surface pass here are the position of the rider’s body and her bar. The rider is standing upright over the board with her head high, not bent over double, and she is holding her bar high above her on an outstretched arm. This position is the perfect set up to an Ole.
- The Ole Pic E.
Firstly let’s remember what an Ole is. You will be moving the hand that is holding the bar, across, upwind of your head and shoulders to the other side of your body, from where you’ll be able to continue riding, but now toe side rather than blind.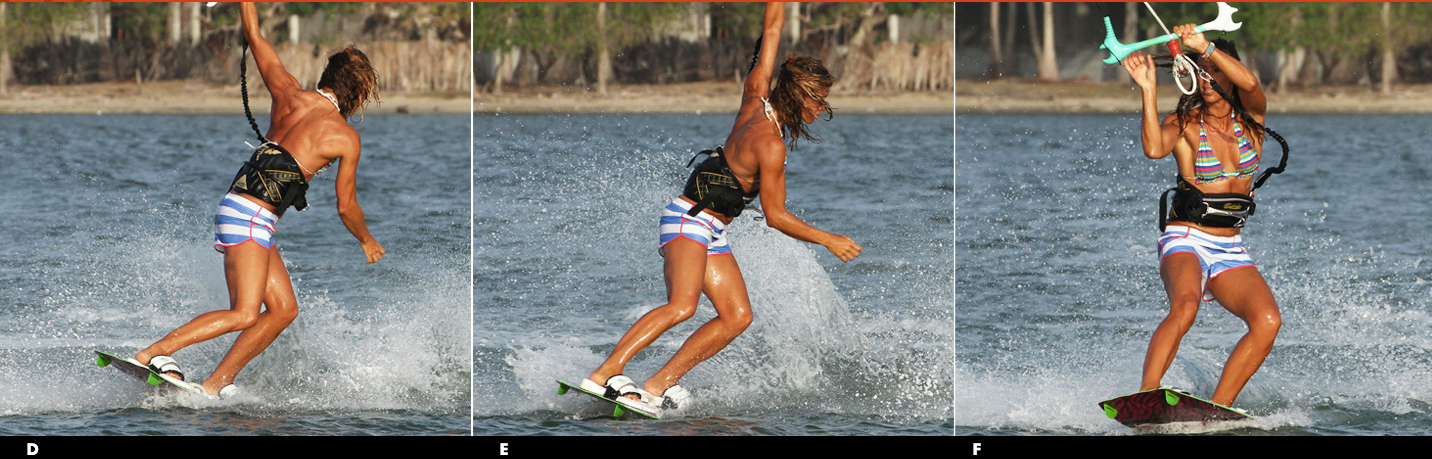
That’s all it is, you’re not trying to turn the board or slide it around to bedside. It’s an upper body movement to get the bar across to the direction of travel and no pass is required. You can see in the photo that because she is travelling towards the kite the rider can push the bar upwind of her and then simply move her hand across in front of her face – now the bar is the same side of her body as the kite and the natural order of things are restored.
- The Finale Pic F.
You have a few options to finish things off, and regardless of what you do it’s a good idea to get both hands back on the bar so that you get control of the kite. Continuing on toe side shows good control, and will certainly confuse a few onlookers. That said if you land with a lot of power and speed the chances are that you will carve onto your heels, so keep going and ride out in the other direction. Here the rider has pushed the bar across, finished her Ole and is reaching for her bar. She has a lot of weight on her heels and as a result will steer her kite across the window once she has her back hand on the bar and follow it by continuing to carve on her heels.
Top Tips
- Apart from making sure that your popped front rolls are working off pat, the secret is to land blind and yes you’ve guessed it, pause foss split second before attempting the Ole.
- If you rush the Ole you’ll fall backwards or if you really rush the Ole you’ll start to rotate into it before you’ve even landed. So first land, balance and then push the bar.

Common Problems
- Assuming that you can get to blind the main issue will be falling backwards. This is normally a result of leaning back to push the bar across your face, rather than keeping your weight balanced and physically pushing the bar up wind and past.
- If you land on your toes across the wind the lines will tighten and you won’t be able to push the bar without it pushing you back, or you leaning back.
Keystones
- Pop then rotate
- Look and pause
- Pull with both hands then throw
- Land downwind and flat – pause
- Then push the bar upwind and across
Kite Loop Handle Pass
The KL3 is a genuine pleasure to tame. Having a bit of pull from the kite and chucking a pass in to boot should get you cheering yourself on even without witnesses. Best bet before trying this would be to get your shifty 3 down, as that way you’ll be used to the rotation and muscle memory should prevail when you pull the trigger. For the more cautious amongst you, the progression step before this is the kite loop to wrapped, which we covered in Issue 21. It goes without saying, we hope, that at the very least you can comfortably and confidently stomp your unhooked fish polled kite loops!?
Approach and Pop
Perhaps a slight recap is necessary as your parting with water moment should be bang on to give you maximum hope of adding a pass and landing. Firstly you’ll need some height and therefore some up pull from the kite, not just some mad demonic downwind tug. Starting with your kite high, near as damn it to 12 o’clock will make all the difference. Trimming your bar down is also essential as not only will this make unhooking with your kite high possible, but it will also encourage your kite to loop, rather than spin on its axis. In Pic A. The rider has already set his kite at 12, flattened the board off to unhook with his hips up.
Lift Off
As you get launched into the air you must be ready for the put as the kite starts to turn. Having popped up hard you will be extended, but in order to take the power and still be able to rotate you must brace and balance yourself.
Pic B. As the rider explodes up off his back foot he puts all his effort into 2 things. Firstly he keeps his elbows in as tight as possible, so that his arms won’t extend too much as the kite pulls, which in turn will keep his body closer to the bar and ready for the pass. Secondly he pulls his knees up, making himself small, so that his legs and board don’t get left behind, and therefore have a chance of coming through and under the bar when he rotates into the pass. In short the rider is trying not to let his body extend into a Raley position. Flick and Kick those of you familiar with the shifty 3 will be aware of the spin that your back leg can create as it comes towards the bar for the pass. The KL3 is no different in that you’ll spin more quickly if you can “involve” the back leg. In fact here it is almost easier as rather than having to kick it out behind you, the whip from the kite will tend to flick your back leg out, so just concentrate on keeping the front leg in and your back leg will be poised and ready to strike.
Pic C. At this point the rider is watching the kite as it goes through the bottom of its loop and starts its journey back up. Keeping his elbows and front knee in the whip of the kite pulls him towards it, which conveniently flicks his back leg out, ready for the pass.
0 – 60!
As well as physical effort the timing of the pass will make or break this move. Although feeling is generally preferred, watching the kite during its loop is no bad thing as you need t “go” before the kite climbs back up in the window, as this will be the moment of least pull and the bar will be light and not pulling away from you. Pic D. As the turbo drops off, the rider pulls the bar down and back towards his trailing hip hard with both hands, so that his upper body comes up towards the bar.
Simultaneously he pulls and swings his back leg up towards the bar, which not only helps him lift the board but also generates the momentum for the pass. You can see how close his body is to the bar now.
The Pass
No rock& science here, as all the usual rules apply. Assuming that you went early enough the kite will not be pulling the bar away from you, so the key is committing. Therefore as your back knee comes through you must release your front hand and turn your head and shoulders so that you don’t block the rotation. Also you must hold onto the bar with you back hand until you can reach it with your free hand behind you. By holding onto the bar you can rotate around it, making the pass more achievable.
Pic E. You can see that the rider has twisted the bar behind him, which allows his shoulder and therefore body to rotate further around, almost rolling around the bar. This makes the pass simpler as by rolling onto the bar, it places the bar easily within reach of the searching free hand. Hence the progression from wrapped, as realistically you are first wrapped in the air, before passing.
Claim it
Once you’ve passed the bar preparation for landing is key. You need the board underneath you and your head looking forward and held high, whilst keeping your arm in as close as possible so that you complete the rotation sufficiently to land with the board heading down wind. Pic F. The rider has dropped his under carriage so that he’ll land on the board. Chances are that this will not be the softest of landings, so he’s lifted his head so that he can stand up and take it, whilst his elbow holding the bar is bent so that his body will follow the kite downwind and complete the rotation.
Top Tips
- As is so often the way the fundamentals are key, so hammering out a few unhooked kite loops first will acclimatize you to the wind and more importantly the kites arc.
- Watch the kite and feel for the flick as the kite whips.
- This way you’ll be able to anticipate the dead point, where you’ll have the slack to pass. If you it for it you’ll miss the moment.
- It will make good sense to learn this with less power and build up from there. If you can nail a pass on a low fly by just before landing it counts and the consequences of it not working are just a splash.
- We won’t be adding any common problems for this move, as it is a matter of concentrating on the relevant skills and putting them together – a comfortable kite loop with an explosive rotation.
Keystones
- Pop early
- Elbows in, Knees up
- Pull bar and swing back leg immediately after whip
- Hold on with back hand to roll around bar
- Get upright for landing and hold in front arm
Blind Judge 3
We’re expecting that you can already stomp the blind judge, and therefore we’ll tweak what you have to move you towards the full monty. In tech terms, considering that you should land a blind judge pretty much down wind, you’re only going to have to turn just over another 90° to claim this one, but that’s a bit like saying you only have to pass the bar in the air to convert the blind landing into a judge, only. It may not sound like much but it’s worth the effort, as it will quite literally feel stunning to land back on your heels – boom! We’ll walk you through the bits that we think make the difference and get you all the way around.
The Approach
Yes once again if you don’t start this right you’ll be emptying your bladder into the wind, whilst banging your head on the proverbial brick wall. First things first, where you start is where you’ll finish, so if you want to land heel side pointing downwind you better bear away so that you’re pointing very downwind before takeoff to help your chances. If not even if you rotate all the way you’ll land on an edge and butt check at best.
Finally and looking at Pic A. you’ll need to get your body and weight into the right position to control the speed and pop. This should be nothing new but you can see that the rider has his hips back over the back of the board, his front leg extended, his shoulders behind his hips and his elbows is This is only possible if you bear away in this position so don’t carve off the wind and bend your front knee!
The Carve
You need to be super aggressive here to get maximum pop, so fight for it if this was a close up you’d see the rider’s rather pained kite face, there’s some effort involved.
Pic B. From the good approach position the rider was able to quickly carve back onto his edge by turning the board back up wind. To resist sufficiently the rider does not allow his back leg to bend more than it was before he carved – you can only use the bend that you have to pop. At the same time the rider’s front leg remains fairly straight which keeps his hips back and low. The final battle is to keep his front elbow in to stop the kite rising as he carves against it
Pop and Flick
This is definitely one of the most influential moments in learning this move, the flick which follows your pop.
Pic C. By resisting hard, carving hard and popping hard but late, the rider’s board flicks around behind him, turning his waist and shoulders upwind, so that the board is more vertical than horizontal behind him.
To prevent him from rotating the rider keeps looking forward and keeps his arms in, but he doesn’t resist this movement as it is the coiling of the spring! In this position the rider’s legs are straight, he doesn’t let his knees bend and feet lift. If you’re used to letting your knees bend your feet up behind you, you need to work on this straight flick. From here you can use gravity to gain maximum speed to spin effectively. If the feet go up you only have your knees travelling a short distance, as opposed to the weight of the board coming from far behind and one side to the other.
Pull and Turn
The flick is only transient, because no sooner is your board behind you than you need to get a move on and throw the 3.
Pic D. As soon as the rider can, he pulls hard on the bar to get his head and shoulders above it and swings the board forward. With the board and his body coming from that turned upwind position, it starts to turn the rider as soon as he moves. Worth noting as well that as the rider pulls on the bar with both hands he is already twisting it around ready for the pass. In comparison to a blind judge the rider does throw himself into the rotation, committing to a full rotation from the off. Think of it as a full flat rotation as opposed to a blind judge with a heel side landing. The basic difference here is that if your board is horizontal it swings forward and down as you pull. From the flicked position, as soon as you pull you automatically start to turn and therefore build up momentum for a full 360°.
The Pass
Hopefully the extra pop and direction of spin created from your flick will allow you to keep two hands pulling on the bar for longer whilst still allowing you to turn. This should then allow you to pass the bar nearer to you, whilst you remain more upright with the board underneath you. If you’re comfortably landing blind judges, then concentrate on passing the bar later, allowing your body to turn further before reaching for the bar. Pic E. You can see in the picture that the rider’s hips are over the board, so he is rotating with the board. The rider achieves this by keeping his head more upright, so don’t tuck your chin into your chest. You can also see that at the moment of passing the rider’s head is turning to look forward, keeping the rotation alive. Finally the rider’s trailing leg is bent.
You must keep this leg, your front landing leg bent so that it doesn’t drop down away from you, preventing you from completing the full 3.
Getting it round Pic F.
The final hurdle. You can see that as the rider releases his front hand he keeps his back arm bent and the bar close. This will keep him moving towards the kite and prevents him from dropping down. The rider’s head is still turning to look for the landing, bringing his shoulders with if now whilst holding the bar in close the rider lifts his front knee through with the rotation and twists the bar around in front of him, so that the bar will lead him as he comes around, bingo.
Top Tips
- They’ve all been mentioned, but start well off the wind, go for the flick and pull early. Really spin into the rotation, committing for the full 360 and pass the bar late so that you turn further, leading with your head held high.
- Once you pass the bar keep your knees and board up, and the bar in close, so that you can roll your front shoulder towards the bar waiting in front of you…. To get yourself in the mood and your head around it, try to get the full 3 without passing the bar, so let go when you should pass but aim to get your body and board around.
- Don’t however practice this method too much as you don’t want muscle memory to remember the letting go.
- You will need time and height to land this, so as well as going early you can sneak the kite up a fraction as you pop, but don’t wait to see if it’s enough, as then you’ll be its late.
Keystones
- Flick from take off.
- Immediately pull and turn.
- Head and knees up.
- Pass later in your rotation.
- Keep bar in close and lift
NIS
It’s a game of grip, harder you grip smarter you perform. We really appreciate your love and affection for this sport, which indeed is a plus point for health and working environment. Benefits are many and space is short to write, just wanted to summarize all the thoughts in one line “keep yourself moving until and unless something strange won’t pack you in a BOX.
Let’s talk about today’s trick from very beginning. Even if you already have an inverted Slim Chance in the bag, adding the non-inverted variant to your repertoire will be both satisfying and worthwhile. It’s likely that many of you and in particular some of the “old timers”, went on to master the Slim as the next step after the long forgotten dangle pass. With the result you may have a habit of sending the kite a bit and having a somewhat dangly finish to what started as a powered pass.
Getting your teeth into the NIS is a great cure for this. If you don’t suffer this problem, well it’s still another trick to claim and if you’ve never tried any sort of Slim Chance, now is the time. What should you already be confident with to try this? The base for this is a powered unhooked popped front roll, preferably to toe side, as that’s the way you’ll be passing. If you can already Shifty to wrapped, or even better Shifty 3 then you’re almost there, and if you can Front to wrapped then you’re knocking on the door That said your front rotation may not need to be inverted, but you do need to get the knees and board high, so the more aggressively you can pop, the easier this will be.
The Important Bits
- Approach and Edge
Pic A
Your first pass would be easier if you get good pop on your take off, it will be more to do with timing than brute force. And to get good pop your approach and subsequent carve onto your edge needs to be dialed in. It’s really important to get speed in starting, if you’ve got enough power great, if not work that kite to get some pull and speed. Secondly park the kite where you want it to be, let’s take it around 11 or 1 o’clock, so that you know it won’t drive you down and therefore give you the confidence to pop hard and not lift the kite as you edge. Finally get your body back over the tail of the board as you bear away, so that once you unhook not only will the kite be in the correct place, but also you can turn back onto a solid edge with your weight low very quickly, which is the crux of good pop. You can see in the Pic A that as the rider carves onto his edge and away from the kite his front leg is extended, his back leg bent but locked and his bum is low – a result of the correct entry position. From this point he is ready to pop hard.
- The Take Off
Pic B
If you’ve got the approach right you’ll have so much edge and bite as you turn the board upwind, that as long as you commit you’ll get plenty enough pop to complete the move without lifting the kite. Your board, knees and hips will be thrown up high enough to make the pass. Even though you’re throwing a front roll, you need to be as low as for as for a raley, uber edge your aim is to get yourself as much height as you can, which will give you time, so as you stamp hard against the back of the board, explosively extending your back leg, concentrate on extending from your back leg all the way up into your back shoulder. This way even as your head goes down and around and your front knee lifts to initiate the rotation, you’re still on the way up. In Pic B you can see the spray that the rider has following him, a definite rooster tail. As he goes down into the front roll he’s still rising. Just as importantly by popping hard Christian is able to bend his arms and pull his hands towards him, keeping the bar in close. If you don’t get the bar in now, you’ll have an almighty task ahead of you. Finally with the bar in close it is more achievable to keep the kite parked with the bar angled forward – if the arms extend you’re likely to pull on the back hand.
- The Halfway Mark
Pic C
It should be looking like at the 180° mark if all is going well this is what. Please watch carefully, the board and knees high, swinging around with your shoulders, not dropping and pulling you down. You need to be leading with your head, even though you’ll be throwing the pass against the rotation, as you need to see where you’re going so that you can time the movement. The rider is coming around and he still has his hands in close, if he were to rotate another 90° he would find his front hip nearing the bar. You don’t want this, so once you can spot your landing you have two jobs. Pull the bar in towards your hips, and pull your old back knee, in this case the rider’s right, towards the bar. They don’t actually have to get very close but this will slow your rotation and lift that end of the board, giving you more chance to make the pass.
- Do It
Pic D
This is the make or break moment requiring full commitment and energy. Timing wise you should be just about to drop, that lovely floaty nanosecond before free fall. Most likely it will feel too late, and if it does that’s perfect! In short you pass as you drop out of your rotation. Whilst your knee and bar move towards each other you have to turn your back on proceedings. Give one last tug on the bar with both hands, a bit front hand heavy to stop the kite flying up when you release it and then throw you head and shoulders back around, down and away from where you’ve been looking. Assuming you’ve already been wrapped or passing the drill is the same, fast and deliberate, twisting the bar as you release your front hand to allow your shoulders to turn further. In the picture the tail of the rider board is high, his knee and hip are close to the bar and he’s leading his pass with his head. He also has his complete kite face on, as this is 100%. With the board high and his knees bent the board won’t drop and pull his away from the bar as he turns.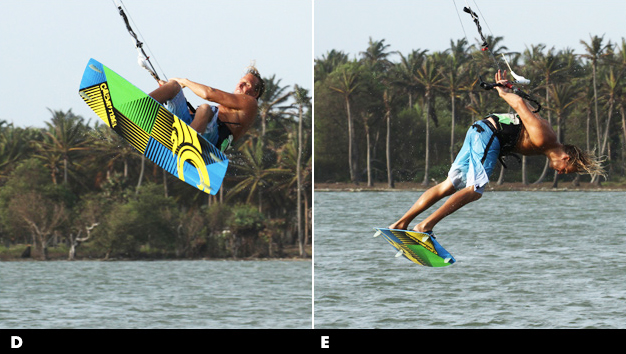
- The Pass [Pic E]
Now it’s hand to hand, which sounds obvious, however if you twist the bar fully and hold on tight your body will wrap around your arm, follow your head and the bar will present itself to your waiting hand. As long as it’s looking for the other hand and not scratching around in the small of your back. Here in this image the rider free hand finds the other one and grabs the bar. Now it’s just a matter of landing it, claiming it and riding away without looking too surprised.
- The Landing [Pic F]
This is a normal tendency that we don’t always think about the landings too much, but this one does require some anticipation, or else you’ll be passing, getting excited and then diving in. You need to be ready to ride as you land, hopefully downwind and maybe even further around. There are two things that really help. Firstly keep your head turning. It’s common to freeze the head whilst changing hands, and this often leads to a fall, so as you change hands keep turning the head to look towards where you’re going. Secondly untwist the hand, that is to say allow your wrist to turn palm down so that the bar is once again as it should be and the status quo is restored. By doing this your shoulder can turn up and forward and you’ll be better balanced to follow the kite. In the picture the rider’s hand is the right way up and his head is trying to look around, following his eyes.
Top Tips
- Your first key of success is “Preparation”, hence make sure you’re in a dynamic stood, as you’ll need to rotate quickly for the pass, and bang out a few popped front rolls
- Be focused on bringing the knees and hands closer as you’re coming around. Beware though, as this will kill your front roll rotation so be ready to land toe side and off balance
- At time you have done enough fronts that time is slowing down, you’ll get an idea of when you can pass. If you are able to bang out a few Shifty to Wrapped,or Shifty 3s, even better. It’ll get your pass rotation well and truly warmed up.
Common Problems
- Pop issues are common with front rolls as by the very nature of the rotation it’s very tempting to throw yourself down before you’ve gone up.
- Also there is a tendency to stand more upright whilst edging to pre-empt the take off, but you must edge low and hard, then stretch up to get the necessary height
- The problem with all passes this way is that the kite loves to rise, either as you pull or once you release. The beauty in the NIS is that as you’re waiting for the moment to pass, you have time to sneakily steer the kite down before or whilst pulling. Do this and the pass will be noticeably easier as you’ll practically manufacture slack
- Getting the knees and board up can be a problem. For the inverted Slim you can throw your shoulder down and head back to get the legs up. Whereas here it’s all about pop. However keeping your hands in close with bent arms will mean that your balance point will be more around your waist and therefore you’re more likely to rotate around this axis
- If your arms are stretched out it’ll be much harder. Finally the landing. Passing like this does encourage you to look down at the water as you throw your head, which works wonders for the pass but doesn’t do jack for the landing. So make sure you try and move your head after passing and untwist your hand.
Keystones
- Good approach and solid pop
- Hands in close
- Bring hands and knees together
- Pass late, as you drop
- Keep looking
Raley To Toe Side
This sport of kite boarding moves with different styles and ticks. The benefits of this sport can be measured by its refreshment and popularity worldwide. Today we all like a Raley, and funnily enough most of us learn on our preferred side, favorite foot forward, leading to a solid heel side touchdown. It looks like an embarrassment to overlook the other side and deny yourself the kudos of flicking your board both ways. Therefore the Raley to toe side, and just to prove it is a genuine move it even has its own name, the Krypt. With no trouble you can gladly learn these both hooked or unhooked. In this article, we will be going through the unhooked variant, but be assured that apart from the actual physical act of unhooking the rest remains pretty much the same for both, from approach to landing.
The Approach A.
As in every trick your approach will always determine how well things will turn out. Please have a look in the picture that the rider has her kite just below 1 o’clock, she has turned the board off the wind onto a very broad reach, whilst keeping her weight both upwind of the board and back towards the tail of the board. You can also see that her front leg is extended and both her elbows are tucked into her sides. Not only is this the perfect position from which to unhook, it is also the perfect set up for a Raley.
Now over here Kite height is very significant, too high and you’ll fly, but too low and you may not have the confidence to pop, so a happy medium is required, at a height just about where your kite is happily flying forward without creating lift, as a reference point this will be just below 1 or 11. Suddenly bearing off the wind allows you to lose tension from the lines and unhook, 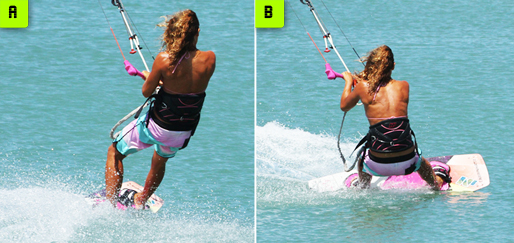 and it lets the kite drop back a touch so that it will pull you downwind, easier landing, once you pop. Weight upwind positions the board between you and the kite so you can pop without the kite pulling your shoulders prematurely over the board. Then weight back over the tail so that you can rapidly and professionally carve the board upwind to pop, the extended front leg helps this. Elbows are tucked in to stop the kite from pulling your arms out straight and you over the board. Now you are all set for the Raley part.
The Carve Pic B.
Your action carving up against the kite needs to be accurate and quick; or else the kite will win the tug of war. With your weight back over the tail of the board you only need to turn your shoulders and the board will carve spec the shape that some lovely board designer put there for such a purpose.
Please see picture B wherein the rider has turned her shoulders and the board carves upwind, putting tension on the lines and thus generating some resistance. This resistance is your platform to pop off. Though to make sure that you are in control you need to keep your position. The easier way to do this is not to let the kite drift up, which it will want to do as you pull against it.
The rider keeps both hands in, arms bent, but her focal point is on keeping the front hand close, as it’s natural to pull on the back one as she turns away from the kite. Also as the rider carves she resists the pull from the kite with her back leg, which combined with her arms allows her to keep her weight upwind, on that edge, turning the board towards the wind.
The Pop Pic C.
Raley is simply an extreme pop. If you’ve somehow managed to oppose on the aforementioned platform you will be in a position to, and have something from which to pop. 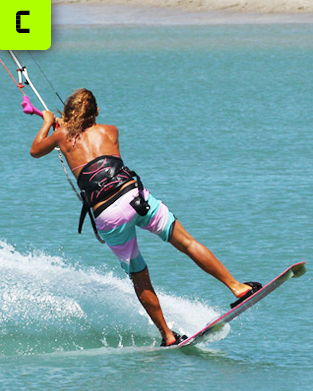 As the board turns underneath you it’s the right time to stamp. The rider feels the board turning under her, and more significantly feels herself being pulled forwards by the kite. This is her cue to pop. She pops hard against the board with her back foot by stamping down and extending her back leg as explosively as possible. Her front leg has remained extended throughout. The amount of pop you get will depend on a few variables -speed, power, timing, aggression, but your aim is to extend, really focus on straightening your legs, uncoiling the spring which is you.
The Flick Pic D.
There are two possibilities in a Raley, to end up with the board horizontal and behind you,  or flicked around vertically behind you. The second talked option will make all number of tricks more attainable and the Krypt is no exception. This flicking action is simply a continuation of the carve upwind and by extending and letting the board go you should end up here.
In this position you are airborne you also require to take stock of what is going on lest adjustments need be made. The rider has let her board flick around by carving hard to get the board into the wind and extending fully as she took off. She now wants to make ensure that she is in control, and here that means that the kite is doing what it should. If you’re well versed in Raleys, you know that once you have it nailed the kite doesn’t move, but if this side is new chances are the kite will have gone up. If it has, steer it down, the rider’s bar here is angled forward to keep the kite from rising. You’ll need to utilize both hands. The rider will also be spotting her landing, that is to say she’ll be working out where she’ll most likely land so that she can prepare for it.
Landing Gear Down Pic E.
Gravity always wins and your legs will naturally fall underneath you, 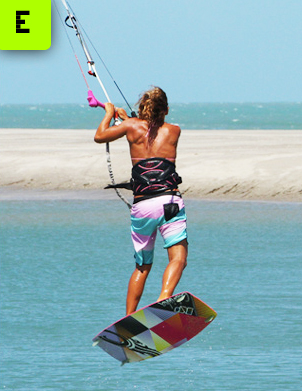 which is the beauty with a Raley. That said if you start with your kite at 45° or below Newton may not be able to save you. You can see in the picture the advantage of the flick, the rider left foot is forward as her front foot was flicked around behind her. If you have a strong toe side preference, chances are that you’ll automatically keep this position, but just to make sure, try to bring your knees up towards you as the board falls. As your knees come up you can pull your toe side leading knee under the bar, much as you would for a gentle pop to toe side. Here in picture the rider pulls her left knee through underneath her.
The Result Pic F.
By pulling her left knee through and under the bar, the rider will now happily and happily 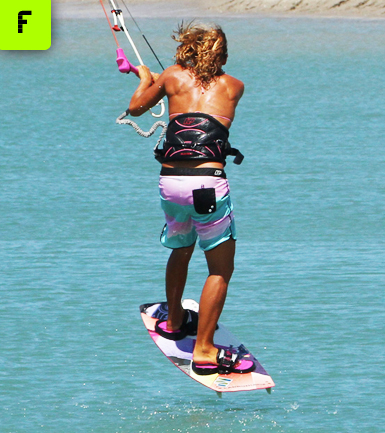 land tail first for a toe side landing and a Krypt claimer. By keeping the bar in close she lands over the board and is not pulled forwards by the kite. Once you have landed, either bear away towards the kite and hook back in, or casually pop back to heel side and ponder what you’ll do next.
Top Tips
- The very first tip is to start off gently, you don’t need to be hounding along at Mach 10 with the intention of a full blown Raley.
- A decent extended pop will give you the feel, so concentrate on carving and extending your legs and body before landing.
- Also have a good look on images.
Common Problems
- If you find that you are landing very downwind and having to carve around onto your heels, the chances are that either your kite has drifted up, or your error have extended which means that the kite will pull you too far downwind. Keep your arms tucked in and don’t be afraid to dive the kite down to keep you going where you should be.
- If you are catching your toe side edge on landing you don’t have enough height, so either pop harder or try with your kite slightly higher in the window. These are the things to keep In mind.
Keystones
- Approach with weight upwind, back and front leg extended
- Carve hard upwind with arms in
- Explode against the edge with your back foot
- Extend and feel the flick
- Pull arms in and bring back knee through
Shifty 5
Everyday small progression in kiting is an important thing and also the most rewarding challenges. In freestyle the possibilities seem endless, moving from a blind landing with surface pass, to an air pass blind judge and then adding that extra bit tars blind judge three and then a five and then a seven – one can but dream or admire those that actually can.
Anyway the point is to those non-freestylers it all can look a tad uncontrolled with a lot of splashing, but if it’s your thing then every extra 90° or so means s00000 much. Taking your Shifty 3 and moving it on to a 5 is a highly rewarding yet achievable challenge – so here’s how.
To make that extra turn to toe side you’ll need more time. There are a few options available to you here. You could put your kite higher, which will help but the higher it is the more strength and effort you’ll need to pass, which may slow down your rotation.
You could go for the pass much earlier and therefore have more apparent time at the end to get around that extra bit although if you don’t kick the back leg it could make the pass trickier. And you could pop as hard as you’ve ever popped, although if you pop too hard you might get extended and pulled out which could also make the pass a tad more difficult. Realistically a subtle combination of all three is needed, with an awareness of how each will affect you. The one exception to all of the above is if you happen to be one of those people who can spin so quickly that you’re not sure what all the fuss is about
Getting Up There Pic 1
From the above you can check that rider is not coming into this with his kite at 45°, but as so often it won’t be above 11 o’clock as you must be able to edge against it, and any higher it’ll be lifting you – 10.30 is perfect.He’s come in with good speed and the kite parked still, with all his weight back over the tail of the board. He’s carved up hard and low and at this point has popped aggressively by stamping against the board, allowing his legs and body to fully extend upwards in an effort to get as much height as he can with this kite angle. His effort is focused ontwo things simultaneously, pop for height AND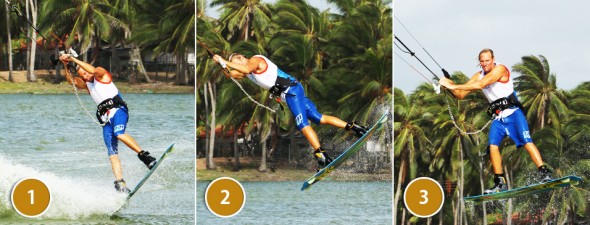 keep the bar as close aspossible. You don’t want your arms getting pulled out straight.
The Leg Kick – Shifty Pic 2
As you’ll no doubt know from your Shifty 3s, kicking the back leg out is to help with your rotation and if you happen to have a stylish shifty it’ll look better too. As soon as he is free of the water the rider kicks his back leg out, winding up some energy for his rotation and pass whilst keeping his elbows and hands in. This way he’ll be able to pull harder and swing his leg further.
Swing and Pull Pic 3
This is a crucial step as the closer you get yourself to the bar, the earlier you’ll be able to pass it and more importantly the less it will pull away from you once you have passed it. Remember that your airs is to go a little earlier so as soon as you have kicked your leg back, pull and go. You need to pull yourself up and over the bar whilst swinging your front leg under your elbows to get you rotating. This is a kite face moment as the effort should be extreme maybe even allow yourself a little grunt!
You can see that in comparison with the last picture where the rider head was level with the bar, he now has the bar coming in and down below his chest. And even though he has swung his back leg through and has started to rotate he still has both hands on the bar as he is still pulling himself up to it.
The Pass Pic 4
The passing action will be similar to your 3, that is to say you’ll be leading with your head and shoulders, turning yourself down and around, away from the bar, releasing your front hand, twisting the bar and then immediately hunting for the bar on the other side. If you popped hard enough and pulled hard enough you should get some slack here from the kite, which will help as the bar won’t get pulled out from you.
That said the main difference here to the 3 is if you look at the rider, you’ll see that his back leg is lifted with his knee coming up towards his chest. This is the precursor to getting the toe side landing, you really have to commit to this during the handle 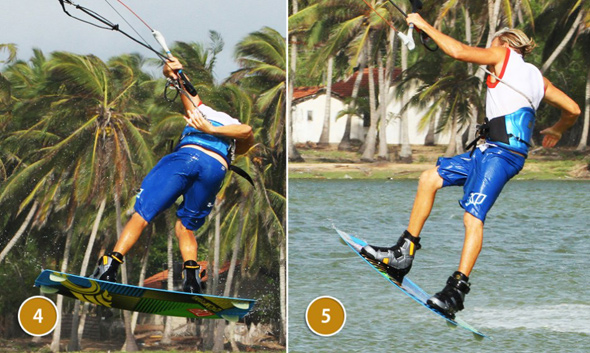 pass, otherwise your feet and the board will drop away from you and you’ll have no chance to go that little bit further.
Head, Hand and Knee Pic 5
And here is the result of bringing that knee up. With the knee up the rider can then bring it through towards his hand. The action is similar to that of a back roll to toe side, even though your adding the toe side on at the end you have to finish the roll with your back knee high so that you can push it through. It’s also important to keep the bar close, by that we mean don’t let your front arm fully extend as then you’ll used to Shifty 3s the chances are your muscle memory will encourage you to just drop out of the pass. Here you must keep your head turning so that it’s looking forward as this will allow you to turn your shoulders further so that your legs and upper body are moving together.
Just think how you learnt the side by taking the front hand off so that your shoulders could twist around. Here you can’t let that hand go so you’ll need to turn your head.
Get the Back Hand on Pic 6
This is almost THE top tip as well as being the final thought to ponder, 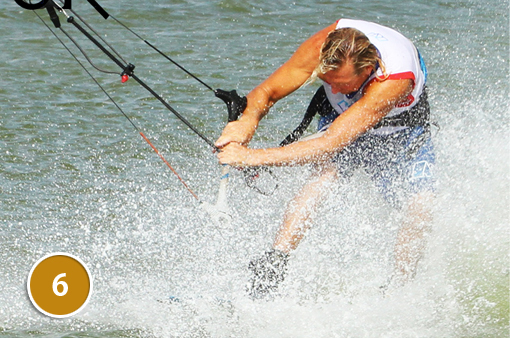 as once you get your head around what is going on, aiming for this from the moment you think about passing will help you get the 5.
If you fry your damnedest to land with both hands on the bar it will make you turn your shoulders even if it doesn’t get on until you splash down, as is the case with our rider here in image.
Top Tips
- You’re going to need power, pop and height, but don’t confuse this with having your kite trimmed too far out, or should we say powered up in old
- If you do the kite will pull all through the move and it’ll be twice as hard.
- If you can think of only two elements of this move, they are to lift that back knee as you pass and fry to land with two hands on the bar.
- Have a gander at the full Sequence and Videos and try to see the early pre-empting of the toe side turn during the pass


Common Problems
- If you’re dropping down out of the pass as per normal for a 3, take time to visualize what you’re aiming for.
- Then give it another 30% on your next try and think about bringing that knee up and landing with two hands.
- If you’re getting around but then fall on your back once you land. This means the kite is pulling you too much once you’ve passed, so either trim a little more or pull harder into the pass.
- If you don’t have time, go earlier and try to get some more height with help from the kite.
Keystones
- Come in with power and speed and pop super hard
- Shifty as soon as you’re off the water
- Then immediately pull up to bar and swing back leg through
- Lift back knee up and through as you pass
- Land with 2 hands on the bar
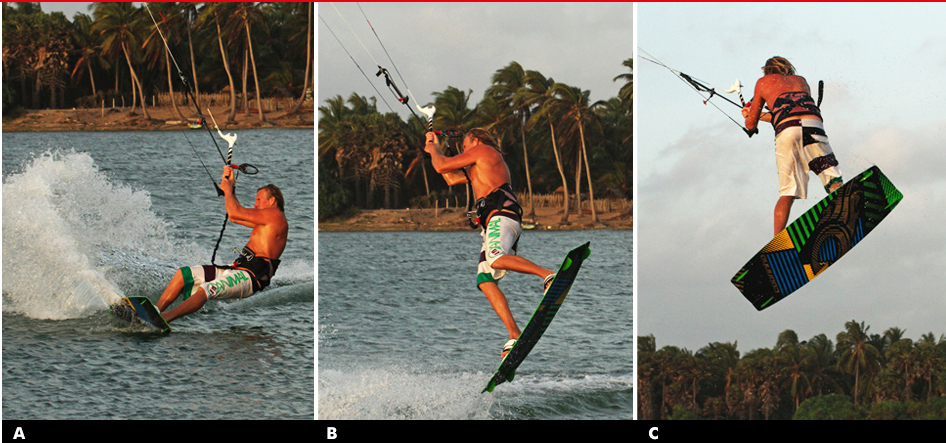
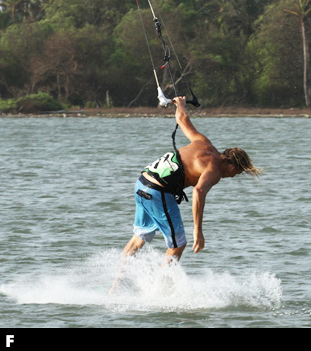
Backloop to Blind with Air Pass
To learn this move you need timing and technique because the air pass on this trick is dependent on it, not on brute strength, it is within reach. But, i if you dangle your thrusting hips, it will serve you proud! Also, we will look at this trick as a stepping stone towards the much cooler named KGB.
REPETITION
A good starting place is to go back to the popped back loop, as you’ll need to give yourself time, some extra height and changing of rotation in preparation of throwing in a cheeky air pass.
Once again you will need to practice a slow rotation, so the two reminders to remember are:
1. Where you take-off is where you land (downwind to downwind). So bear off the wind a lot before taking off. This way you will do more of the back loop in the air than on the water, which in turn will give you time to prepare for the pass and reward yourself with and easier stick downwind landing.
2. Mind your head. If you look around over your front shoulder as you take-off, you will spin much faster, so aim to keep your head square with your shoulders and look through the gap between your arms. Not only will this slow down your rotation, it will also make your direction change easy against the flow when you throw the pass.
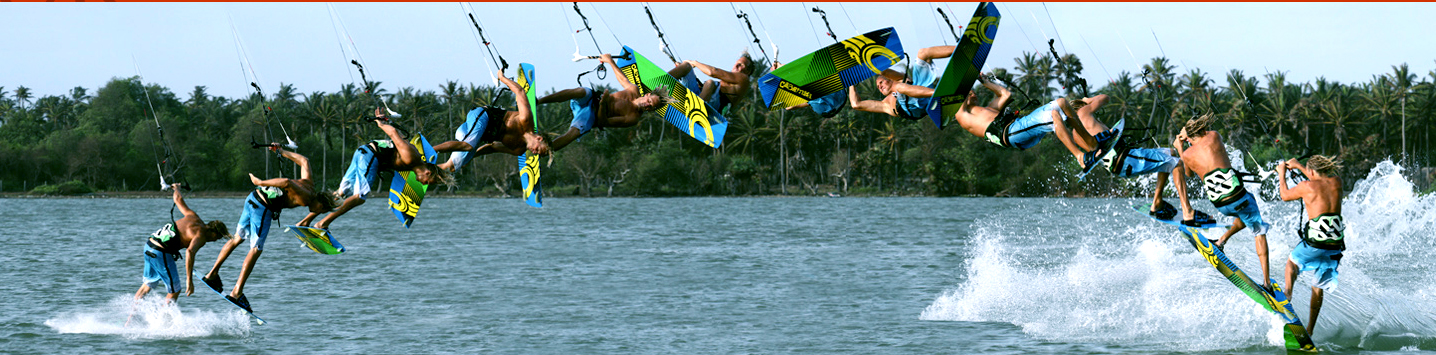
 As far as your rotation is concerned, you will need to get more inversion. This does not mean you need to be upside down, but if you look at pic A you can see how the surfer is in a horizontal position and has his knees up above his body. This will stop his body dropping away from the bar when the surfer goes for the pass. The simplest way to get into this position is to lean your body back over the tail of the board as you pop, which will lay you onto your back in the air. As soon as you leave the water, make huge effort on bringing your knees up.
Try to keep your kite around 11 or 1 o’clock, as it will help you with the rotation, body position. It will give you something to physically pull against when you go for the pass much higher and you will be dangling under the kite, and also you will need that extra energy for that.
TIMING FOR THE GO
 Pic B – we can see that the surfer seems much inverted compared to the previous. However, if you look closely, the only difference is that his feet are higher and his legs are extending, this means that the surfer is going for it. From practicing this trick, you should know the moment when you’re tucked up the bar is close to you and you start to drop down as you complete the back loop. You need to go for the pass just before the dropping time. To give yourself more “float”, kick your legs up just before you throw the blind twist. With the board up, momentarily no force will pull you down. You can see in this picture that the surfer comes further around the back loop and his hips are moving around towards the bar.
THROWING THE PASS
Once you have kicked your legs up and the board away, you’re throwing yourself to a blond, just from a rather familiar position. The actions are the same; you will pull hard on the bar with both hands and bring it towards your front hip.


Pic C – You can see that the surfer has pulled, released the bar with his back hand, and is now throwing his head, hips and shoulders around. This is really where the kite position is so important. If the kite is too high, there will be nothing to pull against, and you’ll find it hard to get the blind rotation.
Pic D – You can see how the surfer twists his wrist and thumb down and around, which enables his body to twist around further. Commitment is the key here. It would be very easy to give up and let go but you must reach around with your free hand. If the kite is sufficiently low, your pull before throwing should result in a tiny bit of slack as you drop and therefore making the pass easier.
Pic E –If you have timed it right, the bar will come to you, hopefully before your board touches down. Just let the kite pull our arm around and try to follow with your head for a balanced landing.
Pic F – Voila! When you watch someone doing a trick like this and it looks often effortless, take in mind that you need a complete conviction and your best kite face.
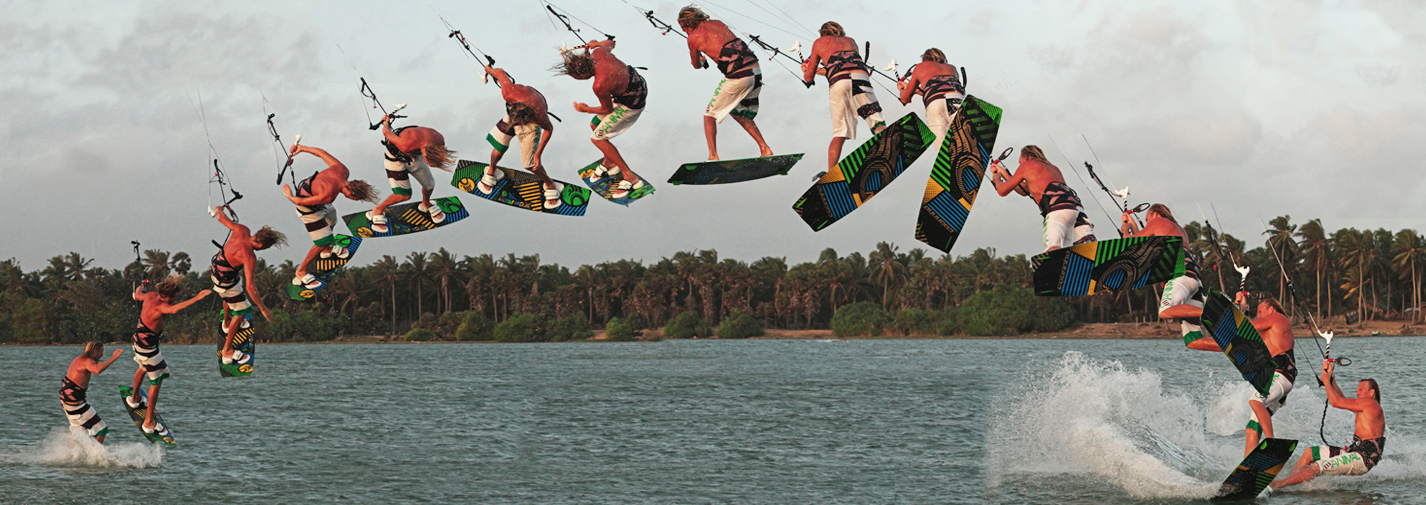
THE COMPLETE SHOW
1. With enough power in the kite and speed under the board to pop against, the surfer has unhooked, pointed off the wind and is now carving hard into his pop. His bum is down and front leg is extended for a decent edge whilst his back leg is slightly bent ready to explode for the take-off.
2. The board turns up and it is time to extend his back leg as the surfer leans back over the tail to initiate a more horizontal back loop. His head is looking forward to where to go for the rotation to slow down.
3. As soon as his board leaves the water, the surfer starts to bring his knees up towards his body. He is still looking straight through his bent arms.
4. Still going up and around, the surfer isn’t looking over his shoulder, but lets the back rotation bring his hips around towards the bar.
5. If you were to look at the bar, it has completed the back loop. However, the surfer will always be following. From practice, he feels the rotation around onto the bar, so it is time to go for it. The surfer kicks his legs up, pulls the bar hard into his front hip, thrusts his front hip up and around and throws the pass. Because the kite is low enough, the surfer has something to pull against to kick-start his blind rotation before letting go with his back hand.
6. Turning the body, the surfer twists the bar around behind his back, enabling him to turn even further and position the bar so that it is ready for his free hand as it reaches around.
7. As if by magic, the bar is where it should be and the surfer grabs it with his free hand, whilst simultaneously releasing his other hand.
8. Dropping down, the surfer lets his arms untwist and lowers his legs in preparation for the landing.
9-10. As the surfer comes in and looks around as to where to go he reaches up for the bar with free hand. Both these movements will help balance the landing. Then regains control of the kite with both hands on the bar and sails on smugly.

Here are some videos of this trick:
Unhooked Popped Front Loop
In continuation of out front loop fest, we thought it high time to introduce and familiarize the baby brother of the much respected S-bend, the Popped Unhooked Front Loop. Not only does this move dazzle, but also it is a foundation for a whole other world of kiting techniques that may or may not intrigue you. In addition to that, all this unhooked malarkey (if you’re tempted) is just as well practiced on those underpowered summer days, so give it a shot.
Popping, front looping and a basic unhooked Raley would be a small requirements, along with a modern safety system that lets you both spin and unhook without risking any third party members of the public or kite surfing community.
To help you learn all the important ingredients of an unhooked popped front, we’ll take another look at unhooking, a little glance at popping and way up the differences of popped front compared to a sent front loop.
DETACHMENT
The simplest way to make unhooking controllable is to understand how your kite is trim, thus your bar position will effect what’s going on.
For unhooking, it is vital that you use the strap to trim your bar’s sweet spot so that it rests just above the chicken loop. This way, the bar will feel light and the kite will drift forward, allowing you to be powered up yet in control. Every kite is unique, but it’s more time consuming getting it right. If you don’t trim the sweet spot down, your kite will most likely flare, pulling you off downwind, falling out of the sky in the calms and making kite surfing in general fairly unkind.
Pics 1 & 2. You can see that the surfer is sailing along hands centered with bar trimmed down, flattens the board off by abruptly standing up and almost carves, putting weight over the rear foot. This sudden change in direction towards the kite releases the tension off the lines.
Pic 3. With the tension gone, the surfer pulls the bar in and pushes it down to let the chicken loop slide out from the hook. Without looking down, as this would prevent the hips to move back and make unhooking difficult.
Pic 4. As the chicken loops drops out, the surfer must start to carve into pop before losing speed. Head positioned forward in direction as to where the surfer wishes to go, moves weight and hips right back over the rear foot and straightens the front leg, while dropping upwind off the board to get it back on an edge.
Pics 5 & 6. The surfer tries to maintain shoulders, back and front leg straight when carving hard against the pull of the kite. The goal is to explode up off the rear leg once it gets unstable, must also try and maintain equal pressure on both hands, as it is easy to pull on the back hand and hurl the kite up.

HANDS OF TIME
 It is essential that you provide a good pop, as this will give you enough time to complete your spin. Your body position in the last stage of the carve will either offer you the chance to explode up or let you be dragged low over the edge which you do not want. In the picture to left, you can see that just before take-off, the surfer positioned the buttocks low to the water, shoulders have not been pulled forward the hips, front leg is extended to keep the edge and push the weight back over the tail of the board, rear leg is flexed in preparation to explode and is looking forward, which will prevent carving too far into the wind.
A PLACE IN THE SUN
To support this, don’t park your kite at a 45 degree angle, that’s for some time in the future. You need to catch a comfortable height where you are comfortable edging like this, without the kite providing too much lift, but which will also give you a tad of extra bounce off the water. 11 or 1 o’clock would be a decent place to begin.
THE DIFFERENCE IS WHY
 Your pop is going to spring you up off the water, and thus your front rotation needs to compliment this. In a standard front loop when the kite is utilized for height, you’re more than likely to throw your head and shoulders down and around to start rotating. This works because the kite gives you an up force.
When popping, if you throw your head down towards your front shoulder, you’ll be neutralizing all the good work you’ve done getting up off the water by forcing your body weight down, and that would be counterproductive. Instead, you need to lift your chin and turn to look up and over the back shoulder as your rear leg extends, see picture on your left hand.
To some, this does not seem to be essentially wise, as you are straightening your back and turning it towards possible impact, whereas the original front loop was a safe roll as if you were crumpling up to break a fall. The second difference is your body can stay extended in a popped front loop, whereas in the jumped version, you are trying make yourself a bit compressed.
ALL IN THE HEAD
Your head is the key to completing this rotation. Half way around you are in prone position, because the kite will be pulling you forward, you will not be able to force your hips, legs and board around in front of you, while your legs are hanging behind and upwind of you.
To finish your spin, you’ll need to look over your shoulder at where you wish to go and then push your hands around to follow. By doing this, your upper body will be facing downwind and the rest will have to follow.
STEERING WHEEL
There is a tendency to pull on the back hand as you carve against the kite. This is more than normal, but it should be avoided. However, if you do find your kite drifting up, give it up a pull on your front hand and a push on the other hand as you come around your rotation. If this still doesn’t help, try pulling on your front hand as you take off.
ALL IN SEQUENCE
- Park the kite in 11 o’clock. Carve hard upwind for maximum pop. Put your weight low and towards the back on the board. Extend your front leg. Ride against the power of the kite whilst looking forward.
- As soon as you feel your shoulders being pulled forward over your hips explode off the water by rapidly extending your back leg.
- Your aim is to spring up and turn your head towards your right arm to initiate the rotation.
- As the kite pulls you forward continue the rotation and keep looking rounds towards your back elbow.
- You are now half way through this trick. You´re facing upwind and are fully powered so you better complete your rotation.

- Try to get a glimpse on where you´re going by spotting a potential landing.
- As your head comes around force your bar and hands around too.
- With your head and shoulders facing forward, the rest of your body follows and you can start dropping down your legs down under you.
- Land the tail first on preferable flat water, slightly off the wind. Soften the knees to absorb the landing and keep looking forward, not down in the water.
- Catch an eye on the kite to make sure that it´s not diving into the water, correct if necessary. Then keep heading towards the kite on a flat board.
- Time to take a hand off and hook back in.

BEST TIPS
Don’t take too much speed into this technique at first, as it’ll feel like you’re in a rush, yet alone rotate and land.
As you develop, you should try and start with the kite a tad lower and keep it still.
As you progress with more power, focus on popping up into the Raley first and then start your rotation.
If your kite is starting to misbehave and is hurling up away, try moving your back hand to the center of the bar with the chicken loop line running between your first two fingers.
A NICE VIDEO OF THIS TRICK
Unhooked Downloop
The unhooked downloop is a satisfying piece that unluckily does not get enough airtime these days. When it is at home this move is performed with a pop at the same time the kite loops in a forward direction, which unavoidably will pull you forward into a raley position. As the pull from the kite comes from your front, it is not that too aggressive, and it is another unhooked move that can be easily performed when you surf at an agitated water. Finally, this trick is the originator for a downloop S-Bend.
ALL IN THE TIMING
In pure timing terms you need to be popping early. You should be able to pop from the speed that you take into the move. This way you do not need to let the kite loop move to give power to perform the pop. The result of this is that you will be going up as the kite starts to go around, simply meant that you will get more land and height as the kite finishes its loop move. The longer you wait the lower the kite you’ll fly. This will also end up with the kite starting another rotation before you land.
UNHOOKING A HIGH KITE
Your first concern is the position of your kite. Ideally you will have your kite pretty much at 12 o’clock to start this move. It is good, but you need to unhook too. This means that your approach needs to work for you. With your kite high, the problems of slowing down and not being able to unhook are lurking in the wings. On your approach you will need to drift the kite up at the same time edging hard and then at the last minute bear away loads to slacken the lines off and then go to unhook. Your body position here for unhooking is crucial, so make sure that you push your hips up and shoulders back, otherwise the chicken loop will not slip out easily.
REDIRECTION
Next you need to get your hands sorted. You need to release your back hand and reach forward to grab the bar just underneath your front hand in a fish pole grip during the redirection phase. There is no relevance to whether you are right or left handed. The important thing only is that your front hand steadily stays up against the center line and the released back hand grabs in close to it as possible. If you have just lathered up with some factor 50, this could prove a tad tricky. The slick movement to one side of the bar will get the kite turning sharpish into a downloop.
THE POP
 You should be well aware by now of the need for a decent edge to pop-off. If you enter with the correct body position, it will be easy enough to get onto your edge quickly. Your shoulders should be in a back position and your hips forward. Even more importantly is that you need to extend your front leg, so your hips are over your back foot and aim upwind while your hips and shoulders twist. This will allow you to drop your bum low to the water and get into a solid craving position in a quick time. Notice how the surfer has already started to drop into carving after the back hand is released. By doing this, the surfer will have a perfect phase to pop off from the edge before the kite gets too far into its downloop. The surfer will explode up off his back leg by suddenly straightening it, kicking it down onto the heel of his back foot to pop perfectly.
ENTERTAINING AIR
 Once you pop up into the air your objective is to follow the pull of the kite. By doing this you will keep your balance and will give you an enough inclination for the landing. The simplest way to go with the kite’s pulling force is to watch it. You can see that the surfer is being pulled through the air by his downlooping kite. Head is in line with the bar, which is pointing at the kite. In a powered downloop, your feet might flick up slightly behind you. As long as you look at the kite, it will not twist you. Also by looking up at the kite, the surfer’s head is lifted. This will make it easier for his feet and board to drop underneath. If you feel the need to take off a hand off for balance, then it must be your back hand.
TOUCH DOWN
 As we mentioned keeping your head up, allow your body to fall into a normal vertical position. If you can keep your arms, or front arm bent, the pull will bring your leading hip forward and set you up for a pleasant downwind landing. The surfer is upright over his board. This gives him the option of going either way depending on where the kite is going.
When you first land a downloop, follow the kite downwind and watch it loop again. As you see it turn through the center of its rotation and is starting to come up, grab the back of the bar with the hand you swapped over. If you do not get the right timing, just grab the chicken loop and let go of the bar. At least the kite will flutter up and you can sort yourself out.
SEQUENCE FOR THE POP PREPARATION
Pic 1 – The surfer approaches with the kite around 11 o’clock and starts to drift the kite up with a sudden pull-away to allow the body to be pulled up over the board, flattening it and pushing the front foot towards the kite and leaning with the back foot with weight over.
Pic 2 – The surfer forces his hips forward and up at the same time pulling down with both hands.
Pic 3 – As the surfer pushes the bar away and the chicken loop out, the surfer starts to drop his bum and shoulders away from the kite and looks where to go and not at the kite.
Pic 4 – The surfer swaps hands and starts to get back on the edge by driving his feet away.
Pic 5 & 6 – The surfer twists his hips and shoulders to face more upwind, forcing the board to carve hard onto its edge. The kite is starting to steer down and will pull soon
Pic 7 – The surfer pops up hard off his edge extending his back leg.


SEQUENCE AFTER THE POP
Pic 1 – As the surfer pops up the kite, pulling forward is the main goal with offering no resistance at all.
Pic 2 & 3 – The surfer looks towards the kite to keep the balance all the way.
Pic 4 – As the kite starts to rise again, it stops pulling and the surfer starts to drop down. Keeping the bar pulled in with bent elbows, this turns the surfer naturally to follow the kite.
Pic 5 – With the head of the surfer up, the feet and the board drops under and releases the back hand for some added balance.
Pic 6 – The surfer lands over the board, waits for the kite to rise, and then gets the other hand back on the bar.

KEY MARKS
- Kite at 12 o’clock
- Unhook with shoulders back and hips forward
- Change hands
- Carve and pop early
- Follow kite once in air
The video of this trick:
Unhooked, Front Roll To Blind

Unhooking and adding a revert to blind can spice up any trick and make you look like you have more game, even a simple front roll becomes something special once you spice it up.
Riding left to right, front foot forward with the kite above 45 degrees, trim the strap to unhook the bar, unhook and ride a short distance to check you have trim spot on.
To make lide easier and to gain an extra rotation time for the landing to blind, send the kite up a little as you pop from the water. Tuck your chin to your right shoulder and look behind you over your right shoulder as you pop to start the rotation.
Half way through the rotation, you should start to spot the landing by looking over your left shoulder. As you come in to land instead of letting the board follow your body round, take your right hand off the bar and swing your arm down towards the water, this will give you enough counter swing to stop your body rotation and land blind.
As you land, bend your knees to take the landing, keep your weight firmly centered over your feet. If you feeling up tp it you can ride out the trick with surfaced handlepass.
Good luck with this cool trick!

Tips! Make sure that you trim correctly to unhook before trying the trick. when landing blind lean forwards and towards your back foot, to help keep the edge.