KGB
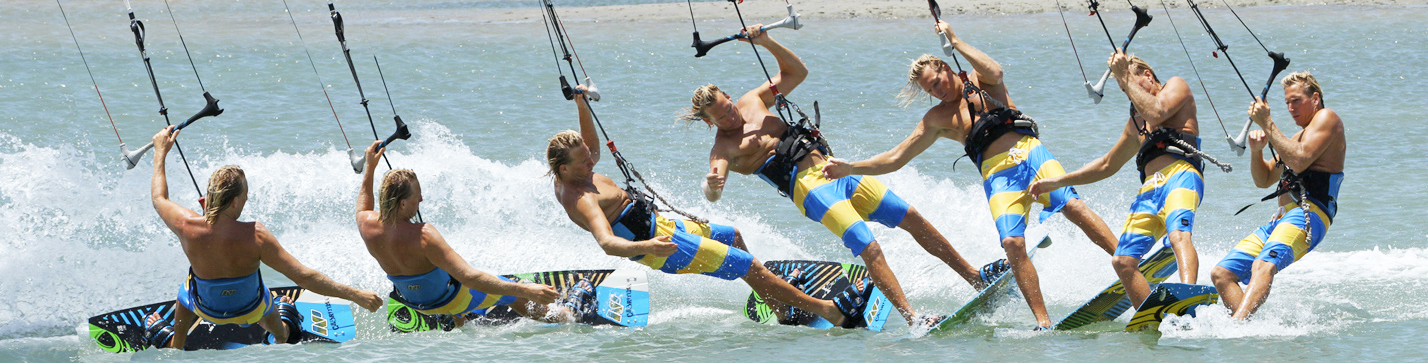
The KGB is the next step on from a back to blind with an air pass. Much like the excitement of a Blind Judge 3, the add on is the final 180 of rotation so that you land heel side, therefore completing the move. It’ll have you laughing on the inside for weeks once you claim it, as that final float around to your heels is one mighty achievement. We will of course advise that you should already be stomping back to blind with air passes, as then it is more a matter of tweaking and polishing rather than learning something from scratch. If you did nail the Blind Judge Three it will help a lot, as you’ll already have built up some muscle memory to get the passing and kicking movement for the heel side landing.
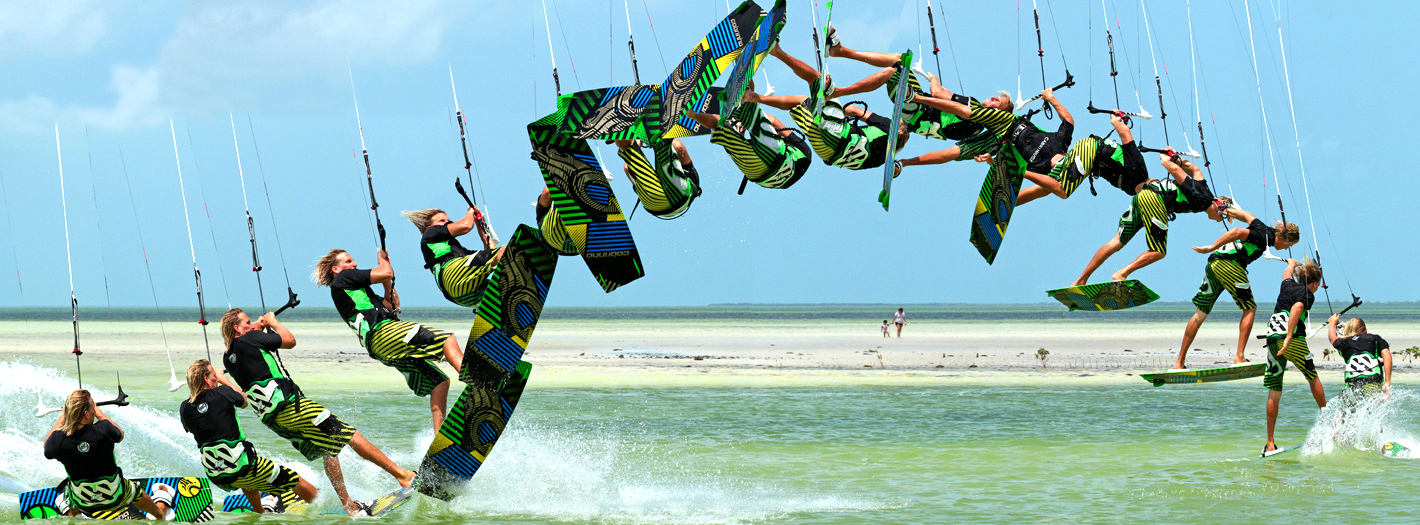
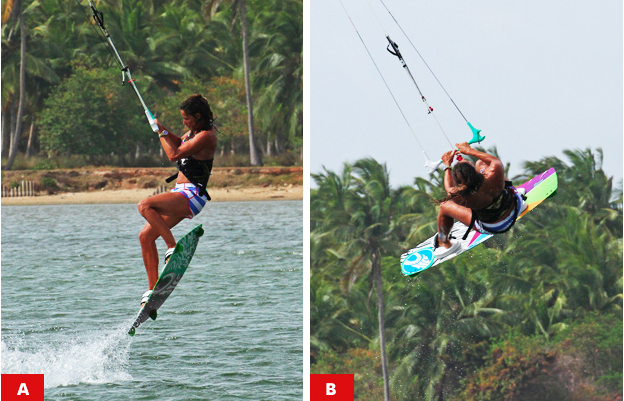
- Approach and Carve Pic A.
In order to get the height, pop and slow enough rotation your entry into the KGB must be bang on. First off make sure you come in well off the wind, so bear away a lot before unhooking. Why? This will let you carve hard enough to get your rotation into the back loop without turning too far into wind, and therefore you’ll actually “do” more of the back loop in the air, and thus it will feel slower, giving you more chance to pass and turn. Secondly make sure you lean back towards the tail of the board as you bear away. You can see in the pit that the rider’s hips are leaning back over his back foot, and his shoulders are leaning back towards the tail of the board. This will help him invert, which in turn will make the pass both easier and closer so that he can pass later and therefore get all the way around to his heels. Finally don’t be afraid to have your kite a tad higher for learning this, as it’ll be more pleasant and confidence boosting knowing that there’s enough room to complete the manoeuvre.
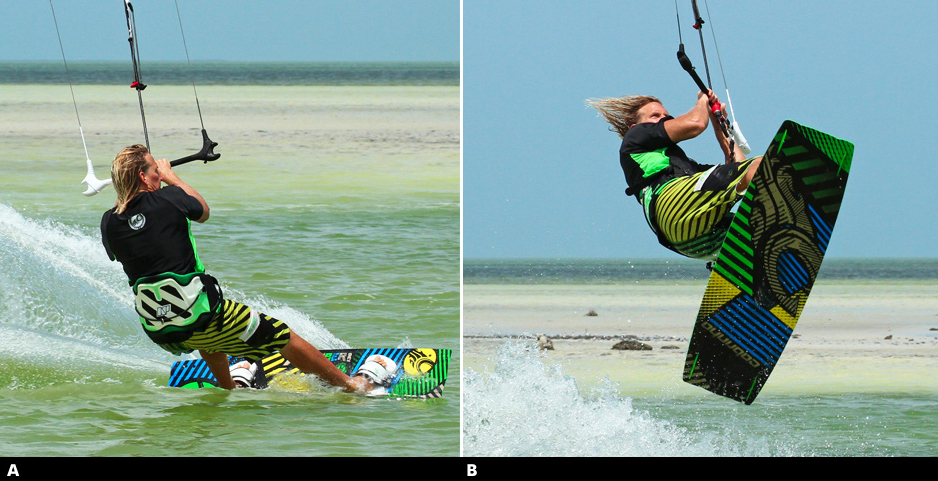
- The Take Off Pic B.
Once you’ve got off the water with a right royal stamp against the back foot your aim is to get the board swinging up whilst you turn slowly through your rotation until you just about complete a back loop – but with the board up high and the bar in close. Here the rider has kept his hands in close to his waist from the off by locking his elbows in, and thus hopefully the bar will stay nice and close too and he won’t need superhuman strength to pass the bar. The rider’s head, although just about leading the rotation, is not looking over his front shoulder, but rather forward, perpendicular to his shoulders. This prevents him from spinning too quickly, thus helping him to turn the other way when needed and pass. Finally as his shoulders are still leaning back from the take off and his board rises the rider and brings his knees up and close, so that the board moves with him and doesn’t pull him down later in the move.
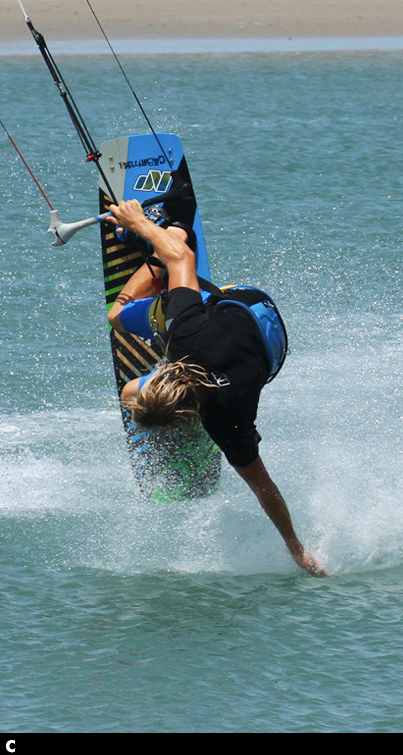
- The Inversion Pic C.
Getting the board up is what gives you time to pass the bar late and get your front foot through.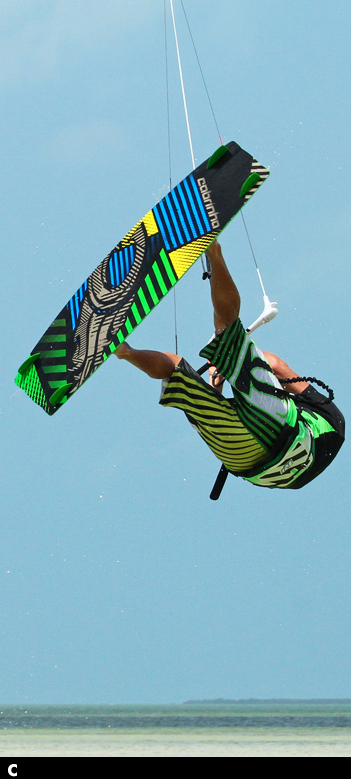
The timing and amount you turn can vary, but the more you complete the back rotation the better your KGB will look, much the same as a back to blind. The rider is coming around his back loop, not quite a full 360, but almost in relation to the angle he went off the wind to start, which gives him the most chance of landing comfortably downwind and not on an edge. Your aim is to get to this point with your board high and the bar still tucked in close to your hips. The further you come around the more your hips will come up towards the bar and save you having to pull your weight up to the bar, and this way you can rotate the opposite way for the pass without getting pulled backwards. Like many passes you will think you’ve left it too late, but this is your cue to go.
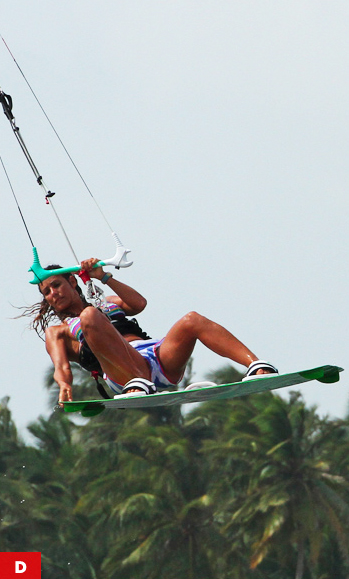
- Turn The Other Cheek Pk D.
Time to pull the trigger! Once you’ve completed the back loop you need to go for the pass before your board and legs drop and therefore pull you down and away from the bar. With two hands still holding the bar, The rider keeps his knees in and up whilst he turns his head to initiate the pass. The head should lead the entire move from here; if it does you can turn and claim the KGB. As you turn your head look up, not down at the water. The fact that the board and his feet have completed the back loop mean that the board is in front of him and therefore he won’t get pulled backwards away from the board but rather drop forwards towards it. This is not a bad time to give the kite a quick tweak down if you find that it keeps rising.
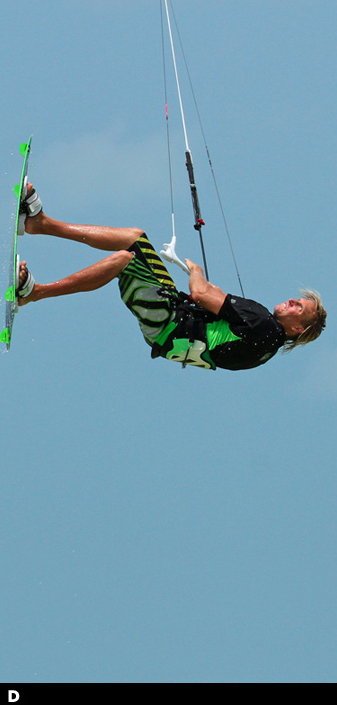 However if you keep your elbows in your kite will naturally dip once you release your back hand, as all your weight will transfer to the front. The MAIN DIFFERENCE here to a back to blind with air pass, is that your focus is not on passing the bar but rather on spinning your head, body and board so that you can see where you’ll land. If you just concentrate on the pass you’ll drop down without turning the full 360 to heel side.
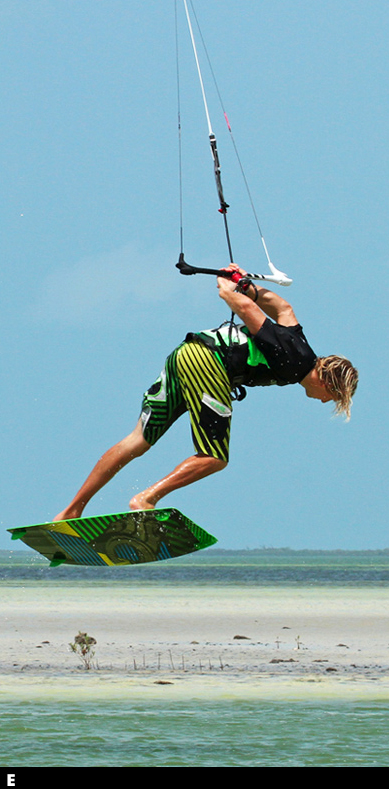
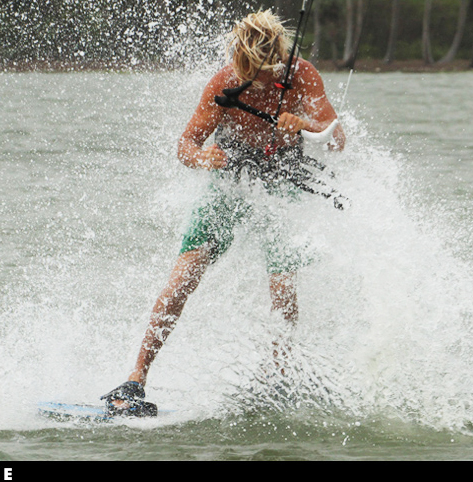
- Forward Pass Pic E.
Looking forward to where you want to go will make you lead the rotation, so stretch your chin out in front of you and keep your eyes up. Normally you would turn your head down, and therefore pass but then drop down. In a KGB you must keep the head looking above the water, searching for where you’ll land. Here you can see the result – The rider is still turning as his head and body are leading the way. As the rider turns he rotates onto the bar and can therefore pass, but the priority is the rotation and therefore the pass from one hand to the other is late. Finally if you look at Christian’s front leg you can see that it is still bent. Keeping your landing foot close will guarantee that it comes with you and doesn’t get left behind. Once you get this far, prepare to scream and celebrate, as the KGB will be yours.
Top Tips
- The foundation for this move is a decent slow and inverted back loop, so repeat as many of these as you can, getting the board high and finishing your rotation at the apex.
- This will get you prepared and visually ready for the final 360. If your feet are dropping as you come around your back loop, you need more inversion, so more leaning back, more locked elbows and more knees up.
- We won’t be adding any common problems for this move, as it is a matter of concentrating on the relevant skills and putting them together – an inverted slow back loop, and a pass rotation lead by you head held high.
Keystones
- Massively off the wind
- Lean back towards the tail
- Hands in, knees up
- Full rotation to inverted position.
- Lead the pass with your head held high and front knee in.
Unhooked Front To Blind Ole
There are a few takes on the front to blind, powered, unhooked, hooked, sent kite, you name it and it’s probably likely. We’re adding the unhooked Ole to the list as it serves a couple of purposes. Firstly it does allow you to go for and learn the blind with a slightly higher kite. Secondly on a big lefty kite in light winds, you will often need to have the kite a bit higher and with the resultant upward pull on the bar “Oleing” out is a health conscious option – oh yes and it does have a different look and feel to a standard bar pass ending. Before you attempt this we’d suggest you can pop front roll, and preferably relay to blind, but if you’ve got the hooked version down then this is a mere step away. Following are a few points worth more than a moment’s consideration.
- Take off, pause and rotate Pic A.
As with all things unhooked and popped we’ll assume that you’ll have the bar trimmed correctly, hands centered and approach with good speed before bearing off with your weight back to unhook, dropping low and edging hard into your pop, stamping hard to get the height without a cheeky kite send. If you use your kite you’ll lose forward momentum and the landing will be difficult to pull off.
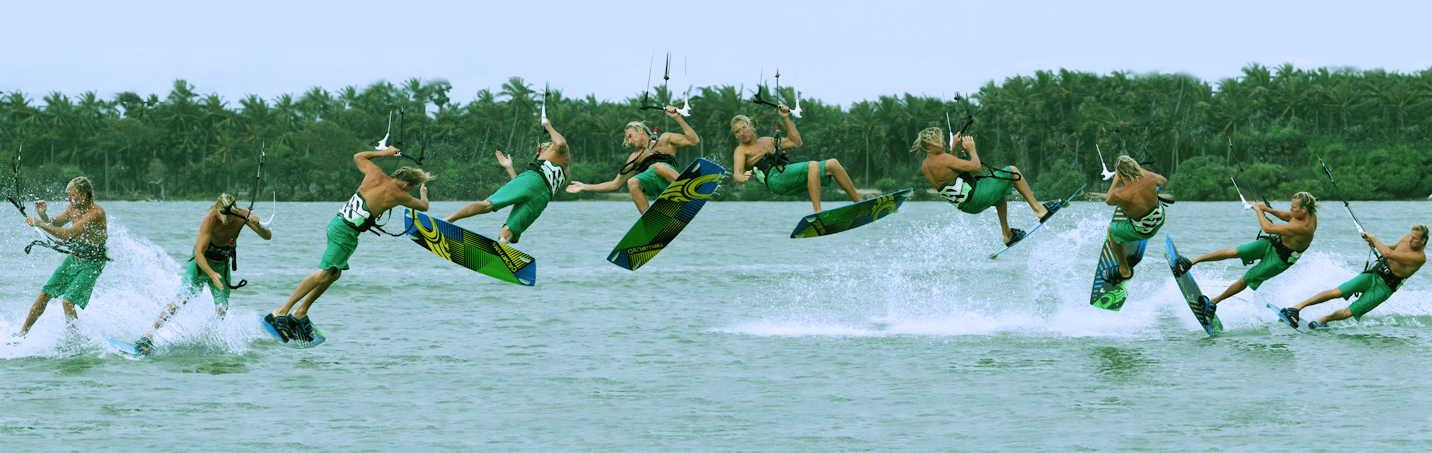
For extra lift when learning you can have your kite positioned higher, just above 11 or 1 o’clock – but don’t move it up. Here the rider has her kite parked at 11 o’clock and has just popped hard to get up off the water. What’s clear to see is that the rider has not yet started her front rotation; she is still looking forward to where she’s going. You too must separate the movement, even if only by a fraction of a second, but you need to pop before throwing your head and shoulders down and around. As a result you’ll get the height, if not you’ll be diving yourself down into the water and onto your back.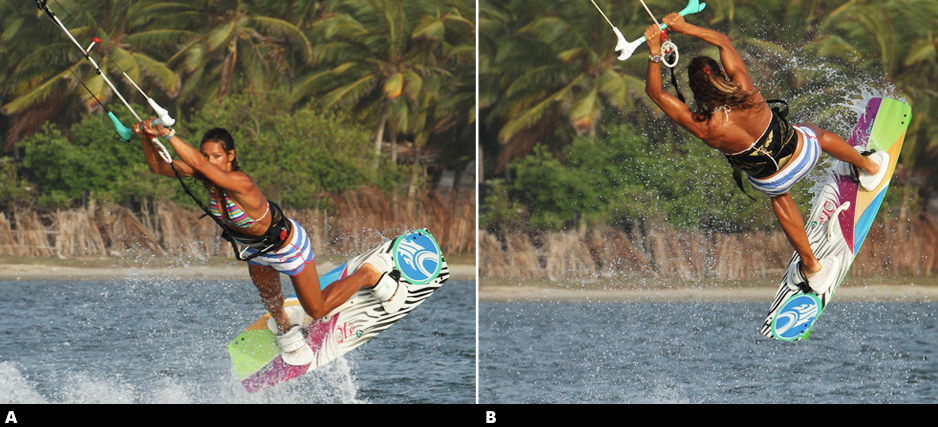
- Front Hand Pic B.
Whilst rotating around, especially if you have the kite high, it will be very tempting to lean on the back hand, and also very natural to have pulled on it whilst edging to pop. Therefore as you spin around it is very good form to keep applying a bit of pressure onto your front hand as this will both stop the kite from floating up above you, and it will keep the kite moving forwards, which will make the landing easier as you’ll have momentum. The rider is only just into her rotation but she is already “leaning” on her front hand. This means that when she finishes her rotation she’ll be able to pull herself towards the bar to throw the blind – if you end up hanging under the bar you can only spin to blind, which won’t offer you any consistency.
- Look Pic C.
We’ve said this before but whether it be a hooked front to blind or an S-bend pass the principal is always the same, another very brief pause between finishing your rotation and throwing the blind. This prevents you from over rotating and you have much more chance of keeping the kite in the air, rather than releasing one arm and starting the mother of all down loops.
Here the rider has rotated the full 360° and is focused again on where she’ll land. This momentarily slows her down, almost pauses the rotation, enabling her to set up for the blind. If not she would be spinning under her kite. From here she can now pull on the bar hard with both hands and throw the blind. With her head, hands and bar leading the rider can throw the blind and swing her legs through to turn far enough for the landing.
- Landing Pic D.
Landing blind for an Ole or pass needs to be flat on the board, downwind, not on an edge across the wind. This way you’ll be moving toward the kite and therefore there won’t be any tension on the lines.
Sc bearing away into the move is important, as this leads to a more downwind landing, and pulling hard before committing to the blind will also help. In the photo the rider’s board is off downwind so her momentum will keep her moving towards the kite. Now what differentiates an Ole from a surface pass here are the position of the rider’s body and her bar. The rider is standing upright over the board with her head high, not bent over double, and she is holding her bar high above her on an outstretched arm. This position is the perfect set up to an Ole.
- The Ole Pic E.
Firstly let’s remember what an Ole is. You will be moving the hand that is holding the bar, across, upwind of your head and shoulders to the other side of your body, from where you’ll be able to continue riding, but now toe side rather than blind.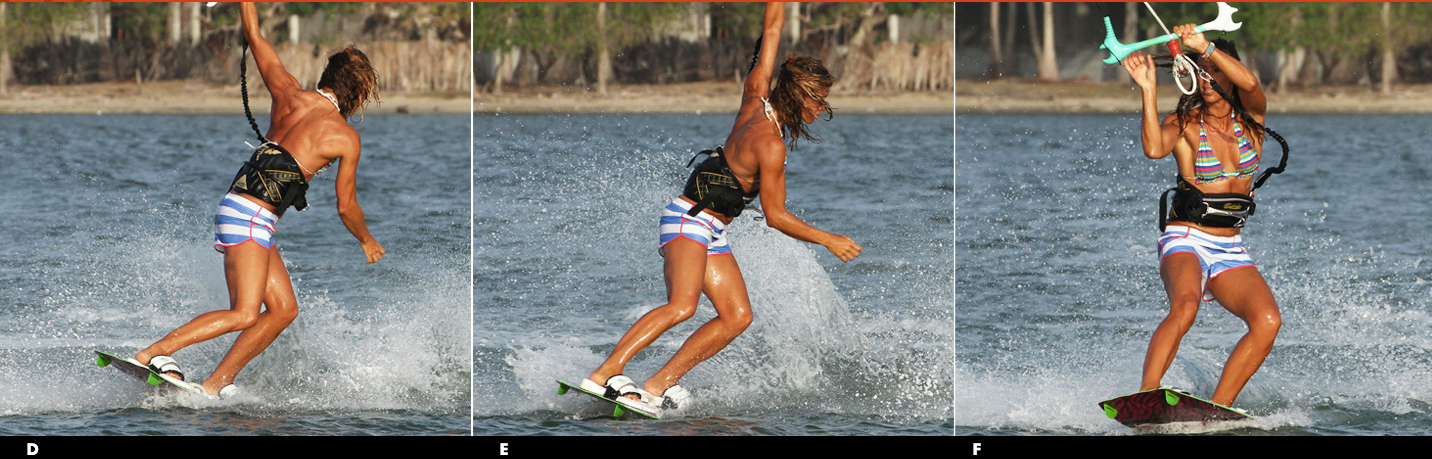
That’s all it is, you’re not trying to turn the board or slide it around to bedside. It’s an upper body movement to get the bar across to the direction of travel and no pass is required. You can see in the photo that because she is travelling towards the kite the rider can push the bar upwind of her and then simply move her hand across in front of her face – now the bar is the same side of her body as the kite and the natural order of things are restored.
- The Finale Pic F.
You have a few options to finish things off, and regardless of what you do it’s a good idea to get both hands back on the bar so that you get control of the kite. Continuing on toe side shows good control, and will certainly confuse a few onlookers. That said if you land with a lot of power and speed the chances are that you will carve onto your heels, so keep going and ride out in the other direction. Here the rider has pushed the bar across, finished her Ole and is reaching for her bar. She has a lot of weight on her heels and as a result will steer her kite across the window once she has her back hand on the bar and follow it by continuing to carve on her heels.
Top Tips
- Apart from making sure that your popped front rolls are working off pat, the secret is to land blind and yes you’ve guessed it, pause foss split second before attempting the Ole.
- If you rush the Ole you’ll fall backwards or if you really rush the Ole you’ll start to rotate into it before you’ve even landed. So first land, balance and then push the bar.

Common Problems
- Assuming that you can get to blind the main issue will be falling backwards. This is normally a result of leaning back to push the bar across your face, rather than keeping your weight balanced and physically pushing the bar up wind and past.
- If you land on your toes across the wind the lines will tighten and you won’t be able to push the bar without it pushing you back, or you leaning back.
Keystones
- Pop then rotate
- Look and pause
- Pull with both hands then throw
- Land downwind and flat – pause
- Then push the bar upwind and across
Front Roll Hand Wash Transition
Yes another hand wash. These moves are always popular crowd pleasures and on clinics everyone wants to get involved in some water tickling. This is the front roll or front loop variant and it has its roots firmly placed in the more traditional popped front loop nose grab transition from yesteryear as featured in Issue 31! There is quite a lot going on in a short amount of time, so you’ll not have the luxury or hindrance to worry about flying the kite, it’s more pop and go and until you’ve nailed a few the kite will seemingly dictate when everything happens. This is another move that will be far easier to learn on a bigger kite and much trickier on a 7m.
The Approach Pic A.
Your approach into this is similar to that of a dark slide or back roll hand wash if you already have those nailed. If not fret not, your principal aim is to stay low whilst maintaining your edge. Normally to pop we explode upwards and naturally as you sit you will bend your knees and come up over the board. So get your cheeks down low whilst keeping your edge. This way you’ll have an edge to kick up and off, whilst being low enough to get your hand in the water.
You can see the rider approaching with his kite about 11 o’clock, bar trimmed out so that he can keep tension on the lines with an extended arm, plenty of speed and he is sitting low but still with plenty of edge. From here the rider takes his front hand off the bar, turns further into wind to check his speed and very gently pulls the bar in with his centered back hand.
Kick Edge Pic B.
Timing wise your moment to go is the same in all these pop trick transitions, you must go early, that is to say before you feel the kite lift. As long as you pre-empt the lift your kite is less likely to fly too far back in the window and you’ll be able to stay low.
In Pic B. The rider really kicking off and against his edge, not up. This fortunately is the standard kick off fees forward rotation but here you must exaggerate the action. The rider leans forward and stretches his free front arm out in front of him as he kicks. This will both initiate the front roll and plant his hand into the water. It is important to get your hand out in front as you’ll soon overtake it without the resistance and drag it’ll produce once buried in the water.
Hand Plant Front Roll Pic C
Not a delicious Ionian snack but your next port of call. If you get your hand down on a straight and stiff arm you will rotate no matter what, as your hand becomes the axis for your rotation. This means that you can try and concentrate your efforts on your kite or rather your other hand, the one holding the bar. You need to keep tension on the lines by holding the bar in on the sweet spot, whilst trying your best not to send the kite steaming off behind you. Three things will help: hand in the centre of the bar, sweet spot trimmed out and big kite…
Here in Pic C. you can see that the rider kite has still not reached 12 o’clock and he is already well into the move. He has his hand in the water and is making an effort to resist by keeping his arm locked out. Simultaneously the rider keeps the bar in and as such the kite will be slowly drifting back whist The rider pendulums underneath.
Upside Down Pic D.
As mentioned earlier there is an element of just going with this move as you learn it. However if you can you should try and invert yourself as much as possible to get some extra style points. You’ll see some folk banging these moves out totally straight and stiff. As your head is down it is a matter of getting your hips, feet and board up, and the simplest method is to keep your hand firmly planted and straighten your legs. With the drag from your hand they’ll be forced up! You can see that the rider pushing his feet up in an attempt to get inverted. Worth noting though is that his hand is only just in contact with the water so he is about to lose resistance and his opportunity to get fully upside down. Whilst trying to straighten up the rider has to keep the bar in and be ready for the moment that he gets lifted and his hand releases from the water.
Is Dive & Land Pic E.
Once you feel yourself lifted, this is your cue to finish your front rotation as the kite has passed through 12 and is effectively jumping you up off the water. If you can get yourself around, then you’ll be able to see where you’re likely to land and balance yourself against any awkward pull from the kite.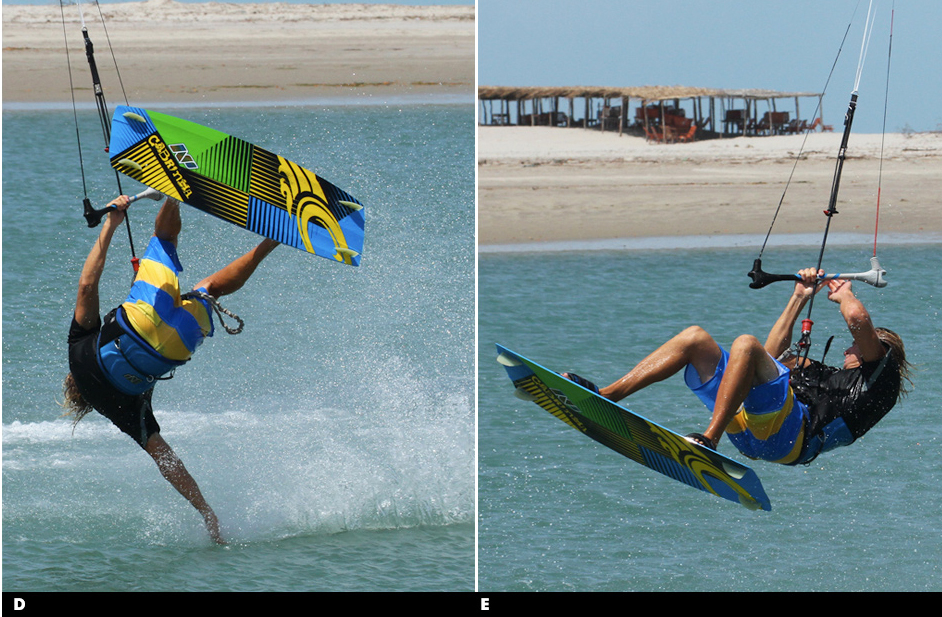
Looking at Pic E. you can see that the first two things that the rider has done are allow his legs to drop and get his free hand back on the bar, as both these movements will give him more control of the situation. By dropping his feet the rider has his undercarriage and landing gear down, and with two hands on the bar he can better control how quickly the kite is moving. The rider is also looking back and down wind, so that he can turn his body and board to where he should be landing. What he does now will depend on how far back the kite is and how far out the rider has pendulum. If the kite is still relatively high the rider will dive hard with his new front hand (the right one) to pull himself out of the move. If the kite is quite far behind the rider will have to dive it harder, aiming for a late kite loop, so that he’ll have the power to keep moving once he lands. Whilst learning this we recommend that you go for the first diving option, as it’s better to get wet and water start than get thrown around backwards.
Top Tips
- It’s a good idea to start off with some gentle popped front loop transitions with both hands on the bar to ease you into the kite timing and see how far back the kite goes.
- If it is going a long way back go earlier.
- Once you feel confident get low and give it a go, not much can go wrong as you shouldn’t be more than an arm’s length off the water.
Common Problems
- Main problem that you’ll have is the kite ending up too far behind you, so go early and keep your edge whilst you get low, and let the bar out a bit to stop the kite drifting too much.
- You may also have trouble getting the hand in and keeping it planted in the water. Really reach forward and throw yourself down into the water.
- Once it’s in resist the pull against it. This may take a few goes to get your head around.
Keystones
- Get low but keep your edge
- Release your front hand and kick forward early
- Reach your hand forward and down into the water
- Resist and try to straighten your legs up
- As you lift drop legs and turn to dive
Inverted Grabbed Front Loop
Funnily enough some of the most pleasant to watch and pleasing on the eye kiters are not necessarily the most radical, but simply the most stylish. Obviously there are the golden few who combine both and have as a result forged a decent career out of kite surfing. So with that in mind here’s another way of adding the mustard onto a move that you can already do, the glorious front loop. For this very reason we won’t be delving into the finer details of the front loop, as we’ll assume that you have them dialed, but rather concentrate on the required aspects of pimping your FL, polishing and adding to the bits that matter.
The Take Off
Your approach and take off should be as normal. Coming into the front loop you’ll need to be thinking ahead so it’s best not to change the way you get off the water, but for one thing…
In Pic A. the rider has already committed to her forward rotation as per normal, she’s sent the kite and kicked off her back foot to push into the rotation and has the bar in with tension on the lines to control the kite throughout the move. The important exaggeration is in her head movement. In an effort to create a more inverted rotation the rider has really thrown her head forwards towards the nose of the board. This will rock her weight and centre of gravity forward of her harness hook and literally tip her upper body forwards, lifting the board behind her.
This is in preference to turning her head back and spinning under the kite and around her lines. Also note that her bar is close to her and her hands are not above her. If your arms are straight and the bar is above you, you won’t be able to throw your weight forwards. The resultant tipping from your head on your front shoulder will give a more horizontal body rotation, but not an inverted one – for that we need more. On the way up get the kite close to 12 o’clock so that it is in position for the rest of the move.
Arch de Triumph
Getting your feet up once again relies on some head work. This is potentially the most confusing and disorientating part of the move, as it is very different from what you will have done before.
Pic B. Once the rider feels that she is rotating and has brought her knees up towards her body she initiates phase two of the inversion, most likely just before the 180° mark. To get the extra purchase on the inversion the rider now throws her head back, as if she were trying to see the water underneath her, in a back arching type of movement. It’s very important at this time to keep the bar in and tension on the lines, as you will need to apply some pressure through your hands to help. With her head on the way back and down, the rider’s knees, feet and board will rise further.
It is at this point in a front loop that you would most likely turn your head further to see where you are going, and it will take some concentration to override your muscle memory! Also as you throw your head back don’t be tempted to correct the kite, as strangely once you’re upside down you may well get confused as to which is your front hand. Not to worry though as the grab will sort that bit out.
Show Your Board
Pic C. As soon as the rider threw her head back she released her back hand and went for the tail grab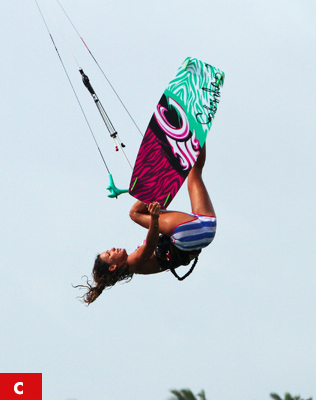 . From this moment on you are committed. Holding the grab the rider has pushed and extended her legs to get the board up. By pushing her feet away whilst holding the grab with her back hand the rider is able to “bone” the grab out. You can see that the rider is looking up at her back foot, but with her head still back.
The good news is that because you throw your head back rather than look for your landing it should slow your rotation down so that you can hold the grab and inversion for longer. Do beware though that if you’re on a small kite, whilst you freeze in this pose the kite might well start to move forward and pull you downwind.
Coming Down
At first you’ll most likely prefer to come down the right way up, upright, and set up for your landing.
Pic D. To get the board down and her head up, the rider uses gravity.
 Simply by lifting her head, moving her chin onto her chest, she rolls forward as the weight of the board pulls her feet down. With this new view the rider can focus on where she’s going to land and act accordingly. Here the rider holds her grab whilst diving the kite with her front hand for touchdown. However if you feel that you’ve already over cooked it on the front hand you may have to let the bar out to avoid a super fast reception.
Once you’ve got this nailed and your confidence up, you can hold the inversion and grab for as long as you like, suddenly releasing and turning in time to land.
Top Tips
- For your first attempts just site it all down, be gentle and don’t jump too high. Ideally we’d recommend leaving the grab out and just concentrate on getting the board up. It’s stunning how going upside down can and will disorientate you.
- If you get it wrong taking it easy there’ll be no consequence. However once you have the movements and develop some special awareness we’d recommend sending the kite well on takeoff for two reasons.
- With a front loop you are likely to release the edge early and therefore need the extra oomph to get the height. Secondly as you’ll be hanging off your front hand whilst you grab with the other, with the kite further back to start with you are less likely to overdo it and come in lit.
Following Sequence 1.
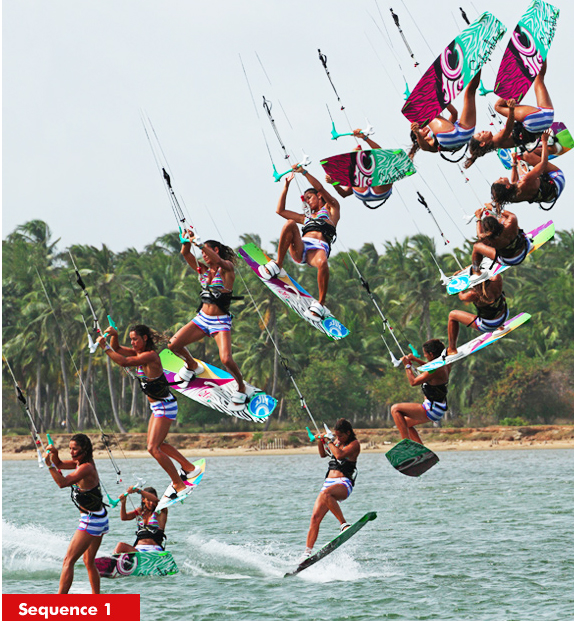
Pic 1. The rider approaches with her kite at 11 o’clock, good speed, hands centered on the bar, a fine edge and the sends the kite as per front loop.
Pic 2. The rider kicks up and into her front loop off her back leg, but really concentrates on throwing her head forward towards the nose of the board to tip her forward into a more horizontal rotation.
Pic 3. As she leaves the water the rider brings her knees up, and gets the kite back up, with the bar held in to keep tension on the lines and aid with the inversion.
Pics 4 & 5. Coming around towards the 180 mark with the board rising the rider throws her head back, arching her back in an effort to get her feet above her.
Pic 6. With her feet up the rider releases her back hand and reaches for the tail grab.
Pics 7 & 8. Grabbing the board the rider pushes her feet up, extending her front leg to bone out the grab and get her sumptuous new board on display.
Pic 9. As she comes around the loop the rider drops the board down by lifting her head, so that gravity can take over and looks towards where she’ll land.
Pics 10 & 11. Releasing the grab on the way down the rider reaches up to get her back hand back on the bar.
Pics 12 & 13. With two hands on the be the rider dives the kite, drops her legs and sets up for a down wind landing.
Common Problems
- If you’re not getting enough inversion don’t look for the grab with your head, but rather lift the board with your legs until you can see it once you’ve thrown your head back. Remember to keep your bar in as you throw your head forward.
- If you’re under rotating and not completing the front loop, drop the grab and board sooner, and then turn your head hard to bring your shoulders around.
- If you’re landing with too much speed and the kite diving hard. Make sure that you send the kite enough, that your front hand is butted up to the chicken loop and that you’re not trying to pull yourself around the site front loop on your hand.
Keystones
- Bar in on take-off
- Throw head and weight forward
- Lift knees
- Throw head back and arch
- Push feet up
Twin Tip Duck Tack
A rather fun transition, the love child of two moves! You could look at it as the twin tip variant of the directional duck tack, but equally it is essentially an on-water, or un-aerial back loop transition. In its own right a smooth way of changing direction and a possible method of learning the key movements to the duck tack before venturing out on your surf or race board. Technically on a twin tip with straps, the mechanics of this move are not overly complicated, however the timing is crucial so once you get the movement, pasting it together piece by piece will deliver the goods. The end result should be a carve up and through the wind of almost 180° degrees, so that your board is across the wind with you facing upwind, followed by a pivot on the nose of the board to turn you and the board the remaining 180°, before you ride off back from whence you came – simples!
The Carve
You need to get the board a long way up into and through the wind so you’ll need some speed. However don’t come blotting into it like a bat out of hell, rather start on a good upwind edge, kite just above 11 or 1 and then momentarily sit down slightly so that your board flattens and picks up a little bit more. To be able to carve all that way you don’t need anything fighting you, whether it is the kite pulling you back downwind or the board dragging through the water. Therefore you need to get your weight, think hips and shoulders, more forward so that you use all the board to carve – the sitting slightly helps with this. If you’re low and have weight on both feet, the board won’t bog and drag, but instead whizz around. To go all the way you must get the kite up to 12 o’clock, so pull gently on your back hand as you approach. And finally to prevent the kite from holding you back you must let the bar out to get rid of the power as the kite moves up.
Pic A. The rider is carving into the wind whilst drifting the kite up to 12 o’clock with his back hand. He has taken his front hand off the bar, which allows him to twist his head and shoulders further upwind and let the bar out as the kite lifts. His front knee is slightly bent, and as he pushes his back foot away he breaks at the waist to keep his body upright. With weight on both feet you can see that his entire edge is in the water.
Half Way
Carving all the way until you are literally across the wind will place you in the perfect position to complete the move. As you can imagine once you’re here you won’t have any time to think before you gracefully sink back into the drink. The good news comes from 2 things. Firstly if you have got the kite up to 12 o’clock with the bar sheeted out, it will have flown all the way to the edge of the window, so therefore be right above you, waiting to support you. Secondly if you have carved hard, there will still be resistance against the board as it turns back towards you. This means that you can pull the bar in and push against both feet for support.
Pic B. You can see that the rider has carved all the way on the edge. With the board banked over and the kite high the tail does not slide, which would move him away from the kite. As Christian comes around past the 180° mark he pulls in on the bar and moves his weight forward, bending his front leg and pushing his hips towards the nose of the board.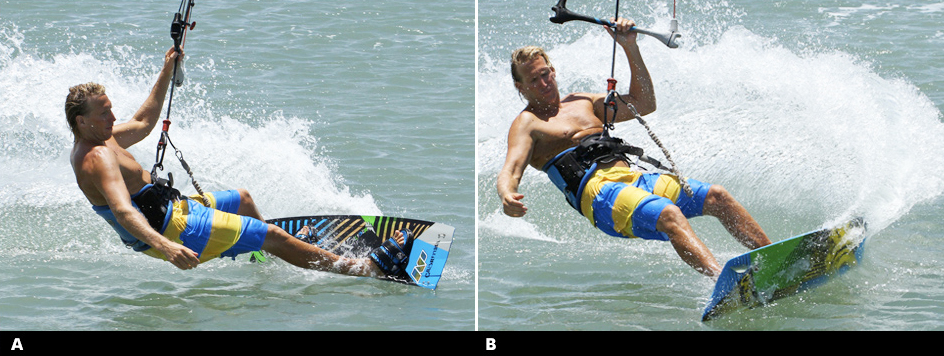
Dig In
Assuming that you’ve got this far now is the time to get dynamic. Your sits is to dig the nose of the board into the water, throwing your weight over it and your front foot, whilst pulling in on the bar and turning your head and shoulders. As the power comes from the kite the resistance from the front of the board should be enough that the kite will pull you around.
Pic C. With the kite above him, the rider pulls down hard on his bar hand whilst throwing his weight forward onto his front foot. At the same time he turns his head down and around to sink the nose and lift the tail – the rest depends on the kite.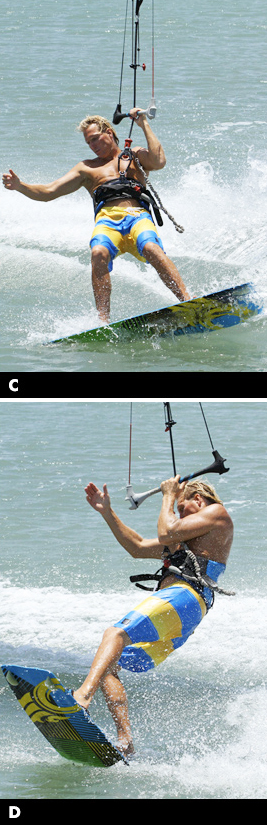
And Around
When the power from the kite arrives you need to be in the previous picture’s pivoting position. If so the kite will lift you up from the water and then pull you off downwind. If however you don’t get your weight forward and therefore have too much of the board in the water the kite will lift you off the water and you hopefully land a couple of feet downwind and sail away.
Pic D. With the bar held in tight, the kite has lifted the rider and he is now up and over the board. With all his weight pushed over what was his front foot, he leans back against the pull of the kite and allows it to pivot him around the sunken nose. To stoke sure that he doesn’t get pulled onto his face, the rider locks out his front leg, which will force the board to follow the pull from the kite.
Top Tips
- It’s worth trying to learn this in two stages. First work on getting your carve; as once this is in the bag you’ll be able to think ahead and throw yourself forward into the pivot.
- The carve must be just that, a carve any sliding and it’ll be goose over. So practice carving as far as you can, moving the kite up to 12 o’clock and letting the bar out as it drifts.
Common Problems
- Best start with the problem of sliding the tail out, as we’re all too proficient at this. If you are “loosing” the tail as you carve up it’s because you’re subconsciously going into slide turn mode.
- This means that as you carve you are bending your front knee so much that all your weight is over the front foot, which results in the tail sliding as you push the back foot away.
- Try to move your hips into a central position in between the foot straps, but no further forward. Also concentrate on edging the board so that you push through your back heel against the board, not your foot over the board. If you’re falling in downwind of the board, it will be because the kite is pulling you.
- Be sure to drift the kite up to 12 and let the bar out as you go. Also try to break at the waist as you turn so that your upper body stays upright. If you are falling onto your side as the kite pulls and board pivots around, make sure that you turn your head and shoulders to lead the pivot.
- Finally if you hop up and out of the pivot, it is because you have too much resistance, too much edge in the water. Make sure you get all your weight over the foot and roll back against the pull.
Keystones
- Drift kite up towards 12
- Release front hand
- Good solid carve off both feet
- Pull on bar, throw weight forward
- Lead pivot with head and shoulders
Dark Slide 1 Hand
The Dark Slide is definitely one of those tricks that appeals to a lot of folk, whether kids in boots or the more laid back lady and gent usually content with some boosting. Maybe there is an element of show boating that lies concealed in all of us, and who can argue that gliding effortlessly over the water with but a corner of your board resisting doesn’t look at least vaguely cool – rest assured a glimpse of a Dark Slide can bring out the exhibitionist in any of us.
We’re going to reach to the one handed variation here in this article. As you know already there are some pros and cons to executing any trick with all your weight potentially committed to one side of the bar. Concentrating on the positive, using one hand to grab can really help you get your body and board into the correct position. Hence although we’ll take you all the way through to the landing (and there are many, deliberate or otherwise), consider this article as much as how to learn the position and gain confidence without even sailing away and claiming it.
The Approach
Pic A. First off let’s consider kite position. We’ll opt for our usual 1 or 11 here. If your kite is too low you’ll plough straight into the water as you “flip” the board, if it’s too high you’ll get lifted either as you commit or as soon as you’ve got into position. So your best bet is a happy medium where you’ll have enough lift to stop you falling into the water, but enough pull that you can stay on your flipped edge and resist for longer. Next question is trim. You do need some power in the kite to less this, as it’ll support you better.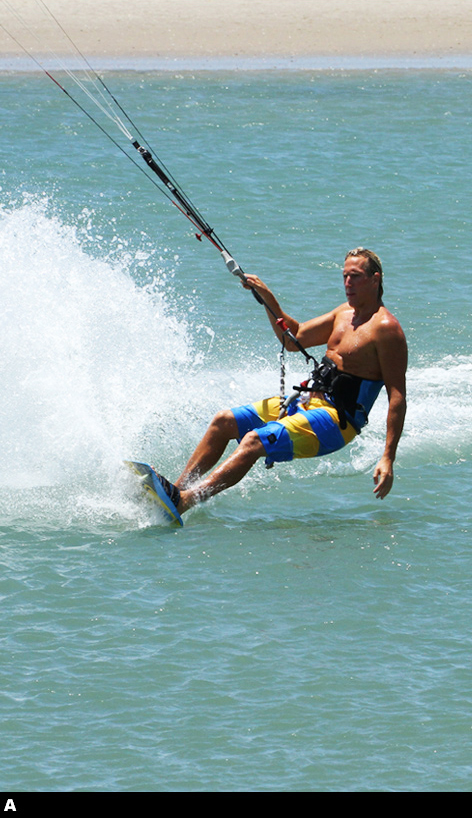
Hence we won’t be going straight into the looping part. You also want to be able to release your front hand without the kite sending back. For this having the sweet spot trimmed out away from you will help. If you have your sweet spot dose you’ll have to pull on your back hand to keep the lift and this will rooks the kite move quicker – not ideal. You need some speed on your approach so you don’t want to be hacking upwind on a huge edge, rather a relaxed across the wind. This will also allow you to turn up into the flip, without losing all your speed. So check again on picture number –A . On entry you can see that the rider has speed and has already taken his front hand off the bar, which is trimmed out and away from him. He has turned up onto his edge, hence the spray, with his front leg extended, so weight back over the tail of the board. His back hand is centered on the bar so as not to move the kite too quickly as he’s on a 9m.
The Sit & Hang
Pic B. This is where it starts to get more dynamic. You need to get your weight off your feet and hanging off the kite, fully committed into the harness. This is because you will flip and trip the board into the slide, you won’t be popping. When you do this you must get your hips back over or behind your back foot. The simplest way to commit is to suddenly bend your knees and sit into the harness. As you do this you must keep the power on in the kite, so now having your sweet spot trimmed away from you really helps. By un-weighting the board you will be able to move into the next stage without having to pop the board off the water which would make it difficult to resist against the edge when it digs in.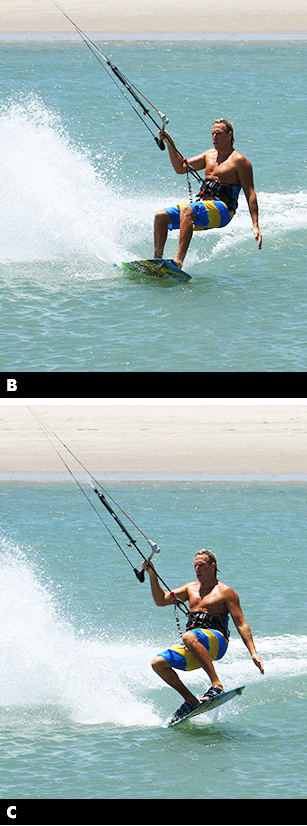
Toe Edge Trip
Pic C. The previous two stages allow you to get here – this is the moment that you’ll move across. Before thinking about what you must do, take note of the rider’s position in this image. His weight is way back, lifting the nose of the board into a wheely. His shoulders are leaning back over his back foot too. His bum is down low over the back of the board. And his knees are now across downwind of the board! At the moment however his body is still upwind of the board.
Your sits here is to trip over onto your toe side edge, but with the front of the board lifted so that only the rear toe side will be left in. This means that you’ll only have a bit of resistance, which is manageable to hold. If you don’t get your weight back, you’ll roll onto most off your toe side edge and come to a rather abrupt halt! Being fully supported in the harness here is key. The rider has dropped his weight lower and lifts his feet to completely un-weight the board, thus he can move his weight across the board by pushing his knees and hips across and literally tripping himself on his toe side edge. If he still had weight on the board, he would end up carving downwind – so if your board starts to carve take more weight onto the harness and if need be your back hand.
Flip & Grab
Pic D. You can see here how the back of the board digs in as the rider rolls across the tail and this trip the board onto the other side – the Dark Slide side! At the same time the rider pulls the front of the board up towards hiss with his front leg and grabs the heel side front fin. This will make it easier to hold the “slide” position as he is pulled by the kite. Once you’ve got the grab hold on tight and the rest should be fairly automated. It is worth noting here that he has not thrown himself forwards towards the kite. He is using the edge of the board to trip him, and from there the kite will pull him.
Hold and Pull
Pic E. This is the moment that the hand comes in handy, if you’ll excuse the pun. If you’ve got a good hold on the fin then you have two points of resistance. You’ll be stretched here, with the kite pulling you, whilst the board will be dragging behind you. Using your hand to keep the board pulled in close will keep the minimum of board in the water and make the whole trick simpler to control. On your first attempts it is quite likely that you may pull too much on your back hand and thus the kite will go up quickly and you’ll either loose power or get pulled up off the water. In both cases your best bet is to just let the bar out and drop softly into the drink.
You can of course loop the kite, but if it’s gone a long way back it may come through very slowly and with a lot of power. So bailing by letting the bar out until you know where you are is a good way to start.
Enjoy the Ride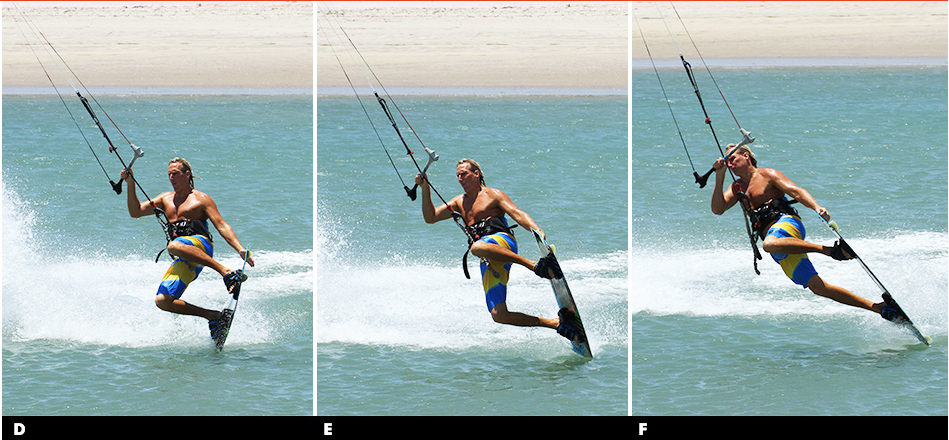
Pic F. If however your kite hasn’t drifted too far up you now need to relax and go with it whilst supporting yourself on the bar. You can see that the rider has been pulled over and extended into the slide with just the tail of the board edging through the water. He’s pulled the bar in for support, which will speed the kite’s journey up and across the window. This will hold him up but there is a point when he’ll feel the support go. This then is the escape stage of the dark slide.
What to do next?
As we mentioned when you’re learning this there is no need to go straight for a loop, step by step will give you the feeling and timing, and with practice you’ll be balanced and ready to loop. So to start enjoy the slide and see how long you can make it last and as you feel the support go sheet the bar o. and drop. As you get more confident you can get the front hand back on the bar and redirect the kite forward, so that you get lifted out of the slide and land going in the same direction. Crikey with more practice you can even add a front or back rotation. However for the classic bona fide Dark Slide you’ll be gagging to add the kite loop I pull you up and out. It’s the timing and your wrist that will benefit you here. Timing wise it’s that moment you feel the support going. Too much after that and the kite will go a long way back and can lead to some fruity loops!
To get the kite looping a tight arc to reduce power you need nest only pull hard on your back hand, but also twist your wrist. Imagine that you’re trying to push down with the outside of your palm and push up with your palm – this way you’ll get some good leverage on the kite. If however you are very powered up it can be a good idea to get the front hand back on the bar to help. Whether you transition or keep going is up to you! To transition loop the kite a moment later and keep the kite looping for longer so that it pulls you back. To carry on stop pulling as the kite comes through the loop.

Top Tips
- It’s all been said but we’ll add flat water and space. This won’t work without speed so you need power in your kite, hence work on the first steps and forget the loop until later.
- Also work on the balance of where you start your kite, as if it’s too high you’ll be lifted too early and stop very quickly. Now have a good look at the Sequence and Videos.
Common Problems
- If you’re falling onto your chest, chances are that you’ve got all your edge catching in the water, pull that front foot up and get your weight back on the approach. If you net trip the board. You are standing on the board, so sit back into the harness.
- If you start to rotate into a back rotation, you’re either turning too far into wind or your looking upwind – look down to where you’ll be going. If you get pulled up into a large kite looping too early.
Keystones
- Speed across wind
- Sit back and edge up
- Drop into harness and se-sight board
- Push knees across board and trip tail
- Grab board and support weight on bar AND
- Either sheet out or loop
Toe side front Roll To blind with Ole
We hope you are grooming well with the aid of our articles and learning every trick carefully. With ever learning day, you are going to be perfectionist in this sport. We always emphasize on doing every trick with right way and right balance, so that your every step of learning should be placed on right path. The trick which we are going to learn today has a better name, but for the moment we’ll stick to the descriptive version. Fundamentally this is a pop trick, but a subtle drifting up of the kite is more than tolerable to get you easiness to learn this trick. For those of you confident with your toe side edge this is a great trick and an inspiring step on from the toe side pop to blind which is a good prerequisite as you need both a decent pop from your toes and the blind that very same side. If this will be doing it first time, let us advise again that it will be easier to pop from your strong toe side to a new and unvisited blind rather than try and pop from your weaker toe side. Popping well from your pinkies is the key here.
The Approach
We need two things in order to pop from your toes, first speed and then a good solid edge. With the board fizzing over the water it’ll be a doddle to get it up and you’ll have momentum when you get it around. Looking at Pic A. you can see that the rider pre pop. First off the rider has his bar trimmed in close so that he can get an aggressive edge and hold the power with two hands without being pulled up onto the board. This way he can turn his head and shoulders away from the kite and stand up onto his toes, hips forward, driving the board between him and the kite. The rider has shifted his weight back on the board ready to pop, as this will help him add tension to the lines by edging harder. However if you need more speed you must keep the front knee bent and the board trimmed flat before shifting your weight back.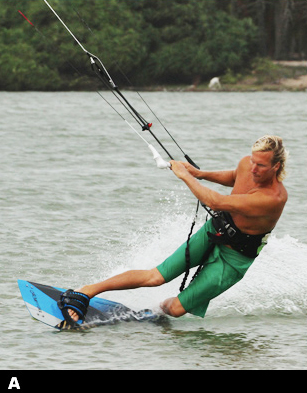
The Pop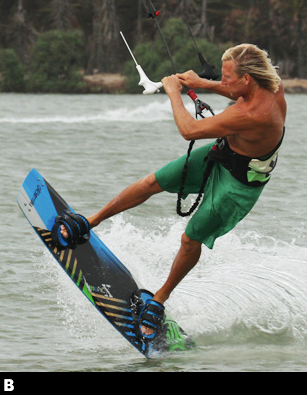
The assumption behind popping is much the same as from heel side – once you have enough speed, carve 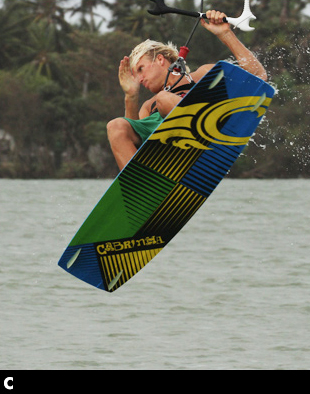 up hard and stamp off the back foot. Though bearing away and then carving up from toe side is no simple task, so for the same sort of effect shifting your weight back will dig the tail in and turn the board upwind on its rocker. The trick is to be quick, shift your weight back and stamp – wait and you’ll lose your speed and nothing will happen. In Pic B. the rider has leant his weight back and simultaneously drifts the kite up slightly from 11 o’clock to give him a bit more lift whilst stamping down hard by explosively straightening his back leg. As he pops up he turns his head and shoulders down and around, initiating the front roll.
The Rotation
The rotation will be very quick as with every front roll from toe side. This is handy, as you’ll need to spin quickly to allow for the extra twist to blind. Aim to keep two hands on the bar until you are coming around the first 360°, as this will keep you more upright and lead to a smoother landing. Looking at Pic C. as Christian reaches this point you can see that he is leading with the head. This is important; as he will know when to initiate the blind once he spots his landing. The rider here also has his knees bent and board up to help encourage a quick rotation and he keeps the bar in for that little bit of extra float. As he focuses on where he’ll land he releases his back hand, turning his head and shoulders down and around under the bar so that he can get his body around to blind whilst the board is leading. This way the board will be beneath him and ready for touchdown.
Throwing Blind
We can see in Pic D. that the rider has “thrown” the blind with the result of turning his head and shoulders down. As he drops his feet and board are leading the way. Whilst turning, he tweaks the kite down by pulling gently on his front hand. This will guarantee a bit more speed and forward momentum for the Ole, and is necessary if you sneak the kite up for takeoff.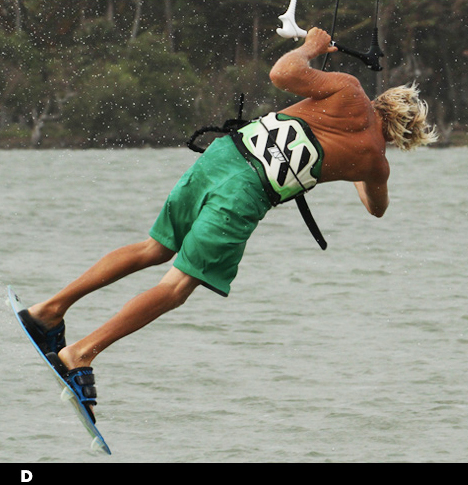
 Landing
As with all things Ole or pass you’ll need to land blind on a flat board heading at least a tiny bit downwind towards the kite. This way you’ll have no tension on the lines and so the Ole should be a walk in the park. Pic E. the rider lands upright over his flat board, having thrown the blind enough to land slightly off the wind. Try to keep your head up, as this will prevent you from breaking too much at the waist, which can in turn force weight onto your toes and put tension on the lines! If anything you want to be leaning on your heels. Landing this way the lines will be slack and therefore the bar will be close to you, not twisted around leading the way and pulling you over.
Ole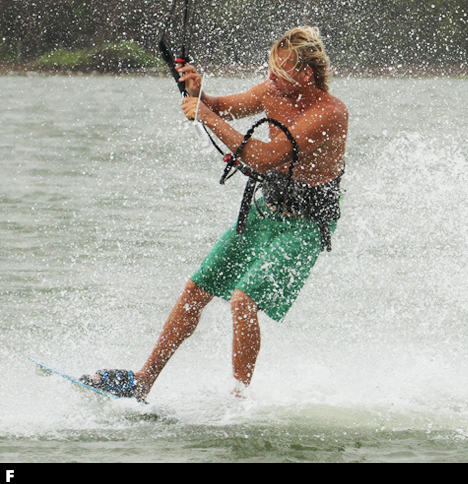
Landing upright on a flat board heading towards your kite sets you up perfectly for the grand finale, the Ole. Pic F. Standing over his board the rider can now push the bar upwind and around in front of him, so that the blind miraculously transforms back into toe side. Once the bar is across get both hands back on it, sheet in and ride off with a hefty grin on your face.
Common Problems
- If you’re not getting enough pop from toe side try sailing more across the wind before dropping your weight back and popping.
- If the kite is falling out of the sky as you land make sure that you are both popping hard into the front roll and that you give the bar a tweak forward to keep the kite from drifting too far up.
- If you slide under the kite on landing try throwing your blind more aggressively by turning your head and throwing your free hand around.
- If you’re getting pulled over & catching your heel side edge, you’re not landing enough downwind.
- If you can’t Ole and the kite pulls you over you’re edging on your toes whilst blind, so make sure your weight is on both your feet, biased towards your heels.
Keystones
- Speed on your toe side edge
- Change weight to back of board and quick pop into fast rotation
- Release back hand after 360’to throw blind
- Tweak kite forward
- Land flat and downwind
Sent Back Roll Indy Grab
Welcome to kitesurfingtrick.com. Our Endeavour is forever to come up with most excellent kite surfing tricks. Indy grab is an exceptional trick, which requires your both legs to be lifted thus this grab makes your back rolls feeling fresh. Riding boots are easy to reach and grab in this trick. Even if you are not riding shoes, the Indy is again the number 1 option to stretch your back and feel great with adventurous Indy moves.
Some of the basic rules and principles, which we have gathered in this article, are as below. This will allow you to do it with exact way with no harm to body.
1. The very first step and take off
First in this trick rider comes in a resisting on a good edge heading firmly upwind with the kite at 11 or 1 o’clock position. Rider’s front leg is extended and pushed forward; hips are forced back towards the end of the board, shoulders are leaning back and rider’s back leg is bowed.
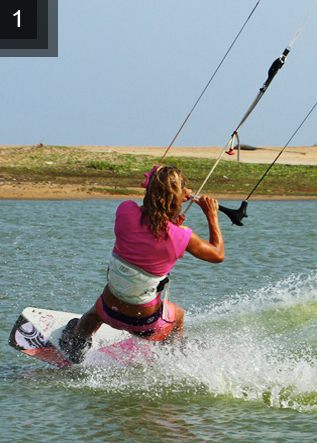
Image number – 1
Here is the first step and in this picture the rider resisted with good edge & sent the kite pretty hard from 11 o’clock so that the pull up will come early on. Now at reaching 12 o’clock position rider will stamp up on back leg in popping position and there pull the bar in. Rider pulls the bar in to stop the kite’s movement, avoiding it from going further back. Though rider has carved into this rotation, however rider hasn’t thrown head over front shoulder.
This would certainly aid you to obtain a smooth rotation righter than an unrestrained spin.
Image number – 2
Okay! Now on second step first extend then lift. You must position your body as soon as you depart from water, if you wait extra then further you will spin and the smaller amount of time you will have. Please remember, this also doesn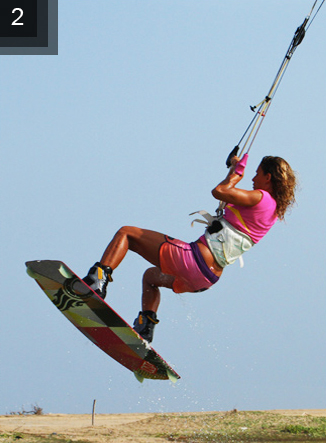 ’t mean that you must be holding the board as soon as fins departs the water, however if you place your body in right position then grab will be trouble-free to obtain. Rider lifts both knees up and this helps with slowing the rotation down. Also you can’t toss your head around into the rotation if you are seeking a firm grab.
Image number – 3
If you succeed in carrying you’re both knees right up into your chest height then the grab must be a child play for you. The blockages with the Indy are your control and the kite. Here the kite lifts you and strap up holds and you will be planning to aim the right for the middle of your board. Bring the board up towards your extended hand; please let your stomach and legs do the work here as you can’t bend down with such force. Permit your head & shoulder to rock back into a comfortable sitting position as your knees comes up. You can also observe here that the rider hasn’t rotated much since the last image. Rider is rotating slowly and is quick to get the board up.
Here, while seeking for the firm grabs keep your head between your shoulders and also keep the rotation slow. In this position you will use a large time keeping the bar pulled in with only your front hand, the kite will simply move from behind you to somewhat in front of you.
Image number – 4
Hold it tight, once you get the grab. Slower your rotation & try to hold the grab as long as possible. 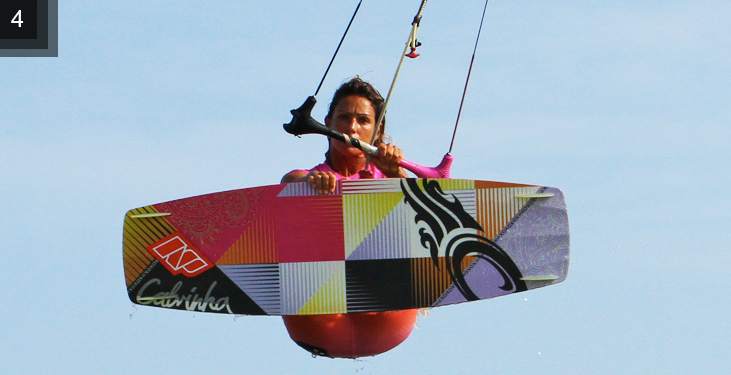 Enjoy it; it’s very cozy as you can also see that rider’s position in the air is almost the same as setting on beach. If you have sent the kite solid and frozen it above you while take off, you must be able to settle down and except you sense that kite dragging too far forward, oppose the enticement to look over your shoulder.
Image number – 5
In this position, If your rotation is controlled and the kite is not too far forward you can hold the grab until just before landing. You would eventually need to turn your head over your shoulder to make sure you complete 360 degree and perfec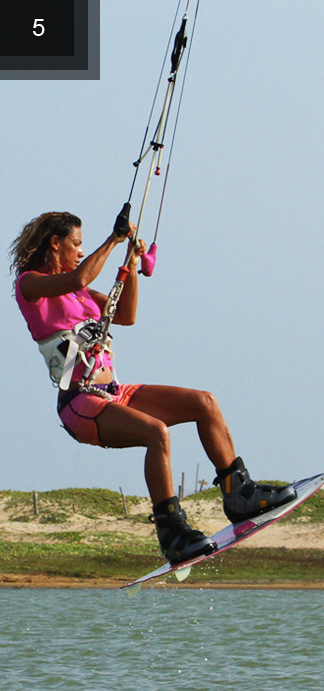 t landing. Mark your landing and obtain the board pointing downwind.
When you discharge the grab, try to get both hands on the bar and provide it a good jump to aid you land downwind.
Top Tips
- Always begin with some back rolls, focusing on the send, upward take off and slow rotation and after that start to take knees up and roll back in your yoke.
- If slow rotation is your problem, then try looming it as you would for a back roll transition, and also with low speed
- you will see it much easier.
- Also have a close look to images
Common Problems
- If you are over rotating your back rolls, ensure that you don’t carve up exceptionally during your take off.
- You must go from the edge that you have approached with and then kick up and around.
- Ensure that you dive the kite for the landing as this will discontinue your revolution and pull you off down wind.
- Ensure your hands are centered on the bar and also keep in mind to send the kite and further it goes back, then it needs to return back. There would be a perfect balance as per kite’s size.
Keystones
- Always send kite positively
- Lift knees and rock then get ready for the grab
- Fine solid edge with straight front leg & back leg resisting
- Pop up into the back roll
- Do turn your head and jump to accomplish rotation
Here is a video that shows how to spice up your back roll with an indy grab