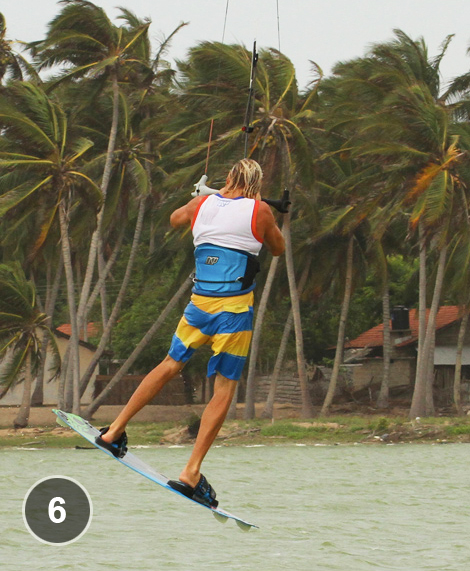
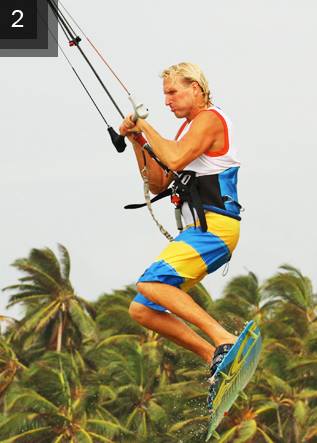
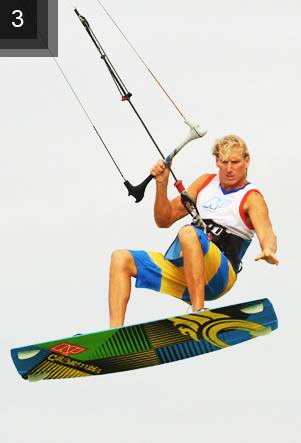
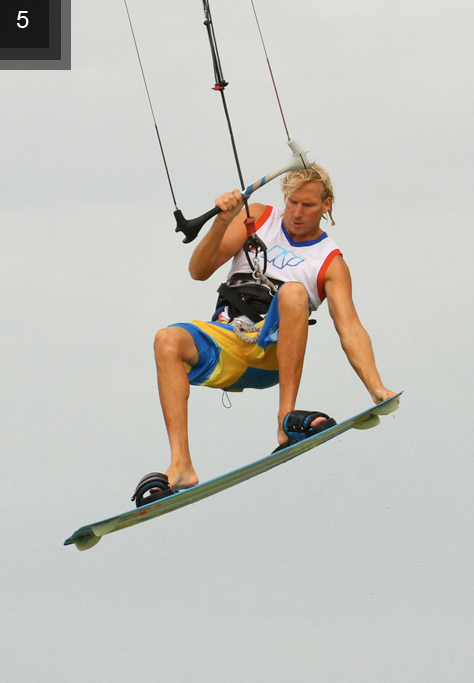
Kite Loop

 The kite loop is an extreme kite trick and you really need big balls to even dare try to perform this insane trick! As an “advanced” kite surfer this is however a trick you most likely will try to perform at least once! If you’re unlucky you might hurt yourself quite bad and will probably not be so keen on trying again! So a good theoretical knowledge about this crazy trick is an advantage before you try to do it practical. Follow this guide and you minmize the risk to crash, but first some ground rules.
- Make sure that you are over powered to the limit using a relative small and fast(!) kite, 5-9 m2 is ok. I use a Royal Era though most new kites are fast enough.
- Be sure that the water is deep enough to not hit the bottom in case you crash.
- It’s best to start doing kite-loops with longer lines, don’t go below 20 meters during your first attempts to make kite loops.
- Have a stand by rescue buddy within reach!
Ok, so the preparations are done and it’s time to loop! Follow these steps:
- Jump as high as you can and when you’re just about to reach the peak, twitch the bar’s back side (if you going left, pull the right side)
- The kite will pass twelve and begin to loop.
- As the kite is about 270 degrees through the loop you will eventually start to fall and the lines might slacken a bit. Now don’t freak out. As you fall the lines will apperantly become stretched again and you´ll now be able to fulfil the last 90 degrees of the loop and the kite will catch you again.
- When it comes to landing, point the board fully downwind!! You´ll land with high speed and will not be able to land with your board pointing a upwind. Doing this can result in a twisted knee or two. Looking over your back shoulder as you loop will help you twist your hip and get you prepared for a landing with the board pointing downwind. Also avoid land on choppy water.
- That’s it! If you done everything correctly you should now be back in the water in one piece!
Good luck and don’t underestimate the use of safety equipment when you´re doing kite loops! Helmet and impact vest can save you months of boring rehab!
Front Loop Grab
It was recently brought to our attention that we had yet to cover one of the first and potentially simpler of front loop (or front roll) variations – the grabbed sent front loop. We’ve talked you through the inversion, the one foot and all manner of transitions and pops, but this issue we’ll set the record straight and deliver an achievable and yet utterly stylish grab which you can add on to your much loved front loop. Adding a grab onto any move that you already have in the bag is a matter of both confidence and making sure that you have the basics right, so we’ll have a look at what is needed to secure a comfortable and safe front rotation whilst enabling the back hand to come off the bar and grab the board.
The set up and take off – Pit A.
To learn this, you’ll best keep everything as close to your standard default front as possible, so that you’re adding a grab, not learning a new move. However there are a few points in the set up that you’d do well to follow and we’ll look at the rider as an example. Firstly if you don’t already, you should centre your hands on the bar, so they are resting either side of the centre line. This will stop any unwanted movement of the kite when you grab. With your hands together, sending the kite may seem a little sluggish so be sure to use both hands in a push and pull movement.
Secondly don’t be afraid to send the kite as hard as you normally do. If the kite travels past and behind 12 o’clock, then pulling and supporting yourself on the bar with your front hand won’t result in an immediate diving of the kite. 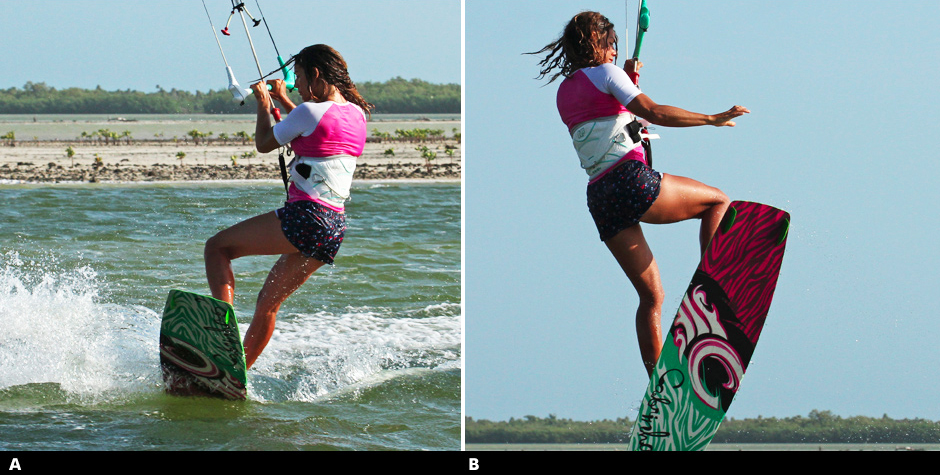 Thirdly do trim the bar at least down to half way, as this way you are less likely to stall the kite on takeoff and during flight, which hopefully means that you’ll execute an up and down jump rather than flying downwind at speed.
Finally, although you must complete your rotation, it will be easier to grab if you’re not spinning too quickly. So to slow your rotation down just a tad doesn’t use your head to turn you on takeoff but rather just your shoulders and the kick off. You can see the rider is still looking forward as she begins to throw her shoulders down towards the nose of the board and stamp away against her back foot edge.
Grab Prep – Pic B.
The secret to getting a grab in during the short time you have is to go for it early. Looking at the picture you can see that the rider is wasting no time in releasing her back hand and lifting the back of the board up towards her as soon as she takes off. You can also see that The rider is looking towards the tail of the board where she intends to grab it, so she can cirri her hand at the target and bring hand and board together. This would not be possible if she had thrown her head around to look over her back shoulder in order to get the rotation. Having released her back hand so early she can already pull on her front hand a little bit, so long as she did send the kite back past 12 O’clock. In this jump the rider is aiming for a boned out grab, hence she just lifts her back leg, but you’re quite welcome to lift both knees if it feels more stable.
The Grab – Pic C.
The moment of truth! Your easiest and most reachable options for the grab are either the heel side edge by the fin, or the tail itself. It’s a great idea to practice this on the beach without your kite to find out where is most natural for you. Holding a grab, rather than a little tickle is a good game plan, as you’ll have more balance with both hands occupied, so literally grab the board and pull it towards you. Once again to bone it out you can straighten the front leg by pushing your front foot away from you whilst holding the tail in close. In the picture you can see that The rider is still watching her grab, which keeps her rotation slow, and she has the bar held in, which keeps tension on the lines and the kite under control as it gently moves it above her.
 Landing Prep – Pic D.
If you’ve held the grab and controlled your rotation speed from the take off you will need to initiate and prepare for the landing by completing your rotation. The first and most important ingredient is your head. The rider has turned her head to look around towards where she will land. The old adage of where you look is where you’ll go has never been more true. As your head turns your shoulders will follow, and as long as at least one of your knees is held up so will your hips and board. With your body turning towards the expected landing strip you need to maintain tension in the lines so that you have enough float to get around, and as you can see The rider still has her bar pulled is From this point onwards as you drop slowly down the harder you pull on your front hand, the more the kite will pull you downwind toward a soft landing. Our suggestion here would be to release the grab and get both hands on the bar so that you’re confident with the dive and can then control the power on landing. As you drop the grab, allow your legs to straighten underneath you so that your landing gear is down and that you have a platform to land on. If you keep your knees up, you’ll land with the board in front of you, not underneath you and you’ll be unlikely to smoothly sail off downwind. And if you have boned out the grab remember to lift the front leg slightly as a tail first landing will be a lot more pleasant than a nosedive.
Top Tips
- As already mentioned playing with the grab on land, whether rolling around on the beach, your lawn or in the lounge will train you to grab without too much thought.
- Once you’re on the water start off by throwing down a few front loops without the grab so grab as soon as you take off – if you wait you’ll miss Now check out the sequence and videos – good luck’ that you’re feeling confident.
- Your next step is to go the moment. For a quick tap of the board and then finally hold the grab.
Common Problems
- If you’re struggling to find the time to grab, your rotation is too fast.
- Practice some front loops, still using your rear leg to kick off and your shoulders to dip forward but keep your head perpendicular to your shoulders – this should help. Also go for the
Keystones
- Good edge and positive send
- Kick hard but don’t turn head
- Go for grab early, immediately after take off
- Tom head to complete rotation
- Drop legs and dive to land
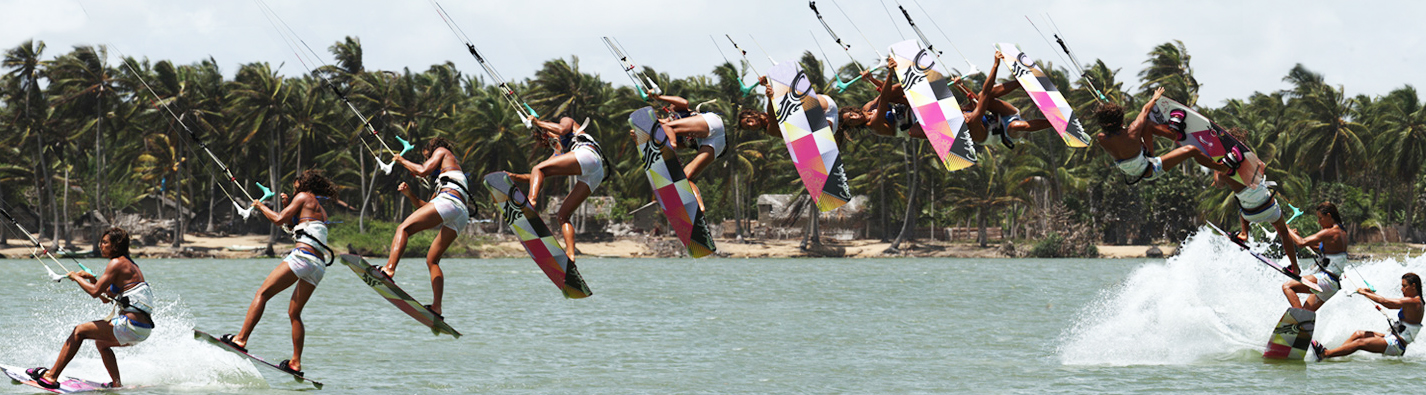
Nose Grab Front
In today’s world we have made it very easy for everyone to be more skilled in kitesuring. Now information is easily accessible on internet and people paste their experiences in the form of blogs, articles and share the best way to enjoy this sport.
So in continue to that here is our guide to a popped front roll with a Crail or Nose grab thrown into the mix for extra spice. The grab itself is done with the back hand reaching forward and touching, stroking or preferably holding either the nose of the board or as near as possible on the toe side way up near the fin. It goes without saying that you’ll already need a competent popped front to nail this beauty, as the more powered it is performed with, the better the axis of rotation will be and thus all the sweeter the grab will look. Let us remind you of a few vital key moments for a decent popped front whilst also sneaking in the grab.
Coming In
You need to approach in the right way if you want pop, as it will not only help in getting up and off the water, but also the rotation and the landing.
Image A. the rider is perfectly set up for some hefty pop. With her kite parked just below 11 o’clock she pushes the nose of the board off the wind and flexes her back leg to flatten the board, increase speed and move towards the kite, allowing it to drop back a bit in the window. At the sometime she has all her weight, hips, head and shoulders dropped back over and behind the back foot. Her hands are centered and she has her bar trimmed in enough that she can get into this position without pulling too much tension onto the back lines. We always recommend moving your front hand over the middle of the bar, centre line between your first two fingers if you can. This will allow you to keep the power on throughout the move without the kite diving down.
Take Off
Going into a popped front rotation it is all too tempting to drift the kite up and wait for something to happen, which will inevitably lead to a dangly and uncontrolled spin under a very high kite. It’s a mast to keep the kite flying forward and get your height from a very aggressive pop. Breaking the pop and rotation apart, even just by a millisecond will make all the difference. If you concentrate on going up before throwing your head around and shoulders down you will get enough height. If you dive straight into the rotation you’ll not extend up and rather fire yourself down towards the water.
Image B. is showing the rider popping up hard. Having carved rapidly back up onto her edge with her weight still back, she has now stamped down hard, pushing her back leg down against the edge of her board and extending her body upwards for maximum pop. She keeps her front elbow tucked in and bent to prevent the kite from drifting up and the bar is still angled towards the kite as if she were riding. The only give away showing a prospective front rotation is the bending and lifting of the front knee.
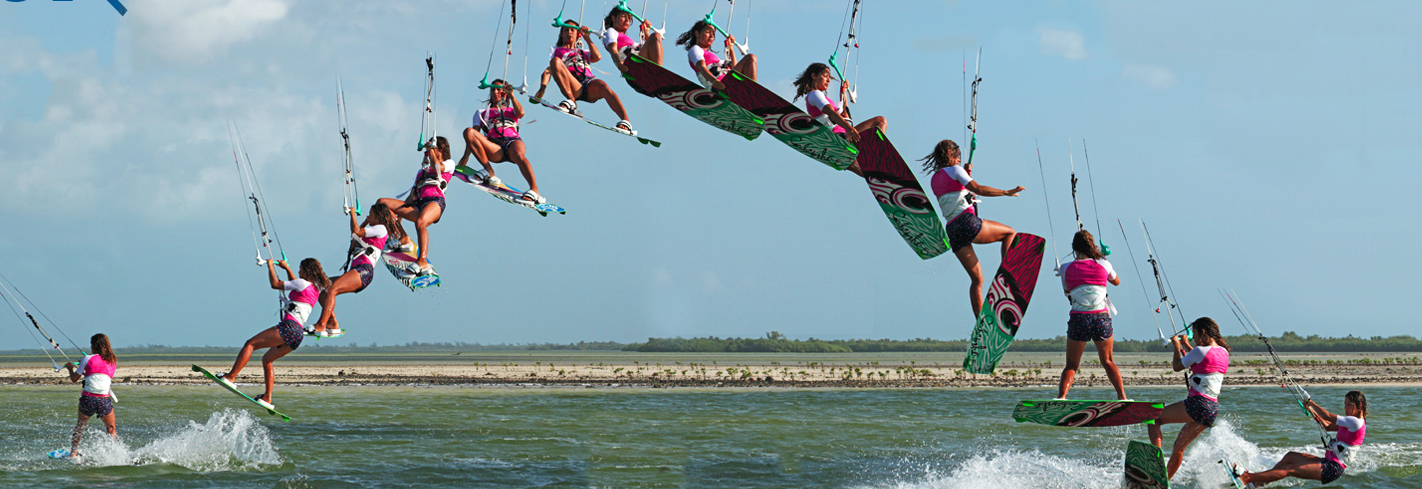
Rotate and Release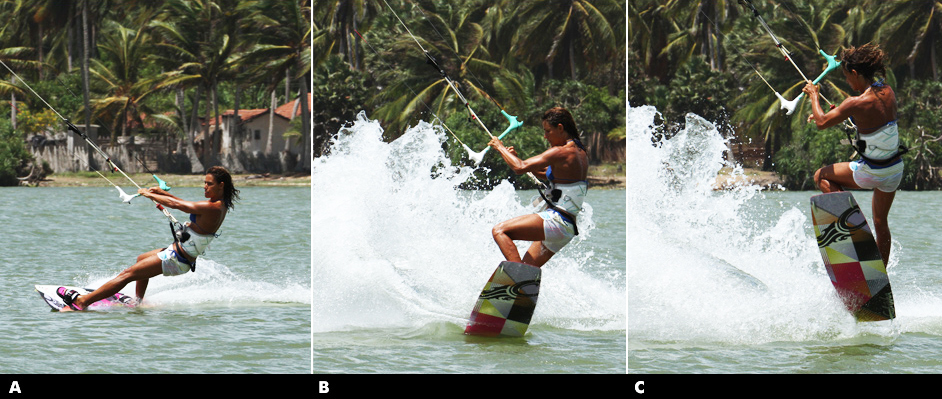
When you relies that that you’re on the way up you need to get spinning and think about the grab. You won’t have long in the air so its chop chop. To start the rotation lean the head and shoulders forward, so that you are going with the pop. By lifting the front leg and allowing your body to be kicked up you will start to rotate from the back legs impetus. Turning your head to guarantee spin will help, but if you whip around too quickly it’ll be tricky to get the grab in early enough. As for the grab you need two actions, release the front hand and start to reach forwards, and you must bring the front knee up and across your body to bring the nose of the board within reach.
Image C. the rider is just off the water and she already has her front knee up and across in front of her. She resists the temptation to pull her back leg up and keeps it straight – with it extended the nose of the board will tip even closer to her. She allows her head and shoulders to tip down and forward into the rotation as she fully extends up and keeps the bar pulled in. Her back hand is reaching down towards the already well-positioned board.
The Grab
Early grab will give you two advantages.
- The first is purely aesthetic, you’ll be able to hold it for longer and thus it’ll be more noticeable.
- The second however is more functional – once you have the grab you can pull the board in, making you small and then concentrate on getting around the rest of your front roll.
Theoretically at least, if you get the take off right the grab should fall into place.
Image D. As a result of all the hard work the rider has got a pleasantly satisfying pop, good height and controllable slow rotation. This allows her to get her hand onto the nose area before she has rotated 90°. Keeping the front knee up and releasing the back hand early were key. Keeping the bar in and power on guarantee that she won’t just drop out of her rotation, but will continue to be pulled forward.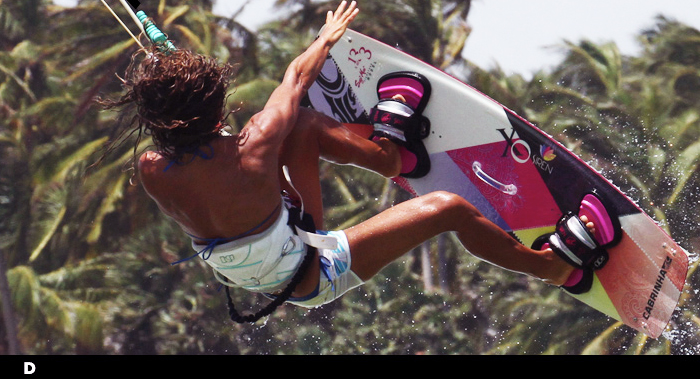
The Money Shot
Once you’ve got the grab, hold it. As stated before, this isn’t just for poseur status, massaging your ego or blatant show boating, but with a solid hold of your board you can pull it in and turn your head and therefore finish your rotation.
Image E. With her grab held the rider turns her head to spot the landing. To speed up her rotation she has pulled both knees up whilst still holding the bar in, keeping the kite moving forward and pulling.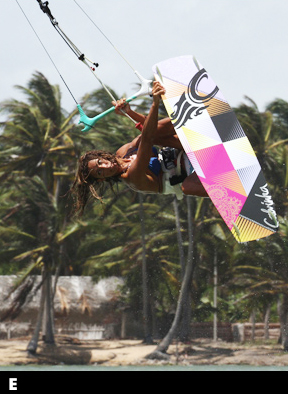
Touch Down
Aim to hold your grab for as long as possible, until you complete the rotation. You’ll find the timing quite natural, as you’ll need to let go to allow your board to drop under you as you start to drop. Assuming you went off the wind in your approach you should come around to a comfortable downwind landing towards the kite, which will kill the power in the kite and make tutu comfortable stomped landing.
Image F. You can see that the rider has released the grab and lets her legs and the board drop down beneath her for a solid reception. She still has pulled in so will land following the kite with her weight squarely over the board.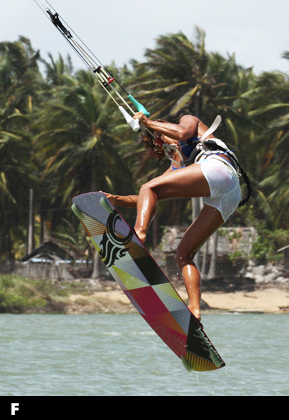
Top Tips
- A good pop and confident front roll are key, so before throwing yourself up into one of these get warmed and ready with a few two handed front rolls. When you’ve knocked out a few high and controlled ones you’ll be more confident to go for the grab.
Common Problems
- If you’re struggling to reach the grab there are two solutions. Firstly if you can already nose or nearly nose (troll) grab the board in sent jumps or front rolls try popping with the kite higher, or even drift it up a tad
- With a higher kite and a more vertical rotation it will be easier to reach the board. Secondly if you’ve never tried a two grab before and you’re finding it tricky here, revert to getting the body movement right in a sent jump and then a sent front roll. Videos and Sequence for the entire visual path….
Keystones
- Bear away with weight back for god pop
- Extend up fully
- THEN release back hand and start rotation
- Bring front knee up and across
- Hold grab and turn head
Nose Grab Jump
Today we have this new trick which is Nose Grab Jump. Jump variations and grabs are always welcome as they add something to the most fundamental of moves without, hopefully, the need to hammer yourself too much in the process. It’s always a delight to see someone boosting and banging out numerous different grabs, making each jump different and the whole performance more pleasing to the eye. This time around it’s the nose grab, the most opposite of the most common but deservedly adored tail grab. This one is a great way to show off your board and any promotional stickers adhered to it as with the majority of jumped grabs you’ll be grabbing the nose with your back hand whilst keeping the kite flying and yourself hanging with your front hand. All that you need is a half decent take off and if you’re already comfortable grabbing anywhere else and freeing your back hand then you’re ready.
After Take Off Pic A.
Assuming that you can jump directly after take off check your balance and then casually grab the tail. To grab the nose from your big chill position with both knees up will be very difficult unless you’ve been hard at the yoga.  As a result there are a couple of points worth your consideration.
No-1 is a good positive kite send, with a decent pull and push on the bar to get the kite moving back past 12. Going up with the kite behind you will rock you back and as a result bring the nose of the board up. Secondly bring your front knee up towards you. Thirdly leave your back leg straight. And finally aim to get the grab in on the way up, before you redirect the kite so that the bar is not in your way. In the photo straight away after takeoff, the rider’s kite is behind her and as a result her legs are penduluming up in front of her, much like those early days of trying to jump but forgetting to bring the kite forward. Her shoulders are leaning back and her front knee is lifted.
Go for it Pic B.
As mentioned, going for the grab early is key to reaching the nose of your board without being made of elastic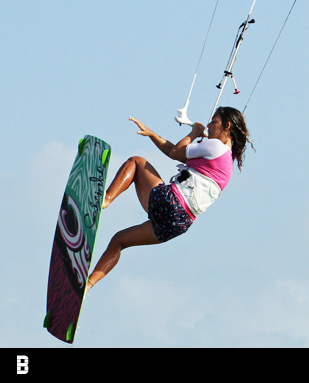 . In this image the rider extends her back arm towards the nose whilst bringing her front knee right up towards her chest and extending her back leg down and away from her. You can see that she is still leaning back and that the kite is still behind her, and therefore even though the bar is sheeted in, it’s not in her way. She reaches for the board by leaning back and twisting her back shoulder around behind the chicken loop, and not by leaning forward towards the nose.
Use Your Hands Pic C.
Once the job is done and you’ve reached your grab your hands will do the rest of the work. The rider has grabbed 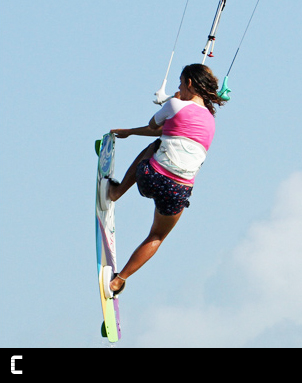 her board firmly and holds it, pulling it towards her, which helps her to keep this position for as long as possible. With the board held close she can now also redirect the kite to around 12 to get some support and hang. You can see that she has given the bar a hefty pull, and this is on a 7m, to get the kite back up and parked so that she stays up and floats.
In Flight Entertainment Pic D.
As with all grabs they’ll look better if you hold them on the way down. This does however mean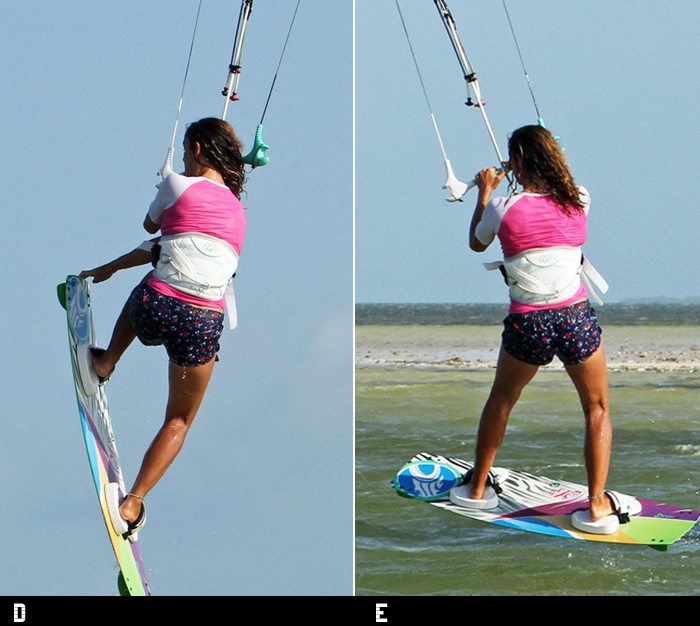 that you’ll have to get the preparations for landing set with one hand! Having sent the kite hard you have the advantage of being able to lean on your front hand throughout this move, once you’ve got the grab, without the kite diving aggressively. However as you come down if the kite drifts slowly around the edge of the window you will have trouble finding power to land, so you’ll need to get it moving through the window as you descend. In this picture the rider is holding her grab but has started to pull hard on her front hand to get the kite moving and ready to dive.
The Landing Pit E.
Now in final the landing should be as for any other jump. We can see that in anticipation the rider has dropped her grab and let her legs fall underneath her. With two hands on the bar she can dive the kite and keep the power on by keeping the bar in. As the kite pulls she goes with it aiming to land tail first with the board pointing quite downwind. Landing over the board she can then carve back onto her edge and set up for the next one.
Top Tips
- The best tip is to start off by trying some jumps with a decent push and pull, to find a comfortable equilibrium between leaning back and staying in control, as you don’t want to be swinging way up with your kite stuck down behind you.
- Now let’s talk about 2nd best tip, once you’re comfortable with this try bringing your front knee up and straightening your back leg. Finally once you’re confident get the back hand off soon after takeoff and twist round for the grab.
Common Problems
- If you’re penduluming up and crashing down onto your back your take off is catching you out. You can only send the kite hard if you keep your edge until you lift off. If you’re losing your edge or letting the bar out before lift off your kite will fly too far back. If this is the case calm the send down a notch or two.
- If you can’t reach the grab, you’re either going too late or reaching forward for the nose. Lean back and twist round. That said if your foot-straps are too tight, it can be difficult to lift the front knee and straighten the back leg, as your feet need to roll in the straps slightly.
Keystones
- Good edge and positive send back
- Lean slightly back and lift front knee
- Straighten back leg and twist around for grab
- Hold board in and redirect
- Release and dive hard for landing
One Handed Tabletop
It’s a classic one and it will never going to get out of style. Now you can learn this from TOP to bottom with the aid of below instructions. And to do this trick you need to understand that it’s a wind game and there is no surprise knowing that when the wind is high, you have to walk with it and literally kiter’s bag of tricks can be weaken. Bye this reason expanding your air game is a very mandate, hence when the wind calls, as it so often does when you’ve set your heart on unhooking or that cheeky dark slide, you can still have an array of moves to amaze your peers and more significantly keep yourself well entertained. Today’s trick “The table top” comes very much from windsurfing and was championed in kiting by many of the early adopters. All you really require is to be happy with a grabbed jump; if you can ride blind you’ll have the movement already!
If you’re not certain what a “Table top” should look like, just go through with the sequence images and get the right idea. This move requires you to take your back hand off the bar and throw it behind you whilst twisting your body and scissoring your legs. The more you invert the more likely that your board will be upside down and that is when you have a purist’s table top. However on a twin tip we reckon not inverting too much looks better, but whatever rocks your boat. So here we proceed to it.
The Foundation Pic 1
Your prospective table top won’t be much if you don’t provide it the legs on take-off. You will be hanging slightly off your front hand as 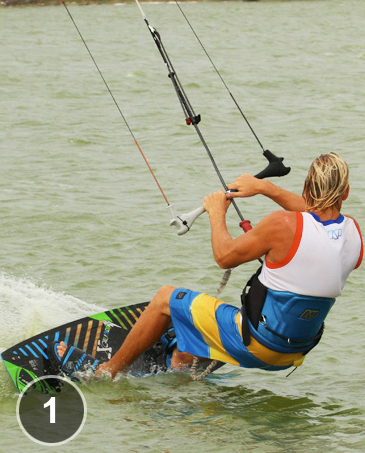 you swing yourself into this and therefore your jump needs to be more send than bow. You can see in images that rider has given the kite a good send by the angle of his bar. Over here the push and pull action is very important as you’ll have your hands very centered so that you don’t make any rash moves once you’re up, but this does mean that your hands have less impact when you send the kite back. You need a decent send to give you the height and get you flying with the kite behind 12. If you don’t send it past 12 and just pull in for lift you will redirect the kite too much once you go for the table top. How far back you go will depend on kite size and wind strength, nothing too extreme as you still want float. Needless to say Christian has a good edge coming into this and he is looking upwind not at the kite.
Get Settled Pic 2
Once you do take off make sure you’re balanced, settled and that the kite is where you want it, just behind 12 o’clock. There is no great rush as you won’t be able to hold the one handed position indefinitely. As the rider launches himself skywards he brings the bar in to make sure that he’s got tension on the lines for float, and this also lets him feel if the kite is supporting him and from where – you’ll feel the kite pulling from anywhere but up if it’s in the wrong place!
By pulling the bar in with two hands it guarantees that the kite won’t move much as you release and swing into the move.
The Moment of Truth Pic 3
Now that you’re comfy it’s time to go. The rider has released his back hand, swung his arm back and turned his head to look down at the water behind him. This action will swing you around so that along with your hea d, your body and legs will turn too. Looking down allows your shoulders to drop, which will lift the board a little. The movement itself is fairly simple, almost like throwing a blind in the air.
However do take note of the fact that he has kept the bar in close to his hip with his front hand. This keeps the kite sheeted in and more importantly keeps you in the air – don’t be tempted to extend your front arm as you extend and swing your back arm.
Tweak It Pic 4

Once you’re happy with the first swing and twist you can tweak yourself into a more extended position, the canvas is now yours. The rider has reached down with his free arm to lift the board further, and pushed the board up and away from his by extending his legs. The trick is now trying to hold it, fighting gravity whilst keeping the bar in. The two simplest variations of this are to invest more by throwing your head back as you turn and to pull your back leg into your bum, keeping the front boned for a more classic position.
The Return Pic 5
In this image, you will find that the weight of board will get the better of you and the board will start to swing back around. As soon as it does make an effort to get your back hand back on the bar as this will help you to control the rest of your flight, and as the rider is doing in the picture, try to lift your knees to cut the pendulum effect of your board.
Swinging Down Pic 6
 This is similar to happen if you do get a bit of tweak to your table top, so be ready. As rider’s legs and board have swung down they’ve created a fair bit of inertia, and so on they go, swinging his merrily so that his front foot turns upwind. If you’re happy to land toe side then there is no problem, but if you had good height and would prefer to dive the kite hard fete soft landing try to keep your head and shoulders facing forward, core tight and dive the kite hard as per usual. As the kite pulls it will help you turn the board back downwind and land as you normally would.
Top Tips
- As we often propose, a few incremental steps along the way to your goal will make it easier, so on your first few attempts just go for a little look back and down whilst keeping two hands on the bar, then move on and release your back hand, and finally when you’re feeling confident give it the swing and let your body and legs twist.
- Keeping your front hand held in tight against your hip is a must. This will enable you to twist back around at any time as you’re locked to the bar.
- Make sure that your front hand is butted up against the centre line in the middle of the bar.
Common Problems
- Your main obstacles will come from the kite and the swinging through on landing.
- As with all one handed moves you are at risk of moving the kite when you least want to, so if you do find that it’s flying forward and pulling you off balance into a front foot heavy landing or a splash, make sure that it is behind 12 o’clock before you take your back hand off.
- Also make sure that you are swinging yourself into the table top and not pulling yourself into it with the front hand.
- Having that hand locked in and stationary is very different from pulling against it to move your body weight.
- If you’re struggling with the landing as your legs swing through chances are you’re not diving the kite hard enough to help get you back to a downwind landing position.
- This is a leap of faith but just as when you learnt to jump, the pull from the kite for landing does and will help.
Keystones
- Send kite past 12 o’clock
- Balanced with bar in on way up
- Release back hand
- Swing arm and look down
- Keep front arm locked in
Front Foot One Foot
This is really a fun of highest order. You’ll confuse yourselves at first, however be rest assured that the Triple “F” is astonishingly easy and is guaranteed to put a smile on your face – it is a show boating with a sense of humor. Now on serious note what do you need to bash out one of these? Practically if you can jump with a tail grab and loosen your straps you are good to go and actually ready to rock and pose.
Preparation
Get yourself prepared before you hit the water. To free your foot temporarily from the confines of your front foot strap you may want to loosen the strap a tad so that your foot can slide out, and probably more significantly back in effortlessly without hindrance or interference. And if you’re going to loosen the front one you best loosen the back one a touch too. With this way if you don’t get the front foot back in it’ll be simple to ditch the board pre splash.
Image-1 (The Jump)
If you’re not as quick as Flash Gordon getting some height and float from your jump is paramount so that you have time to grab the board and set free your foot, get it back in without stubbing your toe and then land . Preferably you’ll wish some power in the kite, a jolly good edge and some space. Start with your kite no higher than 11 or 1 o’clock. Once you know it’s there,
Look upwind and drive against your edge, pushing against your back heel ready to resist the extra power that you’re about to create. Now wiggle your front foot a little out of the strap so that it is not wedged in and send the kite hard with a decent pull push action, keeping the bar on the sweet spot. Keep edging, keep the bar in and wait for the kite to launch you. Only if you edge well and send kite hard you will get the up earlier and the kite won’t fly too far behind you, making it easier to focus on the task in hand. We’re looking for an elevator jump here, so more up and down, not flying at mach 10 downwind.
Image-2(Knees up)
 As with any foot out and board off you, need to get everything in position as soon as possible, so that you’ve got plenty of time. If you only manage to get the grab in on the way down your chances are getting slimmer. Here in this image you can see that straight away after take-off rider is getting his knees up towards him. This needs the most effort as the lift from the kite is straightening you out, so you’ll need to pull hard and its maybe why the rider in the picture doesn’t look too happy. Please have a look at his bar – he has pulled it in and also leveling it. This way he gets the kite settled just behind 12 o’clock with two hands before getting on with business.
Image-3(Look for the Grab)
Pay your attention on where you wish to grab the board, as this way you’ll get there earlier. Turning your head to look at the tail will also turn your body and the board, which is a good thing. By turning the board back you have more space behind your harness to lift your back knee and get the board closer to you. Lifting the back knee and the back of the board towards you tilts the board which aids un-weight your front foot and makes it easier to slide out. You can see that everything is happening behind the guy in the picture, so he has plenty of room to do maneuver
Image-4(Make It Count)
Of course! This moment is full of glory, so stoke it count. Once you have the tail of the board pull it up and in towards your bottom,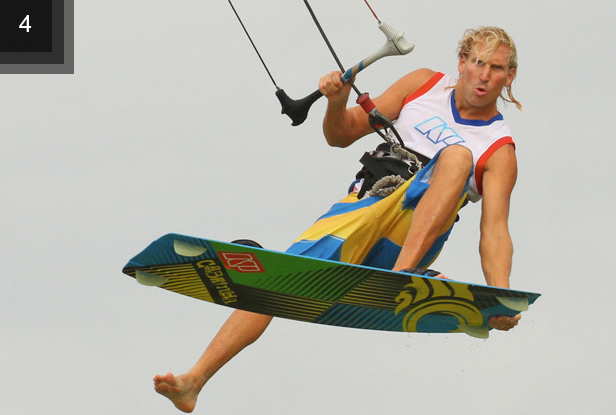 as this will aid twist the board off your foot. At the same time lift your front foot towards you, your foot will now be dangling in told air. Keep your hold tight on the board and keep your bar in for float. From this moment you have a plethora of alternatives to show-off, the most significant of which is to get your front leg extended as the guy has in the images. As you get confident you can play with board angles and leg positions. As per any reasonably high and float jump, aim to keep the kite just behind at the angle of 12 o’clock so that you don’t get pulled forwards and off balance whilst in flight.
Image-5(Eyes and In)
 In the time when you are learning this, once you experience that you’re dropping it’s your signal for font foot in. This way you’ll have sufficient time. Once you get more proficient and confident you can wait until mill moments before landing. To make life easier and give you a bit longer you should start to pull gently on your front hand. This way the kite will fly at 12 o’clock and you’ll be satisfied with a little extra lift, and therefore time. If you don’t perform this, you’ll drop much quicker. Fix your gaze on the front strap and pull your back knee up, which will tilt the nose of the board down. Bend your front leg to bring your foot up and if your strap is loose it should be a fairly simple procedure. Once your foot is in give it a wiggle whilst you still have hold of the tail to make sure that it’s secure.
Image-6(Both Hands and Dive)
 Now all that’s left is to land this with panache and you’ll feel quite chuffed. Once your foot is in release the grab and get you back hand on the bar. You’ll need to dive the kite hard for landing because you gave it a little pull forward for support whilst replacing the front foot, so if you’re not aggressive now you’ll get pulled off balance as the kite flies around the edge of the window. You can see that rider is giving the bar a fair yank down to dive the kite and as it pulls he angles the board off the wind for a soft downwind landing.
Top Tips
1. Approach your first few attempts with an aggressive jump, a boned grab and a subtle look back to get your confidence up.
2. Then loosen the straps and give it a go.
3. You’ll be surprised how both the grab and the back foot act as anchor points, making this feel far more solid and controlled than you would expect.
Common Problems
- First off, struggling to get the foot out. Assuming that you have loosened the strap or straps the primary cause of this will be your legs. If you bring your front knee right up into your chest you’ll have no room to lift your foot out. Similarly if you don’t lift your back knee enough you may have the some problem.
- Make sure you get a decent tilted angle on the board, as this will make a world of difference.
- If you’re getting stuck looking back and then dropping down into the drink. Chances are that you’re being a bit ginger on the front hand and leaving the kite too far behind you after take-off. Remember to fly the kite back up to just behind 12 o’clock with two hands as you bring your knees up. Don’t go for the grab until you have the kite settled.
- When you’re having problems getting the foot back in it’s either going to be lack of time and height, so make sure that you pull gently on the front hand as you slide it back in. It could also be the knees again, so make sure the board is tilted.
Keystones
- Elevator jump
- Control kite with two hands
- Tilt board back knee up into chest and grab
- Pull board in and lift foot out
- Tilt, look at strap and slide foot in
This video shows how you can progress your jumps and not only to take your one foot of from the board but both feet and even flip the board! Practise and you’ll become the jumping king at your local kite spot in no time!