It’s a game of grip, harder you grip smarter you perform. We really appreciate your love and affection for this sport, which indeed is a plus point for health and working environment. Benefits are many and space is short to write, just wanted to summarize all the thoughts in one line “keep yourself moving until and unless something strange won’t pack you in a BOX.
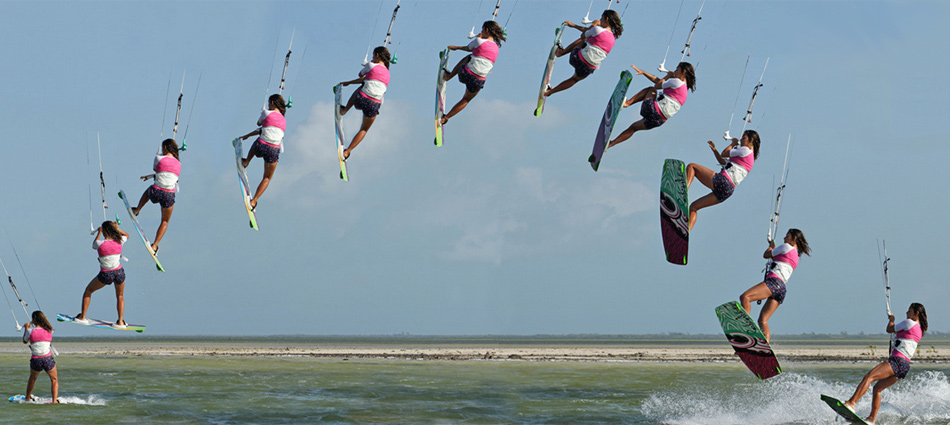
Let’s talk about today’s trick from very beginning. Even if you already have an inverted Slim Chance in the bag, adding the non-inverted variant to your repertoire will be both satisfying and worthwhile. It’s likely that many of you and in particular some of the “old timers”, went on to master the Slim as the next step after the long forgotten dangle pass. With the result you may have a habit of sending the kite a bit and having a somewhat dangly finish to what started as a powered pass.
Getting your teeth into the NIS is a great cure for this. If you don’t suffer this problem, well it’s still another trick to claim and if you’ve never tried any sort of Slim Chance, now is the time. What should you already be confident with to try this? The base for this is a powered unhooked popped front roll, preferably to toe side, as that’s the way you’ll be passing. If you can already Shifty to wrapped, or even better Shifty 3 then you’re almost there, and if you can Front to wrapped then you’re knocking on the door That said your front rotation may not need to be inverted, but you do need to get the knees and board high, so the more aggressively you can pop, the easier this will be.
The Important Bits
- Approach and Edge
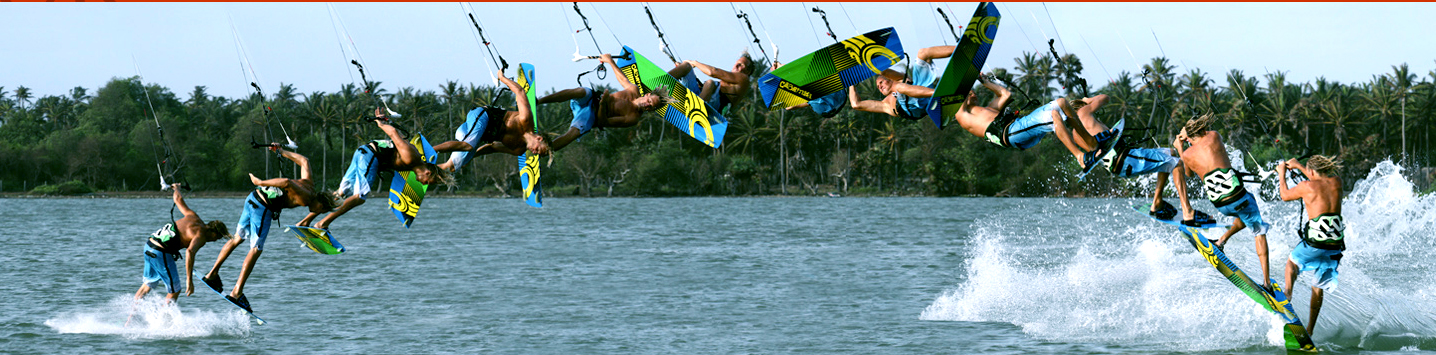
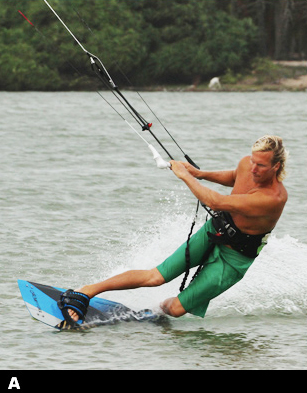
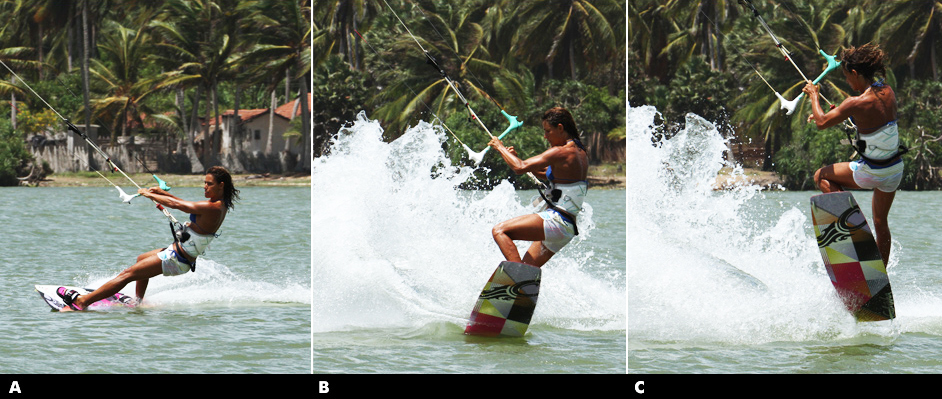
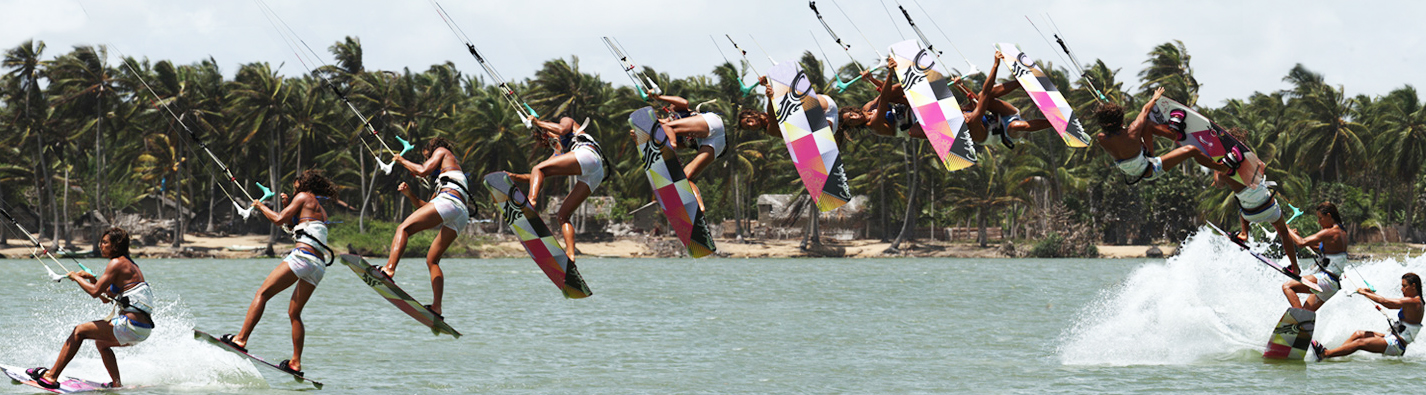
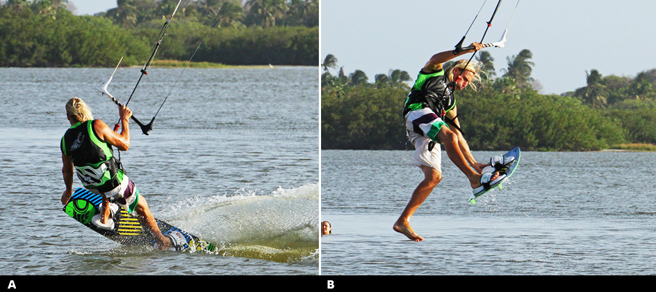
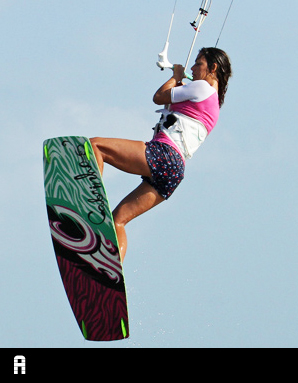
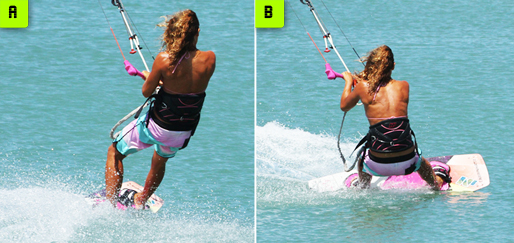
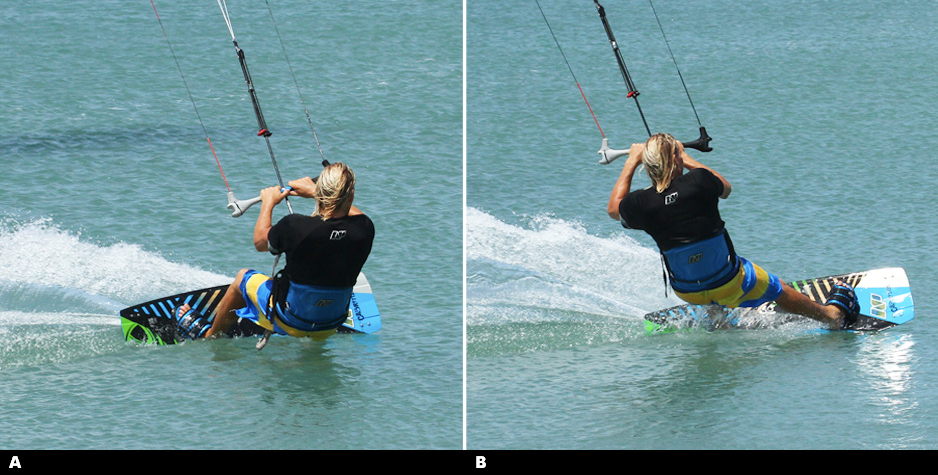
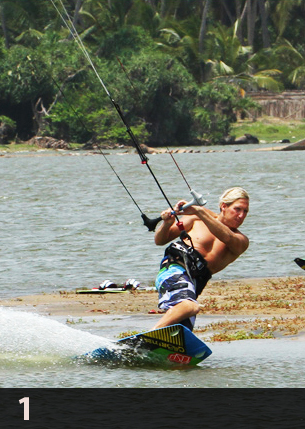
Pic A
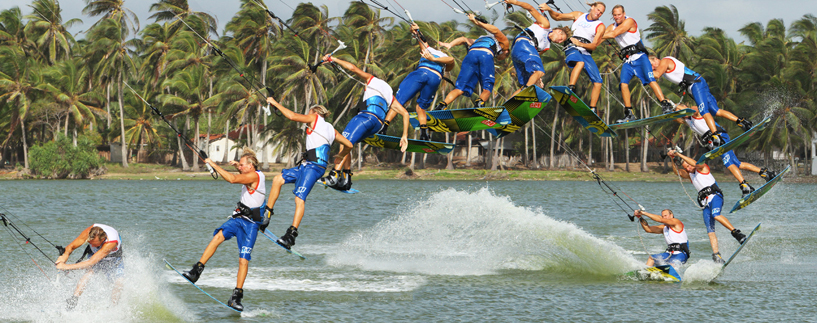
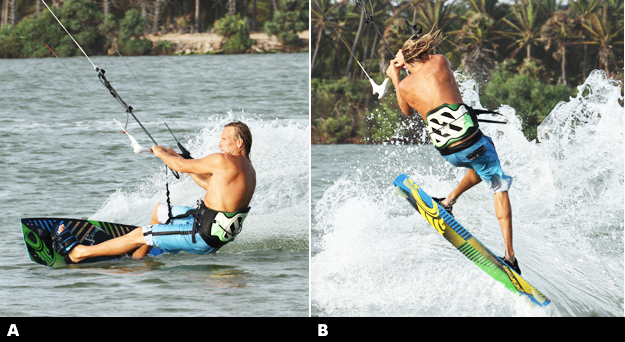
Your first pass would be easier if you get good pop on your take off, it will be more to do with timing than brute force. And to get good pop your approach and subsequent carve onto your edge needs to be dialed in. It’s really important to get speed in starting, if you’ve got enough power great, if not work that kite to get some pull and speed. Secondly park the kite where you want it to be, let’s take it around 11 or 1 o’clock, so that you know it won’t drive you down and therefore give you the confidence to pop hard and not lift the kite as you edge. Finally get your body back over the tail of the board as you bear away, so that once you unhook not only will the kite be in the correct place, but also you can turn back onto a solid edge with your weight low very quickly, which is the crux of good pop. You can see in the Pic A that as the rider carves onto his edge and away from the kite his front leg is extended, his back leg bent but locked and his bum is low – a result of the correct entry position. From this point he is ready to pop hard.
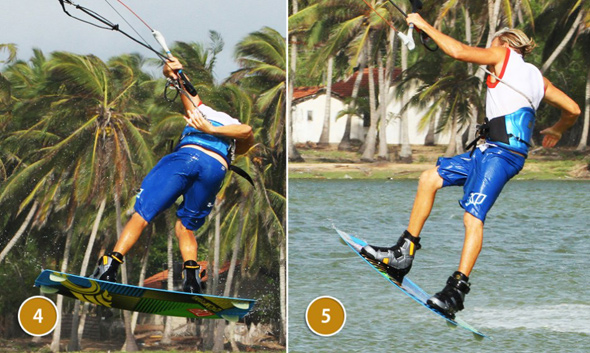
- The Take Off
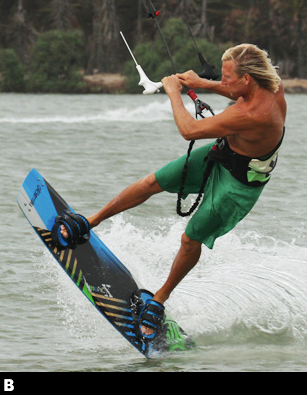
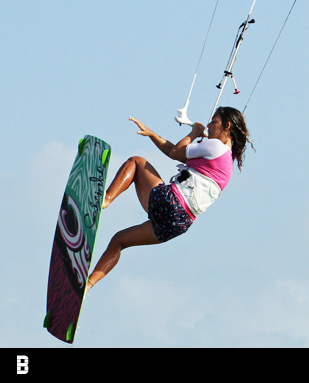
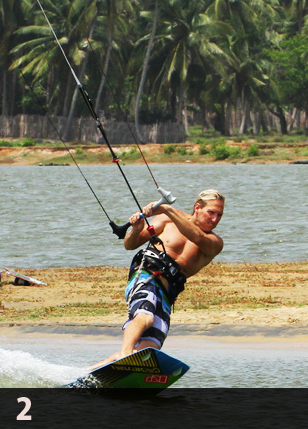
Pic B
If you’ve got the approach right you’ll have so much edge and bite as you turn the board upwind, that as long as you commit you’ll get plenty enough pop to complete the move without lifting the kite. Your board, knees and hips will be thrown up high enough to make the pass. Even though you’re throwing a front roll, you need to be as low as for as for a raley, uber edge your aim is to get yourself as much height as you can, which will give you time, so as you stamp hard against the back of the board, explosively extending your back leg, concentrate on extending from your back leg all the way up into your back shoulder. This way even as your head goes down and around and your front knee lifts to initiate the rotation, you’re still on the way up. In Pic B you can see the spray that the rider has following him, a definite rooster tail. As he goes down into the front roll he’s still rising. Just as importantly by popping hard Christian is able to bend his arms and pull his hands towards him, keeping the bar in close. If you don’t get the bar in now, you’ll have an almighty task ahead of you. Finally with the bar in close it is more achievable to keep the kite parked with the bar angled forward – if the arms extend you’re likely to pull on the back hand.
- The Halfway Mark
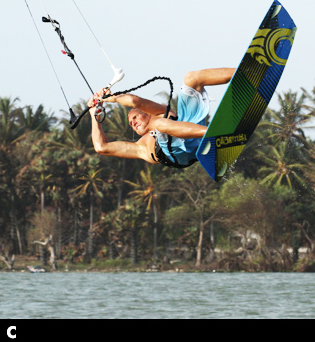
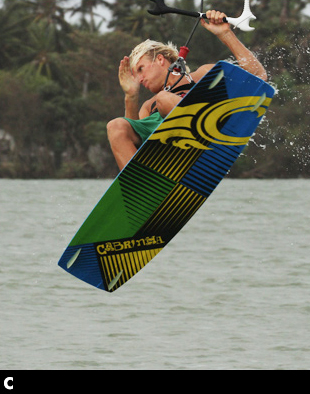
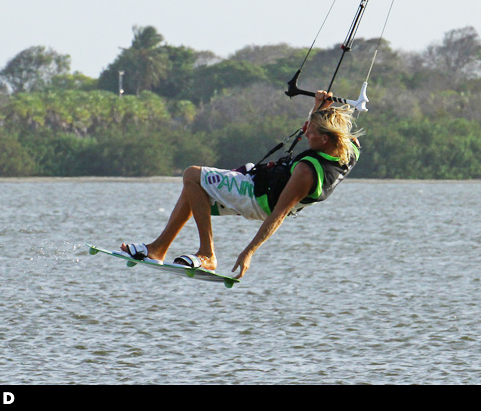
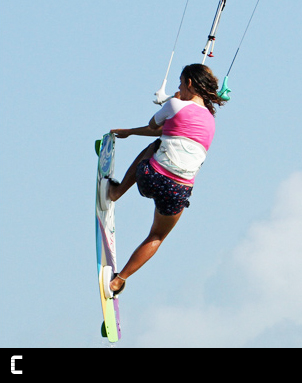
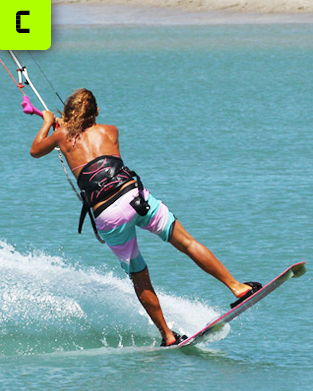
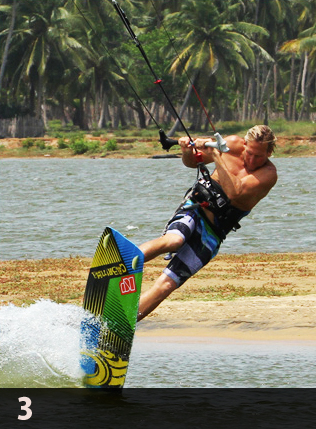
Pic C
It should be looking like at the 180° mark if all is going well this is what. Please watch carefully, the board and knees high, swinging around with your shoulders, not dropping and pulling you down. You need to be leading with your head, even though you’ll be throwing the pass against the rotation, as you need to see where you’re going so that you can time the movement. The rider is coming around and he still has his hands in close, if he were to rotate another 90° he would find his front hip nearing the bar. You don’t want this, so once you can spot your landing you have two jobs. Pull the bar in towards your hips, and pull your old back knee, in this case the rider’s right, towards the bar. They don’t actually have to get very close but this will slow your rotation and lift that end of the board, giving you more chance to make the pass.
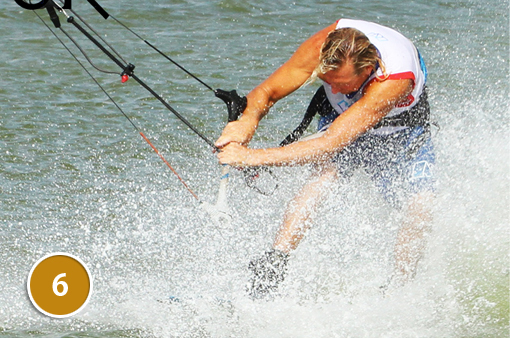
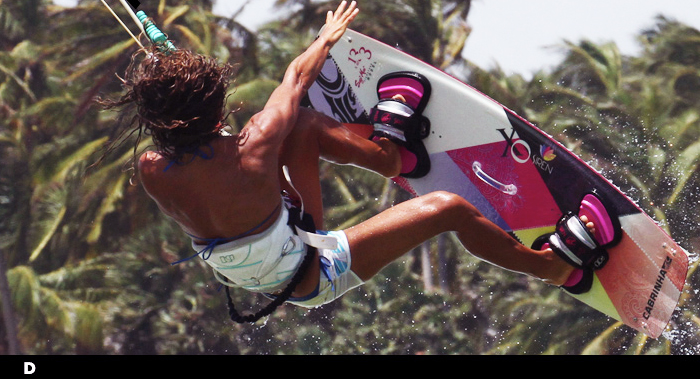
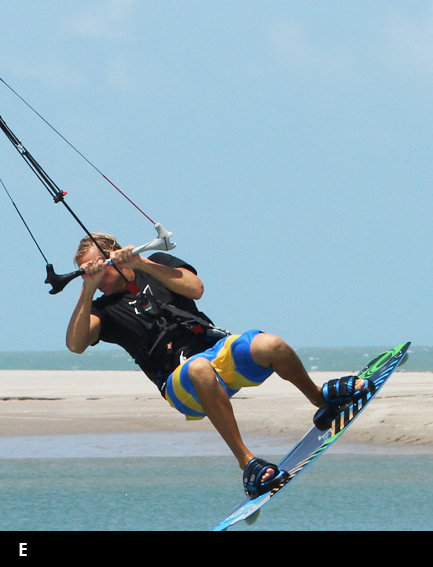
- Do It
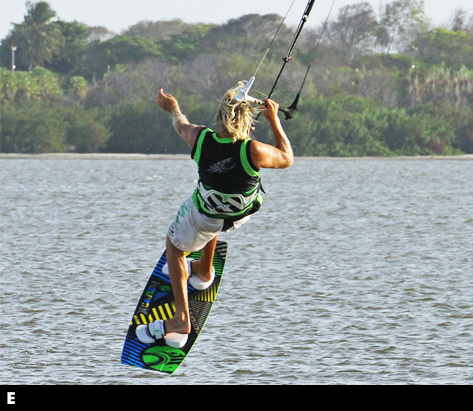
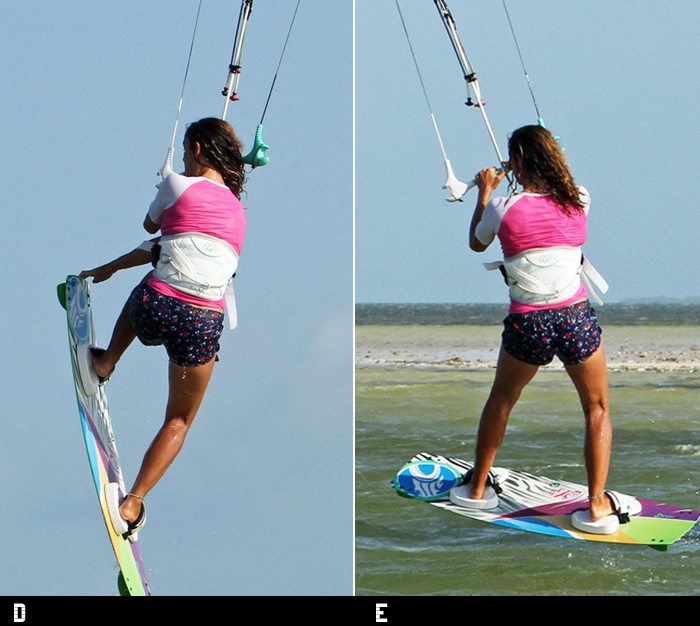
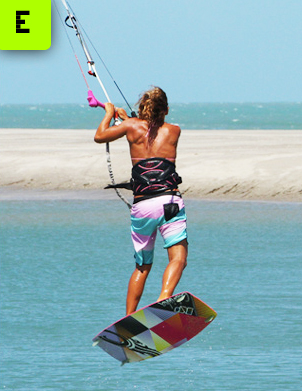
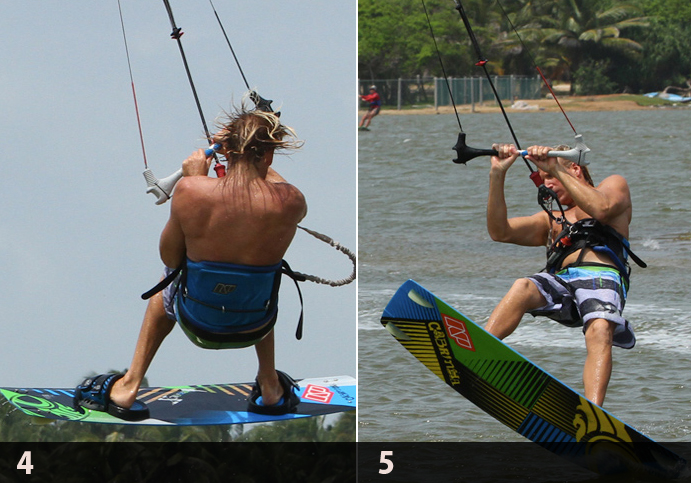
Pic D
This is the make or break moment requiring full commitment and energy. Timing wise you should be just about to drop, that lovely floaty nanosecond before free fall. Most likely it will feel too late, and if it does that’s perfect! In short you pass as you drop out of your rotation. Whilst your knee and bar move towards each other you have to turn your back on proceedings. Give one last tug on the bar with both hands, a bit front hand heavy to stop the kite flying up when you release it and then throw you head and shoulders back around, down and away from where you’ve been looking. Assuming you’ve already been wrapped or passing the drill is the same, fast and deliberate, twisting the bar as you release your front hand to allow your shoulders to turn further. In the picture the tail of the rider board is high, his knee and hip are close to the bar and he’s leading his pass with his head. He also has his complete kite face on, as this is 100%. With the board high and his knees bent the board won’t drop and pull his away from the bar as he turns.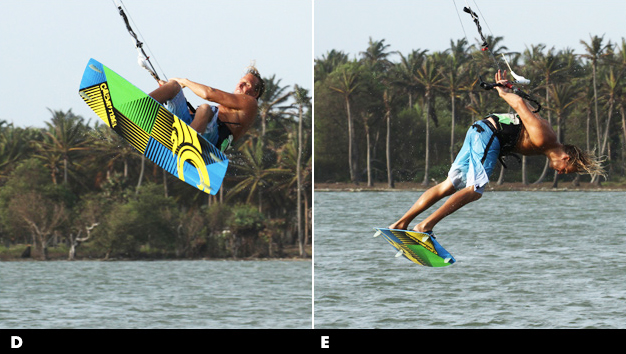
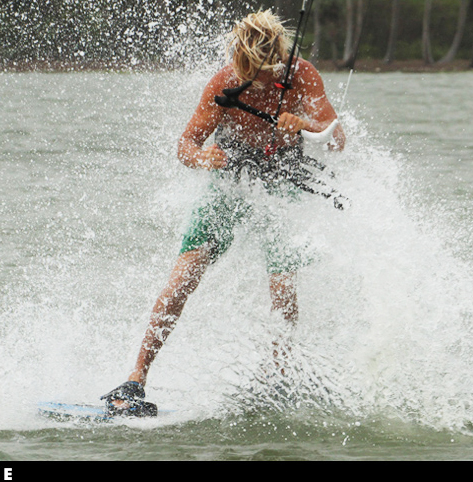
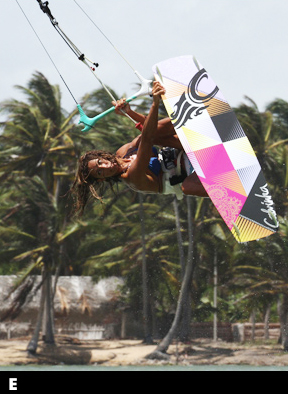
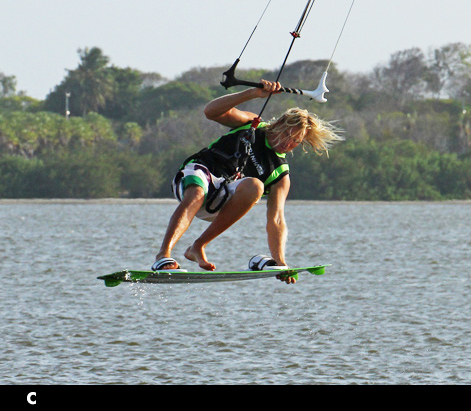
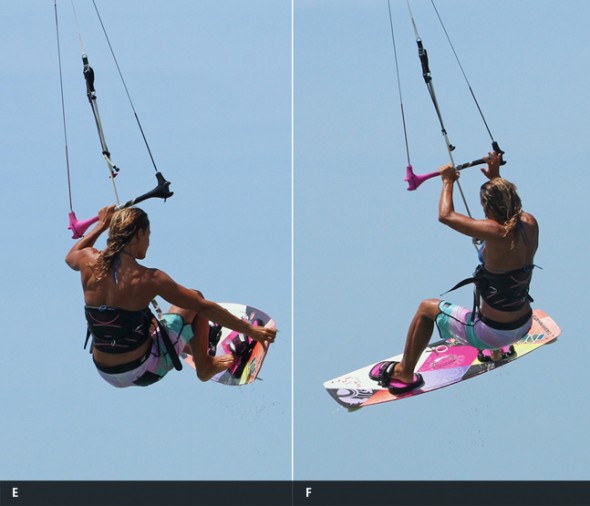
- The Pass [Pic E]
Now it’s hand to hand, which sounds obvious, however if you twist the bar fully and hold on tight your body will wrap around your arm, follow your head and the bar will present itself to your waiting hand. As long as it’s looking for the other hand and not scratching around in the small of your back. Here in this image the rider free hand finds the other one and grabs the bar. Now it’s just a matter of landing it, claiming it and riding away without looking too surprised.
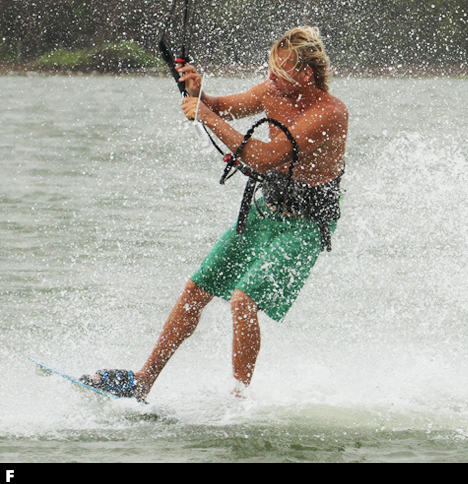
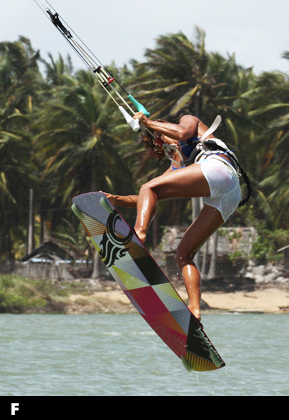
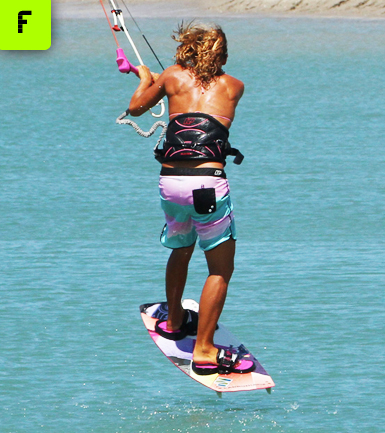
- The Landing [Pic F]
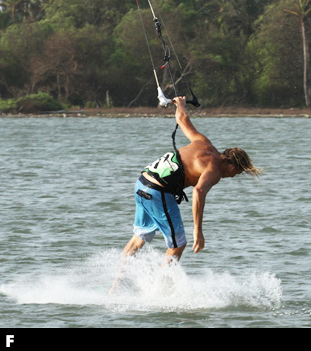
This is a normal tendency that we don’t always think about the landings too much, but this one does require some anticipation, or else you’ll be passing, getting excited and then diving in. You need to be ready to ride as you land, hopefully downwind and maybe even further around. There are two things that really help. Firstly keep your head turning. It’s common to freeze the head whilst changing hands, and this often leads to a fall, so as you change hands keep turning the head to look towards where you’re going. Secondly untwist the hand, that is to say allow your wrist to turn palm down so that the bar is once again as it should be and the status quo is restored. By doing this your shoulder can turn up and forward and you’ll be better balanced to follow the kite. In the picture the rider’s hand is the right way up and his head is trying to look around, following his eyes.
Top Tips
- Your first key of success is “Preparation”, hence make sure you’re in a dynamic stood, as you’ll need to rotate quickly for the pass, and bang out a few popped front rolls
- Be focused on bringing the knees and hands closer as you’re coming around. Beware though, as this will kill your front roll rotation so be ready to land toe side and off balance
- At time you have done enough fronts that time is slowing down, you’ll get an idea of when you can pass. If you are able to bang out a few Shifty to Wrapped,or Shifty 3s, even better. It’ll get your pass rotation well and truly warmed up.
Common Problems
- Pop issues are common with front rolls as by the very nature of the rotation it’s very tempting to throw yourself down before you’ve gone up.
- Also there is a tendency to stand more upright whilst edging to pre-empt the take off, but you must edge low and hard, then stretch up to get the necessary height
- The problem with all passes this way is that the kite loves to rise, either as you pull or once you release. The beauty in the NIS is that as you’re waiting for the moment to pass, you have time to sneakily steer the kite down before or whilst pulling. Do this and the pass will be noticeably easier as you’ll practically manufacture slack
- Getting the knees and board up can be a problem. For the inverted Slim you can throw your shoulder down and head back to get the legs up. Whereas here it’s all about pop. However keeping your hands in close with bent arms will mean that your balance point will be more around your waist and therefore you’re more likely to rotate around this axis
- If your arms are stretched out it’ll be much harder. Finally the landing. Passing like this does encourage you to look down at the water as you throw your head, which works wonders for the pass but doesn’t do jack for the landing. So make sure you try and move your head after passing and untwist your hand.
Keystones
- Good approach and solid pop
- Hands in close
- Bring hands and knees together
- Pass late, as you drop
- Keep looking
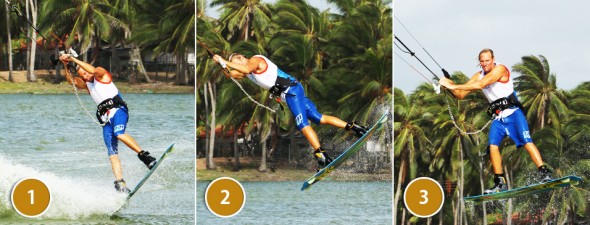
 up hard and stamp off the back foot. Though bearing away and then carving up from toe side is no simple task, so for the same sort of effect shifting your weight back will dig the tail in and turn the board upwind on its rocker. The trick is to be quick, shift your weight back and stamp – wait and you’ll lose your speed and nothing will happen. In
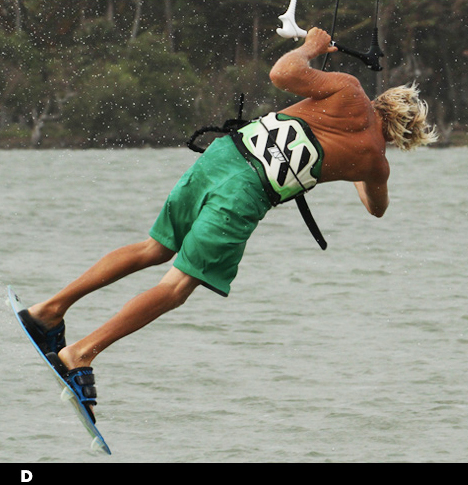


 so watch the strap and aim your foot back in. Once your toes are in, use your grab and push your foot and/or pull the board to make sure that your foot is properly in.
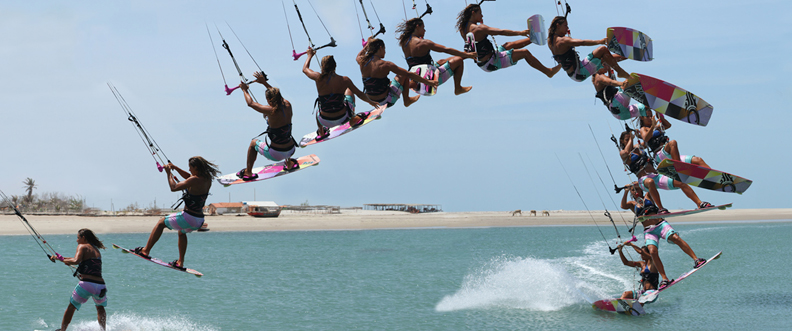
 keep the bar as close aspossible. You don’t want your arms getting pulled out straight.