A Resource of Kite Surfing Tricks & Tips

Latest

Indy Pop to Blind

Before trying Indy pop to blind trick you must be reading well below instructions and practice it with right way. You can have every possible trill which is there in kite surfing. By understanding what to do and how to do can make all the difference.

And as we have often said it’s a great way to freshen up and reignite your passion fats move that you already have in the bag – so it’ll not only look the puppy’s but also feel do booth! Here we have a hooked in pop to blind with a back hand grab on the toe side rail in between your feet. You should already have the ability to pop around to blind and ride and if you don’t then hopefully this will be the incentive you need to learn.
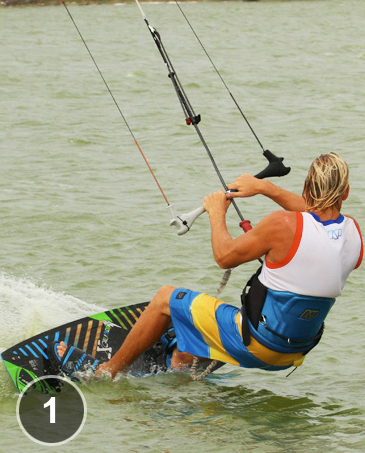
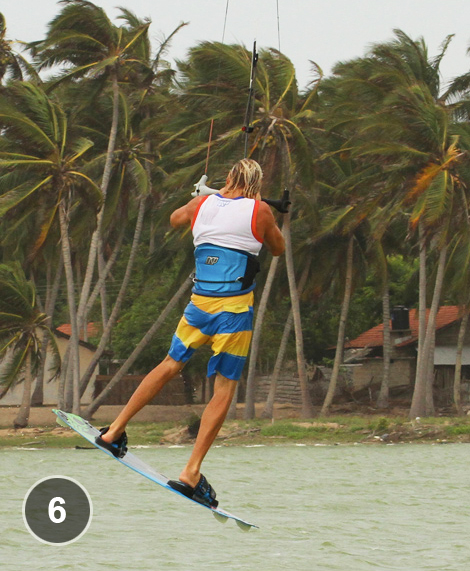
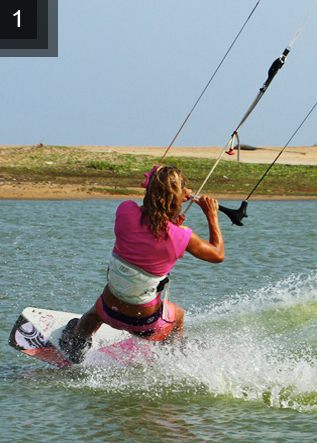
The Set Up- Pic A

When you search for your pop you will require two things, the obvious one being speed with a dose of power and the less obvious one is a good body position, which is always much required. Whilst learning you can afford yourself the luxury of a third one, which is lift from the kite. No need to have it down at 45° when a forgiving 1 or 11 o’clock will help you on your way. Here we can see in the image that the body position as the rider carves back up into her pop. Her front leg is extended, meaning that her hips, and weight are pushed back towards the tail of the board and her shoulders are also leaning back. Surfer adopted this position before she turned off the wind and has held it throughout her carves. This very sturdy position enables her to pop explosively off her back leg. Before we continue take note that your hands should be centered on the bar and your kite parked still.
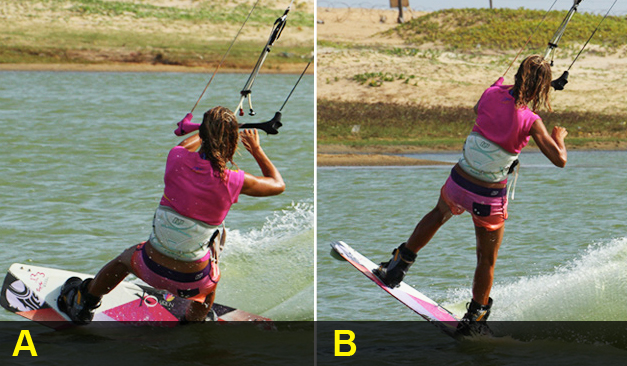
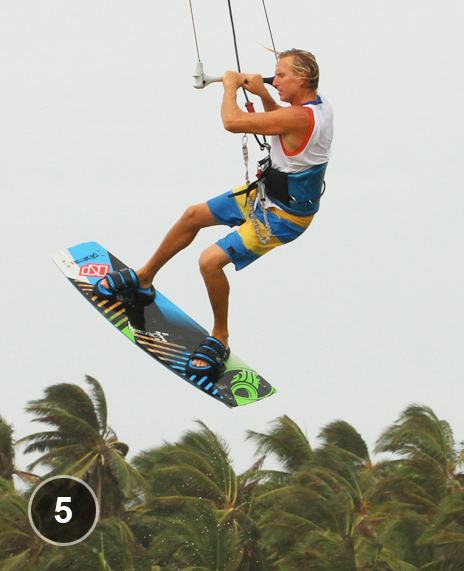
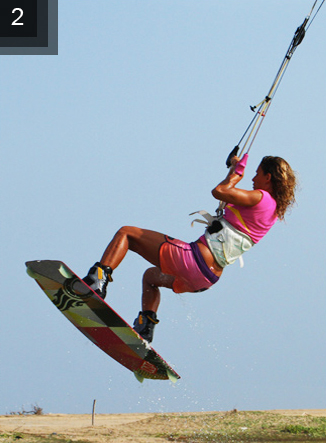
The Set Up

The Explosion Pic B

From such a solid set up the pop should be easy and simple. As long as you turned off the wind before carving up both the kite and the board will behave, that is to say the kite will give you something to pop against and your board won’t slow down too much as you carve. To get maximum pop you must keep your shoulders back and upwind of the board, your bum low and close to the water and you must not soften your back knee as you carve up. The rider has stamped down hard against the board with her back foot, explosively kicking herself away from her edge, and with her weight back and she takes off nose first. In anticipation of not having much time to grab she is already releasing her back hand from the bar as she stamps.
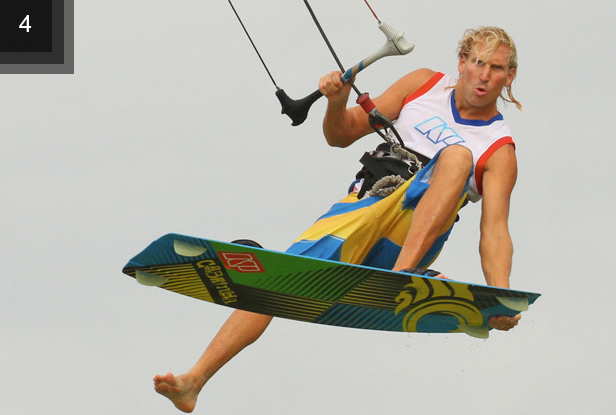
Board Up Pic C

As with any pop you need to wait until you’ve extended your body to get full elevation up, but as soon as you have it’s chop-chop to get the grab in. In picture, having already released hand, her next job is to bring her knees up towards her so that the board is within grabbing distance. The rider looks down towards where she’ll grab as she lifts the board and keeps her knees apart so that there is room for her arm to reach down towards the edge of the board. Also as a result of popping hard the back of her board kicks around and out slightly which has the effect of turning the rider back and away from the kite. This is good as it pushes which in turn gives her more room to reach down with her back hand.
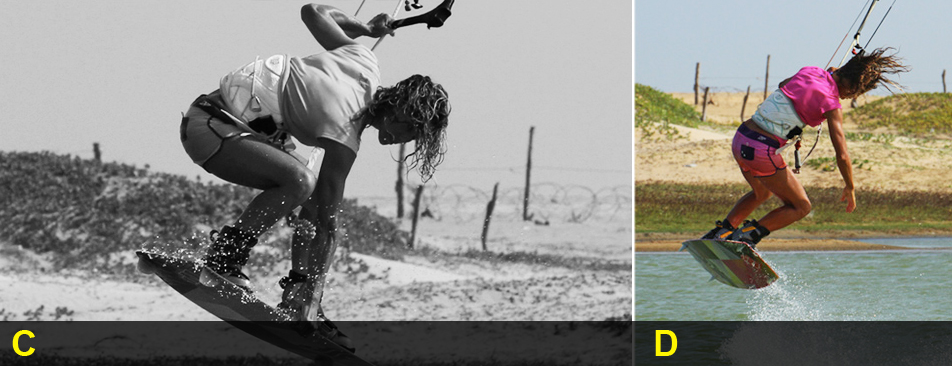
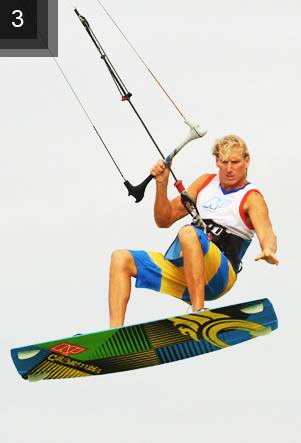
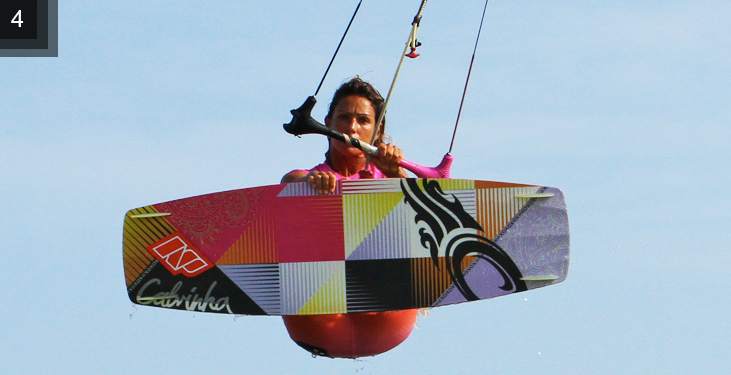
The Grab

The Grab Pic D

With the board flicking around, roots for the back hand to reach down and the knees pulling everything up she can happily grab the board for a solid Indy. In this picture you can see the result of all that has gone before – the bar is in front of her and she has plenty of roots to reach and hold the grab without the need to be a contortionist. Whilst you have the grab sirs to keep the bar in on the sweet spot so that you’ll have a modicum of support from the kite, you’ll keep your forward momentum for the landing, and you’ll be able to dump the pull when you need to turn to blind.

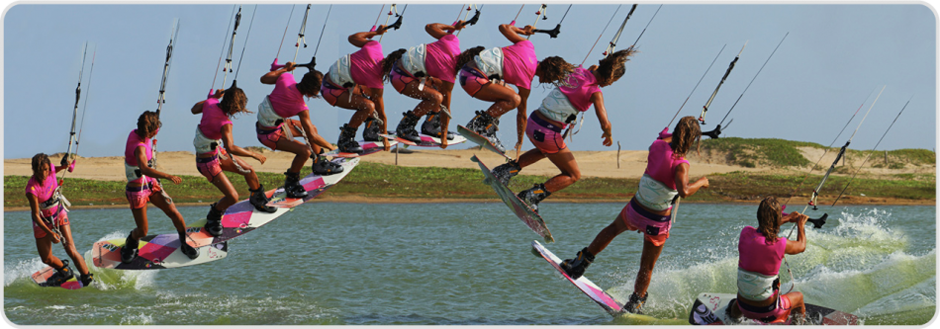
Throw the Blind Pic E

A very good thing about the grab is that it naturally makes you stall your turn or throw to blind. Blind is always a last second movement, hence why we can do a by pop to blind. The higher you go, the longer you have to wait in order to keep your balance and control the landing. Once you feel that you’ve got the grab and you know that you’re coming data it’s time to turn. The action will come from your hips and your back leg whilst your free arm will balance you. The rider has released her grab and now commits to blind. To turn the board she twists her hips and pulls her back leg up towards her bottom and around towards the water. The board will naturally want to fall tail first so she focuses on pulling her back leg up. By doing this she will rotate around her harness hook and should make it all the way.
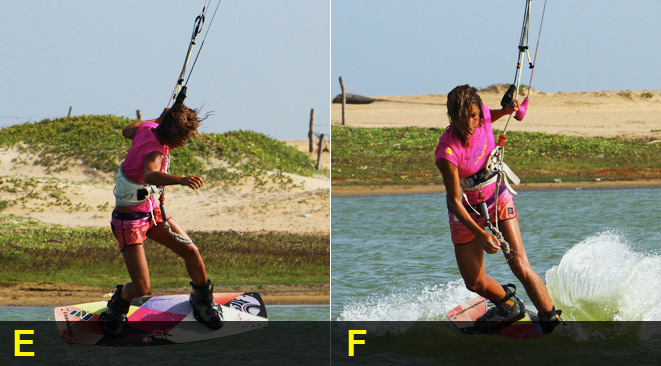
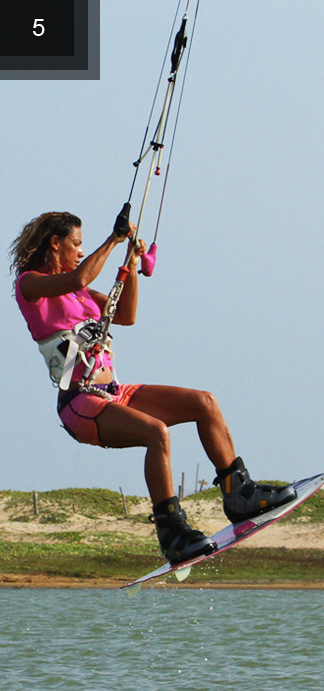
Landing

Landing Pic F

Landing this should be as per your pop to blind, though chances are as you’ve had more height you will have less momentum to keep you going once you plant the board. Make an effort to keep your back foot up so that you can plant the front of the board into the water for landing. This way as the nose catches the board will pivot off the wind more and you’re more likely to keep moving. If you land flat on your edge you’ll just stop. You can see that the rider has landed nose first with her front leg fairly straight, whilst her back leg is bent so that the board will turn further away from the wind on landing

She is already in her default blind position so that she will keep moving. If you have slowed too much pull the bar in to get some oomph from your kite.


Top Tips

  • First of all you should practice the Indy if you never tried it before.
  • Getting the board flicking you slightly around on take-off does make the movement of turning to blind in the air much easier as you have less far to turn and thus your body is in a better position.
  • Try looking back at where you came from as you grab, this will help you turn during your Indy.
  • Although we’ve said you don’t want your kite too low, don’t have it any higher than 11 or 1 o’clock. It still needs to be pulling forward to allow for some flick, an easy grab, and momentum on landing.

indy pop to blind kiteboarding

Common Problems

  1. If you can’t reach to the grab then ensure you’re popping hard enough. The pop will help you lift the board as the water will cork the board back up at you.
  2. Also make sure you turn to face slightly back to get the bar and your harness out of the way.
  3. If you’re falling backwards as you land. If your body is further downwind than the board when you land you need to sheet the bar out as you throw the blind.
  4. If you’re landing and then falling chances are that you’re landing flat or tail first, so concentrate on keeping that back foot up and close to your bottom so that the board can pivot.


Keystones

  1. Turn up and pop hard
  2. Release back hand and look for grab
  3. Lift board and look back
  4. Throw to blind using hips and back leg
  5. Keep back leg up to land nose first

One Handed Tabletop

It’s a classic one and it will never going to get out of style. Now you can learn this from TOP to bottom with the aid of below instructions. And to do this trick you need to understand that it’s a wind game and there is no surprise knowing that when the wind is high, you have to walk with it and literally kiter’s bag of tricks can be weaken. Bye this reason expanding your air game is a very mandate, hence when the wind calls, as it so often does when you’ve set your heart on unhooking or that cheeky dark slide, you can still have an array of moves to amaze your peers and more significantly keep yourself well entertained. Today’s trick “The table top” comes very much from windsurfing and was championed in kiting by many of the early adopters. All you really require is to be happy with a grabbed jump; if you can ride blind you’ll have the movement already!

If you’re not certain what a “Table top” should look like, just go through with the sequence images and get the right idea. This move requires you to take your back hand off the bar and throw it behind you whilst twisting your body and scissoring your legs. The more you invert the more likely that your board will be upside down and that is when you have a purist’s table top. However on a twin tip we reckon not inverting too much looks better, but whatever rocks your boat. So here we proceed to it.

The Foundation Pic 1

Your prospective table top won’t be much if you don’t provide it the legs on take-off. You will be hanging slightly off your front hand as The Foundation 
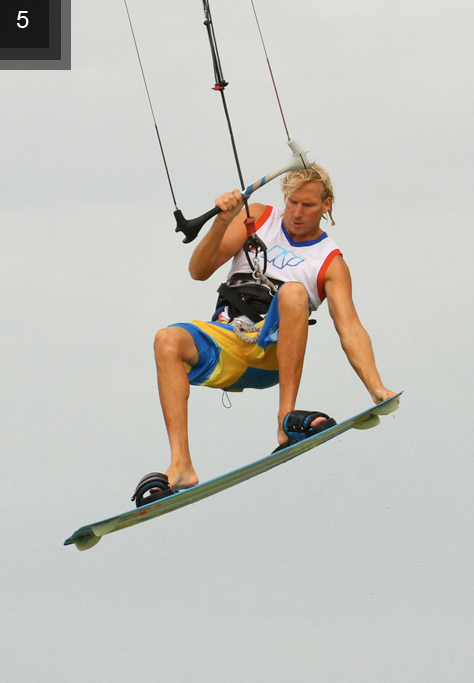
you swing yourself into this and therefore your jump needs to be more send than bow. You can see in images that rider has given the kite a good send by the angle of his bar. Over here the push and pull action is very important as you’ll have your hands very centered so that you don’t make any rash moves once you’re up, but this does mean that your hands have less impact when you send the kite back. You need a decent send to give you the height and get you flying with the kite behind 12. If you don’t send it past 12 and just pull in for lift you will redirect the kite too much once you go for the table top. How far back you go will depend on kite size and wind strength, nothing too extreme as you still want float. Needless to say Christian has a good edge coming into this and he is looking upwind not at the kite.

Get Settled Pic 2

Once you do take off make sure you’re balanced, settled andGet Settled 
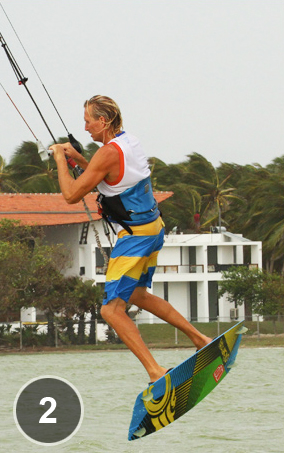
that the kite is where you want it, just behind 12 o’clock. There is no great rush as you won’t be able to hold the one handed position indefinitely. As the rider launches himself skywards he brings the bar in to make sure that he’s got tension on the lines for float, and this also lets him feel if the kite is supporting him and from where – you’ll feel the kite pulling from anywhere but up if it’s in the wrong place!

By pulling the bar in with two hands it guarantees that the kite won’t move much as you release and swing into the move.

The Moment of Truth Pic 3

Now that you’re comfy it’s time to go. The rider has released his back hand, swung his arm back and turned his head to look down at the water behind him. This action will swing you around so that along with your heaThe Moment of Truth 
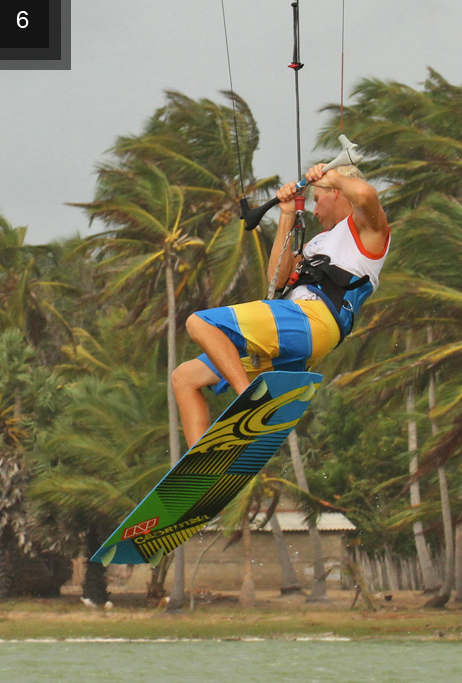
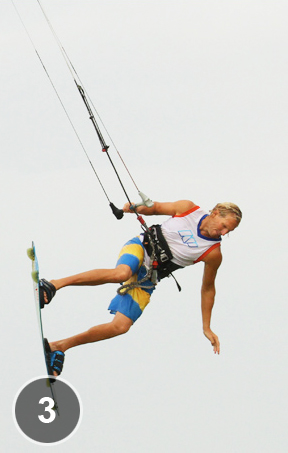
d, your body and legs will turn too. Looking down allows your shoulders to drop, which will lift the board a little. The movement itself is fairly simple, almost like throwing a blind in the air.

However do take note of the fact that he has kept the bar in close to his hip with his front hand. This keeps the kite sheeted in and more importantly keeps you in the air – don’t be tempted to extend your front arm as you extend and swing your back arm.

Tweak It Pic 4

Tweak It

Once you’re happy with the first swing and twist you can tweak yourself into a more extended position, the canvas is now yours. The rider has reached down with his free arm to lift the board further, and pushed the board up and away from his by extending his legs. The trick is now trying to hold it, fighting gravity whilst keeping the bar in. The two simplest variations of this are to invest more by throwing your head back as you turn and to pull your back leg into your bum, keeping the front boned for a more classic position.

The Return Pic 5

The Return

In this image, you will find that the weight of board will get the better of you and the board will start to swing back around. As soon as it does make an effort to get your back hand back on the bar as this will help you to control the rest of your flight, and as the rider is doing in the picture, try to lift your knees to cut the pendulum effect of your board.

Swinging Down Pic 6

Swinging-Down This is similar to happen if you do get a bit of tweak to your table top, so be ready. As rider’s legs and board have swung down they’ve created a fair bit of inertia, and so on they go, swinging his merrily so that his front foot turns upwind. If you’re happy to land toe side then there is no problem, but if you had good height and would prefer to dive the kite hard fete soft landing try to keep your head and shoulders facing forward, core tight and dive the kite hard as per usual. As the kite pulls it will help you turn the board back downwind and land as you normally would.

Top Tips

  • As we often propose, a few incremental steps along the way to your goal will make it easier, so on your first few attempts just go for a little look back and down whilst keeping two hands on the bar, then move on and release your back hand, and finally when you’re feeling confident give it the swing and let your body and legs twist.
  • Keeping your front hand held in tight against your hip is a must. This will enable you to twist back around at any time as you’re locked to the bar.
  • Make sure that your front hand is butted up against the centre line in the middle of the bar.

Common Problems

  1. Your main obstacles will come from the kite and the swinging through on landing.
  2. As with all one handed moves you are at risk of moving the kite when you least want to, so if you do find that it’s flying forward and pulling you off balance into a front foot heavy landing or a splash, make sure that it is behind 12 o’clock before you take your back hand off.
  3. Also make sure that you are swinging yourself into the table top and not pulling yourself into it with the front hand.
  4. Having that hand locked in and stationary is very different from pulling against it to move your body weight.
  5. If you’re struggling with the landing as your legs swing through chances are you’re not diving the kite hard enough to help get you back to a downwind landing position.
  6. This is a leap of faith but just as when you learnt to jump, the pull from the kite for landing does and will help.

Keystones

  1. Send kite past 12 o’clock
  2. Balanced with bar in on way up
  3. Release back hand
  4. Swing arm and look down
  5. Keep front arm locked in

Front Foot One Foot

This is really a fun of highest order. You’ll confuse yourselves at first, however be rest assured that the Triple “F” is astonishingly easy and is guaranteed to put a smile on your face – it is a show boating with a sense of humor. Now on serious note what do you need to bash out one of these? Practically if you can jump with a tail grab and loosen your straps you are good to go and actually ready to rock and pose.

Preparation

Get yourself prepared before you hit the water. To free your foot temporarily from the confines of your front foot strap you may want to loosen the strap a tad so that your foot can slide out, and probably more significantly back in effortlessly without hindrance or interference. And if you’re going to loosen the front one you best loosen the back one a touch too. With this way if you don’t get the front foot back in it’ll be simple to ditch the board pre splash.

 Image-1 (The Jump)

If you’re not as quick as Flash Gordon getting some height and float from your jump is paramount so that you have time to grab the board and set free your foot, get it back in without stubbing your toe and then landThe-Jump. Preferably you’ll wish some power in the kite, a jolly good edge and some space. Start with your kite no higher than 11 or 1 o’clock. Once you know it’s there,

Look upwind and drive against your edge, pushing against your back heel ready to resist the extra power that you’re about to create. Now wiggle your front foot a little out of the strap so that it is not wedged in and send the kite hard with a decent pull push action, keeping the bar on the sweet spot. Keep edging, keep the bar in and wait for the kite to launch you. Only if you edge well and send kite hard you will get the up earlier and the kite won’t fly too far behind you, making it easier to focus on the task in hand. We’re looking for an elevator jump here, so more up and down, not flying at mach 10 downwind.

Image-2(Knees up)

Knees_upAs with any foot out and board off you, need to get everything in position as soon as possible, so that you’ve got plenty of time. If you only manage to get the grab in on the way down your chances are getting slimmer. Here in this image you can see that straight away after take-off rider is getting his knees up towards him. This needs the most effort as the lift from the kite is straightening you out, so you’ll need to pull hard and its maybe why the rider in the picture doesn’t look too happy. Please have a look at his bar – he has pulled it in and also leveling it. This way he gets the kite settled just behind 12 o’clock with two hands before getting on with business.


Image-3(Look for the Grab)

Look for the Grab

Pay your attention on where you wish to grab the board, as this way you’ll get there earlier. Turning your head to look at the tail will also turn your body and the board, which is a good thing. By turning the board back you have more space behind your harness to lift your back knee and get the board closer to you. Lifting the back knee and the back of the board towards you tilts the board which aids un-weight your front foot and makes it easier to slide out. You can see that everything is happening behind the guy in the picture, so he has plenty of room to do maneuver


Image-4(Make It Count)

Of course! This moment is full of glory, so stoke it count. Once you have the tail of the board pull it up and in towards your bottom,Make It Count as this will aid twist the board off your foot. At the same time lift your front foot towards you, your foot will now be dangling in told air. Keep your hold tight on the board and keep your bar in for float. From this moment you have a plethora of alternatives to show-off, the most significant of which is to get your front leg extended as the guy has in the images. As you get confident you can play with board angles and leg positions. As per any reasonably high and float jump, aim to keep the kite just behind at the angle of 12 o’clock so that you don’t get pulled forwards and off balance whilst in flight.

 Image-5(Eyes and In)

Eyes and InIn the time when you are learning this, once you experience that you’re dropping it’s your signal for font foot in. This way you’ll have sufficient time. Once you get more proficient and confident you can wait until mill moments before landing. To make life easier and give you a bit longer you should start to pull gently on your front hand. This way the kite will fly at 12 o’clock and you’ll be satisfied with a little extra lift, and therefore time. If you don’t perform this, you’ll drop much quicker. Fix your gaze on the front strap and pull your back knee up, which will tilt the nose of the board down. Bend your front leg to bring your foot up and if your strap is loose it should be a fairly simple procedure. Once your foot is in give it a wiggle whilst you still have hold of the tail to make sure that it’s secure.

Image-6(Both Hands and Dive)

Both Hands and DiveNow all that’s left is to land this with panache and you’ll feel quite chuffed. Once your foot is in release the grab and get you back hand on the bar. You’ll need to dive the kite hard for landing because you gave it a little pull forward for support whilst replacing the front foot, so if you’re not aggressive now you’ll get pulled off balance as the kite flies around the edge of the window. You can see that rider is giving the bar a fair yank down to dive the kite and as it pulls he angles the board off the wind for a soft downwind landing.


Top Tips

1.  Approach your first few attempts with an aggressive jump, a boned grab and a subtle look back to get your confidence up.
2.  Then loosen the straps and give it a go.
3.  You’ll be surprised how both the grab and the back foot act as anchor points, making this feel far more solid and controlled than you would expect.

 Common Problems

  1. First off, struggling to get the foot out. Assuming that you have loosened the strap or straps the primary cause of this will be your legs. If you bring your front knee right up into your chest you’ll have no room to lift your foot out. Similarly if you don’t lift your back knee enough you may have the some problem.
  2. Make sure you get a decent tilted angle on the board, as this will make a world of difference.
  3. If you’re getting stuck looking back and then dropping down into the drink. Chances are that you’re being a bit ginger on the front hand and leaving the kite too far behind you after take-off. Remember to fly the kite back up to just behind 12 o’clock with two hands as you bring your knees up. Don’t go for the grab until you have the kite settled.
  4. When you’re having problems getting the foot back in it’s either going to be lack of time and height, so make sure that you pull gently on the front hand as you slide it back in. It could also be the knees again, so make sure the board is tilted.

Keystones

  1. Elevator jump
  2. Control kite with two hands
  3. Tilt board back knee up into chest and grab
  4. Pull board in and lift foot out
  5. Tilt, look at strap and slide foot in

This video shows how you can progress your jumps and not only to take your one foot of from the board but both feet and even flip the board! Practise and you’ll become the jumping king at your local kite spot in no time!


Sent Back Roll Indy Grab

Welcome to kitesurfingtrick.com. Our Endeavour is forever to come up with most excellent kite surfing tricks. Indy grab is an exceptional trick, which requires your both legs to be lifted thus this grab makes your back rolls feeling fresh. Riding boots are easy to reach and grab in this trick. Even if you are not riding shoes, the Indy is again the number 1 option to stretch your back and feel great with adventurous Indy moves.

Some of the basic rules and principles, which we have gathered in this article, are as below. This will allow you to do it with exact way with no harm to body.

1. The very first step and take off 

First in this trick rider comes in a resisting on a good edge heading firmly upwind with the kite at 11 or 1 o’clock position. Rider’s front leg is extended and pushed forward; hips are forced back towards the end of the board, shoulders are leaning back and rider’s back leg is bowed.

first-Take-off

Image number – 1

Here is the first step and in this picture the rider resisted with good edge & sent the kite pretty hard from 11 o’clock so that the pull up will come early on. Now at reaching 12 o’clock position rider will stamp up on back leg in popping position and there pull the bar in. Rider pulls the bar in to stop the kite’s movement, avoiding it from going further back. Though rider has carved into this rotation, however rider hasn’t thrown head over front shoulder.

This would certainly aid you to obtain a smooth rotation righter than an unrestrained spin.

Image number – 2

Okay! Now on second step first extend then lift. You must position your body as soon as you depart from water, if you wait extra then further you will spin and the smaller amount of time you will have. Please remember, this also doesnfirst take off
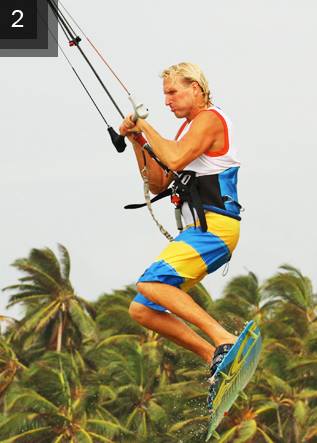
’t mean that you must be holding the board as soon as fins departs the water, however if you place your body in right position then grab will be trouble-free to obtain. Rider lifts both knees up and this helps with slowing the rotation down. Also you can’t toss your head around into the rotation if you are seeking a firm grab.

Image number – 3

 If you succeed in carrying you’re both knees right up into your chest height then the grab must be a child play for you. The blockages with the Indy are your control and the kite. Here the kite lifts you and strap up holds and you will be planning to aim the right for the middle of your board.Indy Grab image 03 Bring the board up towards your extended hand; please let your stomach and legs do the work here as you can’t bend down with such force. Permit your head & shoulder to rock back into a comfortable sitting position as your knees comes up. You can also observe here that the rider hasn’t rotated much since the last image. Rider is rotating slowly and is quick to get the board up.

Here, while seeking for the firm grabs keep your head between your shoulders and also keep the rotation slow. In this position you will use a large time keeping the bar pulled in with only your front hand, the kite will simply move from behind you to somewhat in front of you.

Image number – 4

 Hold it tight, once you get the grab. Slower your rotation & try to hold the grab as long as possible. Indy Grab image 04Enjoy it; it’s very cozy as you can also see that rider’s position in the air is almost the same as setting on beach. If you have sent the kite solid and frozen it above you while take off, you must be able to settle down and except you sense that kite dragging too far forward, oppose the enticement to look over your shoulder.

 Image number – 5

 In this position, If your rotation is controlled and the kite is not too far forward you can hold the grab until just before landing. You would eventually need to turn your head over your shoulder to make sure you complete 360 degree and perfecIndy Grab image 05
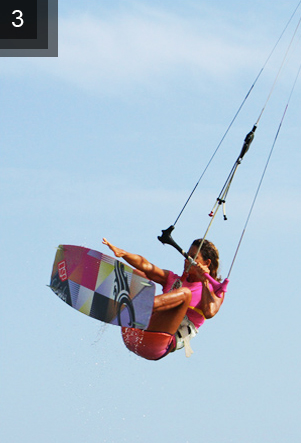
t landing. Mark your landing and obtain the board pointing downwind.

When you discharge the grab, try to get both hands on the bar and provide it a good jump to aid you land downwind.


 Top Tips

  1. Always begin with some back rolls, focusing on the send, upward take off and slow rotation and after that start to take knees up and  roll back in your yoke.
  2.  If slow rotation is your problem, then try looming it as you would for a back roll transition, and also with low speed
  3.  you will see it much easier.
  4. Also have a close look to images

Common Problems

  1. If you are over rotating your back rolls, ensure that you don’t carve up exceptionally during your take off.
  2. You must go from the edge that you have approached with and then kick up and around.
  3. Ensure that you dive the kite for the landing as this will discontinue your revolution and pull you off down wind.
  4. Ensure your hands are centered on the bar and also keep in mind to send the kite and further it goes back, then it needs to return back. There would be a perfect balance as per kite’s size.


Keystones

  1. Always send kite positively
  2. Lift knees and rock then get ready for the grab
  3. Fine solid edge with straight front leg & back leg resisting
  4. Pop up into the back roll
  5. Do turn your head and jump to accomplish rotation

Here is a video that shows how to spice up your back roll with an indy grab


Double Front Loop Down Loop Transition

One of the advanced level tricks in Kite surfing is the double front loop transition. This is tried by mostly experts or advanced intermediate surfers. The technique here is mostly based on how you balance your forward momentum on the board and then move to height and bring yourself down on the downward wind and this is where you try out the perfect rotation of yourself. So to approach this trick there are couple of steps you need to follow.

First thing you need to do is basically place yourself on the board. This is done with the right leg placed straight on the board with the left leg behind in such a way so that it is used for pushing the board. As the wind speed increases the kite will start to lift you up and this is the point you need to start rotating yourself.  Make sure you do not bend the back legs from the board as this basically slows down the entire rotation obstructing the perfect transition. The main idea here is to take you up on the first rotation and slide down in front for a smooth landing but you will notice that by the time you finish the first rotation and shift your head on the other side you are again ready to go for the second time. The next step is here when you and the kite are lifted up and you need to stay at 12 o’clock to the kite all this time by controlling the kite bar with front hand pulling it in forward direction.  Every time you jump up the kite should be at 12 o’clock position and this is done when you rotate the body but your feet should be on the board. The impressive part of this is when you are lifted in the air and try to come down it descends slowly and gives you a feel of the kite and its forward movement.

A point to remember here is the kite should be always above you during this time otherwise the downward loop will pull the kite in front and you will be away from it. Always remember that the downloop will be slow and steady so that during this movement it will land you and also has the force to pull you forward. In fact you do not need to make the whole 720° as the downloop which helps in the smooth transitioning to landing also takes care of the turnings. But this is different from kite to kite and it matters on the sizes. For instance if you are using a kite which is slightly larger than the common ones available then make sure the front hand which is over the bar to move in the forward direction to control the high speeds which is controllable with two hands in case the kite is smaller. As you move forward with the wind, you will soon realize that how the kite quickly understands where to downloop and the downwind along with it also assists you in landing your kite.


Back Loop to Blind

This moves shows an absolute control and beautiful trick in its own right, it is also the final building block to a couple of world class air pass moves. Once nailed you will be the envy of many at your local point, and it will spur you on with a new found confidence to try more technical tricks that not so long ago seemed impossible to reach.

THE BACK LOOP

First, your unhooked popped back loops need to be 100% accurate and controlled. By this we mean that you need to be executing a popped rotation at a slow pace. This will result in your land facing downwind. Such a back loop will also result with your landing with slack lines with no pull from the kite and a feeling that you’re actually dropping down. To achieve this, the three things to remember are the head position, kite and the point of sail. Try not to use your head for rotation, just look forward where you are going to take-off and leave your head square with your shoulders.

In picture A, the surfer is coming around his rotation but isn’t looking over his shoulder. This way you’ll not suddenly be round and landed, but will have that split second to think about throwing it to blind. You need to have the kite a tad lower than your usual measure. If it is 11 or 1, you will be less likely to spin under the kite and there will be something to pull against to get your knees up and the rotation to blind starts as in picture B. You can see the surfer is really pulling his knees in before throwing to blind.

Where you take-off is where you land. So if you want to land more downwind, you need to take-off more downwind. The real advantage of this is that if you start your back rotation in the air, sometime before the board passes through the wind; your brain has time to react and ponder the blind a bit. If you take-off into the wind, you will be able turn around before you have time to pull.

So once again before attempting a back to blind, hammer out back loops to get the first part automatic!

THE BLIND

The blind in the Back loop to blind is made more difficult than a front to blind because it is by the fact that not only you are throwing to blind, but you actually have to break your rotation and turn the other way. In the raley, your body is trying to twist the wrong way so it should have trained you in a certain level.

As mentioned already, your head, kite and point of sail will be crucial here. By not looking for your landing over your shoulder, you’ll find it easier to change the direction that your body is travelling in. With the kite lower, your feet will be higher and your body will be in a horizontal position sp you can pull against the bar to stop the initial back rotation and go the other way around. And having taken off earlier, you can rotate more slowly which in turn means that there will be less momentum to fight against.

Do not forget to turn your head and twist your wrist, pointing your thumb at where you are going as in picture C. This will help your shoulders turn further, enabling you to turn the board further and stick a more downwind landing with the bar in the right place (picture D) to grab when you go for the surface pass.

Once you have mastered a load of back loops, do the same with several raleys to blind and then you will be ready!


SHOWTIME SEQUENCE

Following the sequence which is relatively low and in very light wind will give a good way of confidence. Do not forget to make sure your leash is on the correct side.

pic 1 – The surfer come up over the board flat off and unhooked knowing that the coast is clear. His kite is around 1 o’clock and his hands are together in the middle of the bar.

pic 2 – From a broad reach the surfer carves hard against the power in the kite, front leg extended and back leg flexed and ready.

pic 3-4 – As the board turns upwind, the surfer extend his back leg and pops up. The surfer also keeps his arms bent as this will make the pull in for the twist to blind much easier.

pic 5 – Due to the pop and the kite position, the surfer is pulled into a more horizontal back loop.

pic 6 – As the surfer comes around the back loop, the board is behind and up in the air, almost where it would be during a raley. This is the moment to throw the blind and later on you will miss the chance as the board will start to drop.

pic 7 – The surfer pulls the bar hard towards his front hip to initiate the twist to blind. If the kite were much higher, this would be harder as it would not turn. At the same time the surfer turns his head in the opposite direction and keeps his knees up.

pic 8 – To make sure, the surfer turns far enough and looks around towards the direction of travel.

pic 9 – The surfer will then be able to turn his thumb down and forwards, twisting the bar which moves the shoulders further around, therefore allowing the surfer to get his upper body low.

pic 10 – So now an arc has been created, the surfer can easily pass the bar behind the small arc of his back.

pic 11 – And finally, the surfer turns to face the new direction of travel and sort it out.

Here´s what it will look like when you master this trick:


Downloop S-Bend

We are throwing this just in time for those winter gusts and/or trips abroad. We have noticed quite a bit of a down looping this summer and this is a fairly simple add-on. The move opens up a plethora of possibilities down with super power up. It can deliver some serious arching height and looks great off a wave and is a real crowd pleaser when thrown to blind.

THE DOWNLOOP
The kite downloops when it is sent with the direction of travel by being somewhat aggressive on the front hand side of the bar. It is best to start with the kite at 12 o’clock position.

THE S-BEND

An S-BEND is the most effective way of completing a pop forward rotation when powered up. The primary difference between this and a standard front loop is the take-off. When learning the front loop, we usually throw our head and front shoulder down towards the water, bending and folding in the process as if we were role-playing. Because we have sent the kite, it gives us the necessary lift.

THE FULL MONTY
Like many moves, your first attempts at this are best when you are not clinging onto your bar. Larger kites will give you more lift and time; smaller kites will give turn more quickly, so middle of the road relative to your weight would be ideal. The key to down looping is the timing, more precisely going early.

GO FOR THE GOLD
(sequence)

  1. The surfer carves the kite and starts to move forward. In anticipation, the surfer has compressed his legs to get ready for the launch. The surfer is not waiting to get ripped off the water by the kite, but instead explodes upwards as soon as he feels the kite begins to pull. Up to this phase the surfer could also be going for a straight down loop. (The only difference being that as the rider jumps, he will look over his hands towards the kite for balance and prepare for a downwind landing).
  2. As the kite starts to pull, the surfer stamps down on the back leg and throws him upwards, literally jumping into the air.
  3. To initiate the rotation, the surfer has thrown his trailing right shoulder up.
  4. The kite is now generating a fair amount of pull as it turns good top to toe stretch. This is real commitment time, just hold on and enjoy your flight.
  5. The kite continues its journey and the yank will in fact pull the surfer around the rest of his rotation.
  6. The surfer’s only effort is to twist his head and search for the landing strip.
  7. Once this kitesurfer sees the water, the rest of the body follows suit, the completion of the S-BEND bringing his feet back underneath. If at this stage you feel you still have some height. It is time to let go with the original back right back hand to help slow your rotation and balance the landing.
  8. On touchdown, the surfer absorbs the impact with soft knees and once they have recovered, the surfer grabs the bar again with the back hand, sails on downwind to hook back in and giggles blissfully.

PROBLEM YOU MAY ENCOUNTER
Ideally, as you land you’ll see your kite once again diving down towards the sea. That means that you can grab the back of the bar and pull the kite out of its dive posture as you hook in.
There are 2 Reasons why the kite does this.
First – If you edge for your country and wait for the kite to physically rip you off the water, the kite will almost have finished a complete loop before you get airborne. To correct this, just think about going early. By this we mean swap your hands, carve and jump up. You should then get the pull in the air, a slower rotation, more height and a sweeter landing.
Second – You are riding in a tiny kite.

TOP TIPS
If you are having trouble finishing your rotation, try starting with the kite higher. It is fairly unnatural to stick the kite at 12 o’clock.
More power in the kite should give you a slower rotation but a more preferred gun blazing downwind strike.
Once you are confident, try using more power. That is to say do not pull the trim strap as far down as you usually would for and unhooked move.

Here are some videos of this kitesurfing trick


Front Loop Kiteloop

This is a stunning move for those that really like ballsy tricks where it is all about setting up everything perfectly. Before going through the move, it is encouraged to simply “go earlier” and “pull of your life”,   stepping it up a gear so you get focused on the move. This trick is all about commitment, once you have set the wheel in motion, you are a whole lot better off going the nine yards than trying to make your way out. The good news, however, is that you can build up into this trick and therefore save yourself onto any unnecessary spankings.

To give yourself a good chance of nailing the front loop kiteloop, there are definitely a few things that you should be able to do. Due to the fact that you’ll be looping forwards whilst the kite loops backwards, you will perform this move blind, as all the action will be happening behind you. The base for learning this move is a front loop transition, so this needs to be solid. On top of that, this shouldn’t be the first kiteloop you are attempting, as you really need to have your fast and sometimes hard and difficult landings down.

FIRST STEPS

To get your head around the idea of what is going on we will start at the front loop transition. Normally as you exit the transition, you should dive the kite hard. This pulls you out of your rotation and encourages you to land downwind. Essentially this results in the kite diving straight down through the window, and it usually takes a fair old tug to stop the kite from hitting the water. It is then when you carve back onto your edge and the kite rising which takes you back in the other direction.

Once you done a few front loop transition and feel comfortable with the approach. As you exit the move, just as your board touches down pointing off wind, rather than pulling the kite back up, pull harder with your back hand so that the kite loops under itself. This way you will follow the pull of the kite and carve out in the same direction that you went into the move, so no change in direction.

THE APPROACH

Pic A – Shows the surfer just before the take-off. If you look at her hand and the bar, you can see that the surfer has sent the kite back, but jump is not that aggressive. There are two reasons for this. First, you do not want to be jumping high because this move is all about commitment, make it easier to commit. Once you are three meters up, you may find the thought of looping your kite-less appeal. Second, you do not want your kite to go too far behind you. The further back it goes, the lower it will loop, which in turn means a heavier landing. Apart from the gentler sending, much as transition, the surfer is still carving hard against the kite off his back foot and dropping his weight against the upward pull of the kite.


TIMING

Pic B – The surfer is most definitely rotating into a front loop. You can see how far his front shoulder dipped still down from the take-off and that the surfer has already brought his legs up for balance and speed of rotation. However, the really exciting part of this picture is the bar. His back hand has slid all the away to the end of the bar, so the surfer can get decent purchase to crank the bar in and get the kite turning into its loop. It is also worth noting that the surfer has not pulled his front hand in. It is very easy to pull hard on the back hand and subconsciously pull down on the front hand too. Just keep the bar sheeted in with the front hand and let the back hand/arm do all the work. When learning this move, the harder you pull on the bar and the quicker the kite turns the gentler the kiteloop will be. From here there is no way back.

KITE CONTROL

Pic C – To be in control of the kite and make sure it loops, you need to have tension on the lines. Here you can see that the surfer has the bar sheeted in, so the kite will react. Also by making a physical effort to keep the bar sheeted in, you are far less likely letting the bar slide out as the power comes on, which would unfortunately stop the kite from turning. An added bonus is that, as the looping kite pulls, you will feel it through your arms, not just your harness and thus, you will able to keep your balance more easily.


COMMITMENT

Pic D – The surfer has been pulled around his front loop by the looping kite and the pull of his harness hook. As long as the kite loops, you will always finish your rotation. Even though she is around, if you look closely, the surfer still has the bar pulled right in with both hands  thus giving it plenty of hand. It is tempting to ease off because it will feel like the kite has turned further than it really has, but if you do, the best end is the splashing down in like a doggy transition. The surfer is also looking where to go. As a reference, try to look slightly behind of the downwind, this way you can land with speed and then carve out, and if you have looped the kite too fast, you can carve back from where you came, having turned the whole thing into a front loop kiteloop transition.


LOCOMOTION SEQUENCE

1. Approaching with speed, the surfer has a good check to see the room to get pulled back and downwind by looping the kite without risking anybody else. The surfer got a bit of water under too. The surfer sends the kite back positively, keeping the bar on the sweet spot.

2-3.  As the front loop goes, the surfer throws himself forward and down as the kite lifts him up off the water. At this point the surfer levels the bar and sheets in.

4. As the surfer starts to rotate, sliding the back hand down the bar and pulls his knees up and then pulls hard on his back hand to get the kite looping.

5-7. To increase his chance of success, the surfer keeps pulling on his back hand to make sure that the kite turns all the way and also keeps the bar pulled in, so that there is tension on the lines and the kite does what the surfer expects.

8. So far all through the rotation, the surfer has been looking over his back shoulder. As the surfer gets most of the way around the loop and focuses on where to land.

9. With the kite powering around its loop, it spins the surfer around so that his harness hook is pointing at where the pull is coming, slightly behind of downwind. The surfer keeps the bar sheeted in and keeps turning the kite with his back hand.

10. This is the moment of most power as the kite starts to climb back up. The surfer keeps his knees up thus, pulling the bar with his hands to keep the balance.

11. The surfer has survived the loop and just need to stick the landing. With the power of the kite decreasing, the surfer starts to drop. This is his cue to let his feet drop beneath.

12. As his feet drops, the surfer aims for a downwind landing, concentrating on keeping his weight over the board and not to one side or the other.

13. The surfer lands tail first but onto a level board, so the surfer can soak up the speed. Once steady, the surfer carves back onto his edge, with a great relief plus the applause.

KEYSTONES

  1. Keep bar in to sweet spot on take-off.
  2. Move back hand down the bar.
  3. Start kiteloop as soon as you feel you are rotating under the kite.
  4. Keep both hands on the bar and keep the bar in.
  5. Look to land downwind over the board.

Here is a video of this trick


Backloop to Blind with Air Pass

To learn this move you need timing and technique because the air pass on this trick is dependent on it, not on brute strength, it is within reach. But, i if you dangle your thrusting hips, it will serve you proud! Also, we will look at this trick as a stepping stone towards the much cooler named KGB.

REPETITION
A good starting place is to go back to the popped back loop, as you’ll need to give yourself time, some extra height and changing of rotation in preparation of throwing in a cheeky air pass.
Once again you will need to practice a slow rotation, so the two reminders to remember are:

1. Where you take-off is where you land (downwind to downwind). So bear off the wind a lot before taking off. This way you will do more of the back loop in the air than on the water, which in turn will give you time to prepare for the pass and reward yourself with and easier stick downwind landing.

2. Mind your head. If you look around over your front shoulder as you take-off, you will spin much faster, so aim to keep your head square with your shoulders and look through the gap between your arms. Not only will this slow down your rotation, it will also make your direction change easy against the flow when you throw the pass.

As far as your rotation is concerned, you will need to get more inversion. This does not mean you need to be upside down, but if you look at pic A you can see how the surfer is in a horizontal position and has his knees up above his body. This will stop his body dropping away from the bar when the surfer goes for the pass. The simplest way to get into this position is to lean your body back over the tail of the board as you pop, which will lay you onto your back in the air. As soon as you leave the water, make huge effort on bringing your knees up.
Try to keep your kite around 11 or 1 o’clock, as it will help you with the rotation, body position. It will give you something to physically pull against when you go for the pass much higher and you will be dangling under the kite, and also you will need that extra energy for that.

TIMING FOR THE GO
Pic B – we can see that the surfer seems much inverted compared to the previous. However, if you look closely, the only difference is that his feet are higher and his legs are extending, this means that the surfer is going for it. From practicing this trick, you should know the moment when you’re tucked up the bar is close to you and you start to drop down as you complete the back loop. You need to go for the pass just before the dropping time. To give yourself more “float”, kick your legs up just before you throw the blind twist. With the board up, momentarily no force will pull you down. You can see in this picture that the surfer comes further around the back loop and his hips are moving around towards the bar.

THROWING THE PASS
Once you have kicked your legs up and the board away, you’re throwing yourself to a blond, just from a rather familiar position. The actions are the same; you will pull hard on the bar with both hands and bring it towards your front hip.


Pic C – You can see that the surfer has pulled, released the bar with his back hand, and is now throwing his head, hips and shoulders around. This is really where the kite position is so important. If the kite is too high, there will be nothing to pull against, and you’ll find it hard to get the blind rotation.
Pic D – You can see how the surfer twists his wrist and thumb down and around, which enables his body to twist around further. Commitment is the key here. It would be very easy to give up and let go but you must reach around with your free hand. If the kite is sufficiently low, your pull before throwing should result in a tiny bit of slack as you drop and therefore making the pass easier.
Pic E –If you have timed it right, the bar will come to you, hopefully before your board touches down. Just let the kite pull our arm around and try to follow with your head for a balanced landing.
Pic F – Voila! When you watch someone doing a trick like this and it looks often effortless, take in mind that you need a complete conviction and your best kite face.

THE COMPLETE SHOW
1. With enough power in the kite and speed under the board to pop against, the surfer has unhooked, pointed off the wind and is now carving hard into his pop. His bum is down and front leg is extended for a decent edge whilst his back leg is slightly bent ready to explode for the take-off.
2. The board turns up and it is time to extend his back leg as the surfer leans back over the tail to initiate a more horizontal back loop. His head is looking forward to where to go for the rotation to slow down.
3. As soon as his board leaves the water, the surfer starts to bring his knees up towards his body. He is still looking straight through his bent arms.
4. Still going up and around, the surfer isn’t looking over his shoulder, but lets the back rotation bring his hips around towards the bar.
5. If you were to look at the bar, it has completed the back loop. However, the surfer will always be following. From practice, he feels the rotation around onto the bar, so it is time to go for it. The surfer kicks his legs up, pulls the bar hard into his front hip, thrusts his front hip up and around and throws the pass. Because the kite is low enough, the surfer has something to pull against to kick-start his blind rotation before letting go with his back hand.
6. Turning the body, the surfer twists the bar around behind his back, enabling him to turn even further and position the bar so that it is ready for his free hand as it reaches around.
7. As if by magic, the bar is where it should be and the surfer grabs it with his free hand, whilst simultaneously releasing his other hand.
8. Dropping down, the surfer lets his arms untwist and lowers his legs in preparation for the landing.
9-10. As the surfer comes in and looks around as to where to go he reaches up for the bar with free hand. Both these movements will help balance the landing. Then regains control of the kite with both hands on the bar and sails on smugly.

Here are some videos of this trick:


Back To Wrapped

This trick is a fairly funky move in in its own right, although you do not get to see them as much. Most riders skip it in preference of going straight into the back move, and once they land, then they are unlikely to go back to the wrapped version. However, if you’re not one of the better riders in the country, this is a very useful stepping stone which will satisfy and build a consistency for more progressive moves.

The beauty of the back to wrapped is that the momentum of a slightly over rotated back loop can carry you around to wrapped. Without stating the obvious, you will need a controlled unhooked back loop to toe side at the very least. If you are already popping to blind, then this will help. Even though blind is very different, having a natural bar pass will make life easier.

POP LATE

In many pass tricks, the difficulty is in slowing your rotation down. In this one you need to speed it up. The simplest way to do this is to carve your way up into wind before popping off your back leg. This late take-off will spin you faster and will send you into a second rotation, at least to toe side, without you having a moment’s thought. The only disadvantage is that you won’t have much time to prepare for the rest.

ELBOWS IN

When you carve into the wind it is more likely that your arms will be pulled out by the power in the kite. As soon as you leave the water, you need to get your elbows tucked into your side. If you can get them in, your hips will roll onto your hands, which keeps the bar in close and enables you to keep your balance and pass.

TWIST AGAIN

You need to rock your back knee in order for you to stay with the move. As you rotate with elbows pulled in, you will need to lift both knees. This will not only speedup your rotation but will also place your back knee high enough so you can kick it through. This knee force will accelerate your second rotation and will take you past the landing toe side. Remember to twist your wrist once you release the bar with your front hand as you will be able to turn your shoulders further. Once you get the hang of things, you can even pull your hands in and steer the kite down as you push through. This will bring everything together at your hips and helps keep the kite lower for landing, preventing it from pulling you out of position and off balance.

TOUCH DOWN

It is all good when you are through with all that leads, but it means nothing if you are not ready for the touchdown. To stick this you will need to get around to downwind preferably a bit further. To increase your chances you should try and land tail first, as the back of the board will then pivot you around a touch further. To make this possible, get your weight on the ball of your feet, not your heels, otherwise you will keep slamming. Finally, keep looking around so your body will turn to face your intended direction of travel and make the pass behind you considerably easier.

GIVE IT A GO

pic 1 – The surfer has checked for space, turned off the wind and unhooked, hands on the center of the bar with his weight over his back foot.

pic 2 – The surfer carves hard into the wind, dropping his weight low and resisting the power by driving against both heels, making sure to take the weight of the kite on both hands evenly to stop any unwanted kite movement.

pic 3 – The surfer has carved further into the wind than a normal pop would do. His head is turned to look right upwind over his shoulder. Also, as the board turns up into the wind and under the surfer, there is a little resistance from the edge so pulling his elbows back in has been started already.

pic 4 – When the surfer feels that there is less pressure on the bar and on her legs, the surfer quickly pops. This means that the explosion off her back leg will accelerate his spin. You can see that the surfer extends his back leg as it pushes him around as opposed to up into a huge pop. The timing here is very important, If you leave it too long you won’t even get enough height to complete a back loop.

pic 5 – Because the turning off so far on the water, the surfer is already three quarters around his back loop as soon as the rotation is in process. His aim is to keep his elbows in and bring his knees up making him smaller because this will help keep momentum going for the rotation to wrapped, and by lifting his knees, the weight of the board will not pull him down away from the bar too soon.

pic 6 – Coming around the back loop, the surfer’s trailing knee is up near the bar and his hands. As he continues to rotate, his hips will follow his knees and roll towards his hands. Once you have tried it enough to give your brain some time, this would be a good moment to jerk our hands in and even steer the kite down as you do so. At this point, the surfer must keep looking over his shoulder and around into the next rotation. If he were to focus on where to land, it will slow his spin and prevent him from getting around.

pic 7 – A split second before this shot, the surfer  have really pushed his back leg and knee just as his hips rolled towards his hands. So he have done it with both hands on the bar to keep the kite from going up and allowing him to get hands and hips as close as possible. As the knee comes through, the surfer lets go with her front hand and keeps looking over his shoulder.

pic 8 – As the surfer turns, the wrist is twisted and the thumb pointed towards the small of his back. This enables him to turn further. He lands back foot first with weight on the ball of his feet. The board will pivot further around here without the surfer catching his heel side edge.

KEYSTONES

  1. Carve hard and long, lead with head.
  2. Elbows in.
  3. Knees up.
  4. Both hands to hips before releasing.
  5. Twist your wrist.

Here are some videos of this trick:

Aaron Hadlow shows how to make a back 2 wrapped

Konstantin Tuludis also knows how to make this trick

As well as Ariel Corniel