Unhooked Front To Blind Ole
There are a few takes on the front to blind, powered, unhooked, hooked, sent kite, you name it and it’s probably likely. We’re adding the unhooked Ole to the list as it serves a couple of purposes. Firstly it does allow you to go for and learn the blind with a slightly higher kite. Secondly on a big lefty kite in light winds, you will often need to have the kite a bit higher and with the resultant upward pull on the bar “Oleing” out is a health conscious option – oh yes and it does have a different look and feel to a standard bar pass ending. Before you attempt this we’d suggest you can pop front roll, and preferably relay to blind, but if you’ve got the hooked version down then this is a mere step away. Following are a few points worth more than a moment’s consideration.
- Take off, pause and rotate Pic A.
As with all things unhooked and popped we’ll assume that you’ll have the bar trimmed correctly, hands centered and approach with good speed before bearing off with your weight back to unhook, dropping low and edging hard into your pop, stamping hard to get the height without a cheeky kite send. If you use your kite you’ll lose forward momentum and the landing will be difficult to pull off.
For extra lift when learning you can have your kite positioned higher, just above 11 or 1 o’clock – but don’t move it up. Here the rider has her kite parked at 11 o’clock and has just popped hard to get up off the water. What’s clear to see is that the rider has not yet started her front rotation; she is still looking forward to where she’s going. You too must separate the movement, even if only by a fraction of a second, but you need to pop before throwing your head and shoulders down and around. As a result you’ll get the height, if not you’ll be diving yourself down into the water and onto your back.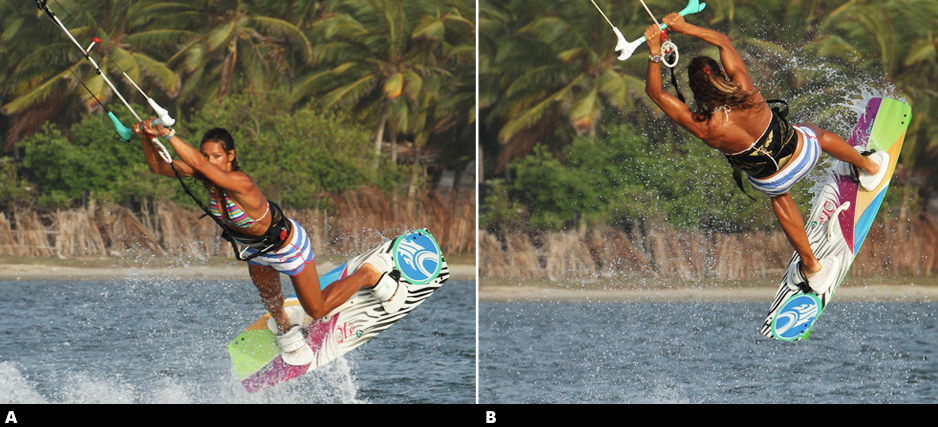
- Front Hand Pic B.
Whilst rotating around, especially if you have the kite high, it will be very tempting to lean on the back hand, and also very natural to have pulled on it whilst edging to pop. Therefore as you spin around it is very good form to keep applying a bit of pressure onto your front hand as this will both stop the kite from floating up above you, and it will keep the kite moving forwards, which will make the landing easier as you’ll have momentum. The rider is only just into her rotation but she is already “leaning” on her front hand. This means that when she finishes her rotation she’ll be able to pull herself towards the bar to throw the blind – if you end up hanging under the bar you can only spin to blind, which won’t offer you any consistency.
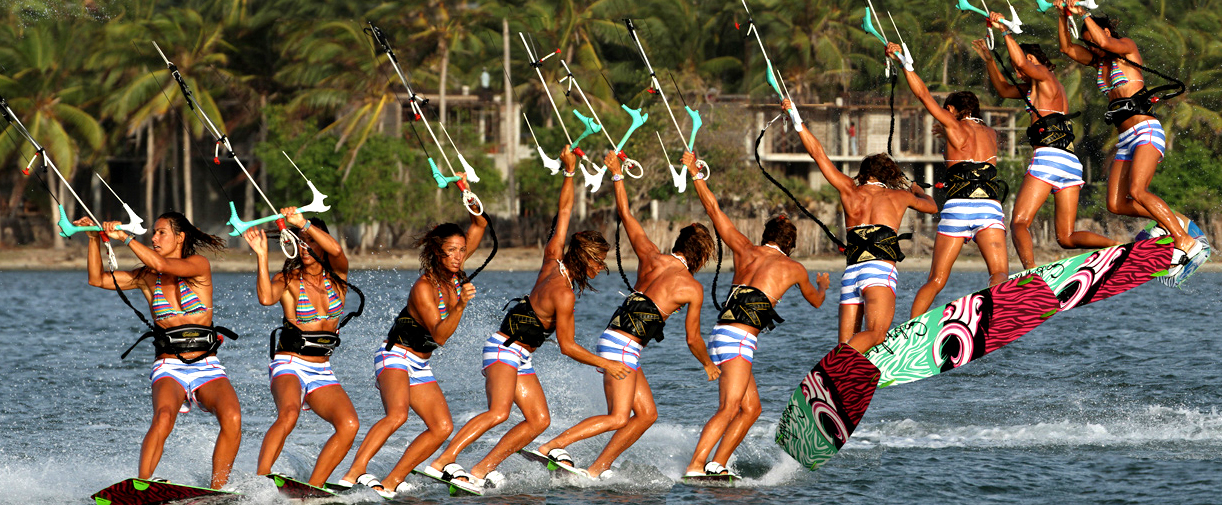
- Look Pic C.
We’ve said this before but whether it be a hooked front to blind or an S-bend pass the principal is always the same, another very brief pause between finishing your rotation and throwing the blind. This prevents you from over rotating and you have much more chance of keeping the kite in the air, rather than releasing one arm and starting the mother of all down loops.
Here the rider has rotated the full 360° and is focused again on where she’ll land. This momentarily slows her down, almost pauses the rotation, enabling her to set up for the blind. If not she would be spinning under her kite. From here she can now pull on the bar hard with both hands and throw the blind. With her head, hands and bar leading the rider can throw the blind and swing her legs through to turn far enough for the landing.
- Landing Pic D.
Landing blind for an Ole or pass needs to be flat on the board, downwind, not on an edge across the wind. This way you’ll be moving toward the kite and therefore there won’t be any tension on the lines.
Sc bearing away into the move is important, as this leads to a more downwind landing, and pulling hard before committing to the blind will also help. In the photo the rider’s board is off downwind so her momentum will keep her moving towards the kite. Now what differentiates an Ole from a surface pass here are the position of the rider’s body and her bar. The rider is standing upright over the board with her head high, not bent over double, and she is holding her bar high above her on an outstretched arm. This position is the perfect set up to an Ole.
- The Ole Pic E.
Firstly let’s remember what an Ole is. You will be moving the hand that is holding the bar, across, upwind of your head and shoulders to the other side of your body, from where you’ll be able to continue riding, but now toe side rather than blind.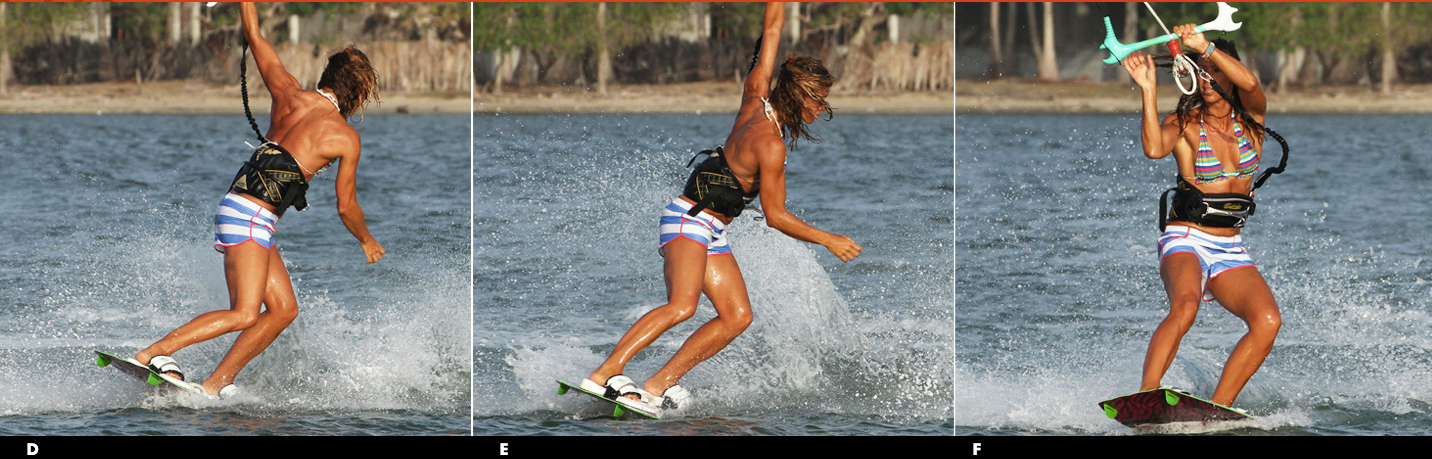
That’s all it is, you’re not trying to turn the board or slide it around to bedside. It’s an upper body movement to get the bar across to the direction of travel and no pass is required. You can see in the photo that because she is travelling towards the kite the rider can push the bar upwind of her and then simply move her hand across in front of her face – now the bar is the same side of her body as the kite and the natural order of things are restored.
- The Finale Pic F.
You have a few options to finish things off, and regardless of what you do it’s a good idea to get both hands back on the bar so that you get control of the kite. Continuing on toe side shows good control, and will certainly confuse a few onlookers. That said if you land with a lot of power and speed the chances are that you will carve onto your heels, so keep going and ride out in the other direction. Here the rider has pushed the bar across, finished her Ole and is reaching for her bar. She has a lot of weight on her heels and as a result will steer her kite across the window once she has her back hand on the bar and follow it by continuing to carve on her heels.
Top Tips
- Apart from making sure that your popped front rolls are working off pat, the secret is to land blind and yes you’ve guessed it, pause foss split second before attempting the Ole.
- If you rush the Ole you’ll fall backwards or if you really rush the Ole you’ll start to rotate into it before you’ve even landed. So first land, balance and then push the bar.

Common Problems
- Assuming that you can get to blind the main issue will be falling backwards. This is normally a result of leaning back to push the bar across your face, rather than keeping your weight balanced and physically pushing the bar up wind and past.
- If you land on your toes across the wind the lines will tighten and you won’t be able to push the bar without it pushing you back, or you leaning back.
Keystones
- Pop then rotate
- Look and pause
- Pull with both hands then throw
- Land downwind and flat – pause
- Then push the bar upwind and across
Leave a Reply