Raley To Toe Side
This sport of kite boarding moves with different styles and ticks. The benefits of this sport can be measured by its refreshment and popularity worldwide. Today we all like a Raley, and funnily enough most of us learn on our preferred side, favorite foot forward, leading to a solid heel side touchdown. It looks like an embarrassment to overlook the other side and deny yourself the kudos of flicking your board both ways. Therefore the Raley to toe side, and just to prove it is a genuine move it even has its own name, the Krypt. With no trouble you can gladly learn these both hooked or unhooked. In this article, we will be going through the unhooked variant, but be assured that apart from the actual physical act of unhooking the rest remains pretty much the same for both, from approach to landing.
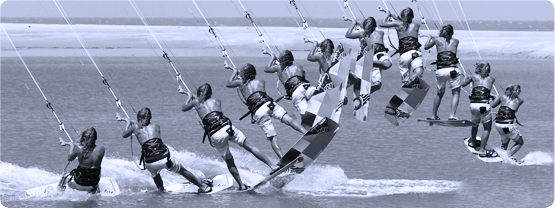
The Approach A.
As in every trick your approach will always determine how well things will turn out. Please have a look in the picture that the rider has her kite just below 1 o’clock, she has turned the board off the wind onto a very broad reach, whilst keeping her weight both upwind of the board and back towards the tail of the board. You can also see that her front leg is extended and both her elbows are tucked into her sides. Not only is this the perfect position from which to unhook, it is also the perfect set up for a Raley.
Now over here Kite height is very significant, too high and you’ll fly, but too low and you may not have the confidence to pop, so a happy medium is required, at a height just about where your kite is happily flying forward without creating lift, as a reference point this will be just below 1 or 11. Suddenly bearing off the wind allows you to lose tension from the lines and unhook, 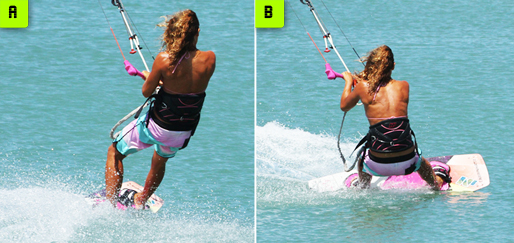 and it lets the kite drop back a touch so that it will pull you downwind, easier landing, once you pop. Weight upwind positions the board between you and the kite so you can pop without the kite pulling your shoulders prematurely over the board. Then weight back over the tail so that you can rapidly and professionally carve the board upwind to pop, the extended front leg helps this. Elbows are tucked in to stop the kite from pulling your arms out straight and you over the board. Now you are all set for the Raley part.
The Carve Pic B.
Your action carving up against the kite needs to be accurate and quick; or else the kite will win the tug of war. With your weight back over the tail of the board you only need to turn your shoulders and the board will carve spec the shape that some lovely board designer put there for such a purpose.
Please see picture B wherein the rider has turned her shoulders and the board carves upwind, putting tension on the lines and thus generating some resistance. This resistance is your platform to pop off. Though to make sure that you are in control you need to keep your position. The easier way to do this is not to let the kite drift up, which it will want to do as you pull against it.
The rider keeps both hands in, arms bent, but her focal point is on keeping the front hand close, as it’s natural to pull on the back one as she turns away from the kite. Also as the rider carves she resists the pull from the kite with her back leg, which combined with her arms allows her to keep her weight upwind, on that edge, turning the board towards the wind.
The Pop Pic C.
Raley is simply an extreme pop. If you’ve somehow managed to oppose on the aforementioned platform you will be in a position to, and have something from which to pop. 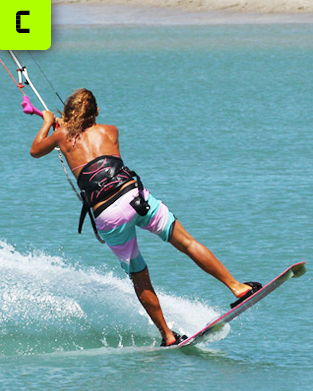 As the board turns underneath you it’s the right time to stamp. The rider feels the board turning under her, and more significantly feels herself being pulled forwards by the kite. This is her cue to pop. She pops hard against the board with her back foot by stamping down and extending her back leg as explosively as possible. Her front leg has remained extended throughout. The amount of pop you get will depend on a few variables -speed, power, timing, aggression, but your aim is to extend, really focus on straightening your legs, uncoiling the spring which is you.
The Flick Pic D.
There are two possibilities in a Raley, to end up with the board horizontal and behind you,  or flicked around vertically behind you. The second talked option will make all number of tricks more attainable and the Krypt is no exception. This flicking action is simply a continuation of the carve upwind and by extending and letting the board go you should end up here.
In this position you are airborne you also require to take stock of what is going on lest adjustments need be made. The rider has let her board flick around by carving hard to get the board into the wind and extending fully as she took off. She now wants to make ensure that she is in control, and here that means that the kite is doing what it should. If you’re well versed in Raleys, you know that once you have it nailed the kite doesn’t move, but if this side is new chances are the kite will have gone up. If it has, steer it down, the rider’s bar here is angled forward to keep the kite from rising. You’ll need to utilize both hands. The rider will also be spotting her landing, that is to say she’ll be working out where she’ll most likely land so that she can prepare for it.
Landing Gear Down Pic E.
Gravity always wins and your legs will naturally fall underneath you, 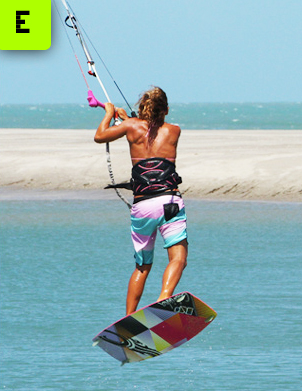 which is the beauty with a Raley. That said if you start with your kite at 45° or below Newton may not be able to save you. You can see in the picture the advantage of the flick, the rider left foot is forward as her front foot was flicked around behind her. If you have a strong toe side preference, chances are that you’ll automatically keep this position, but just to make sure, try to bring your knees up towards you as the board falls. As your knees come up you can pull your toe side leading knee under the bar, much as you would for a gentle pop to toe side. Here in picture the rider pulls her left knee through underneath her.
The Result Pic F.
By pulling her left knee through and under the bar, the rider will now happily and happily 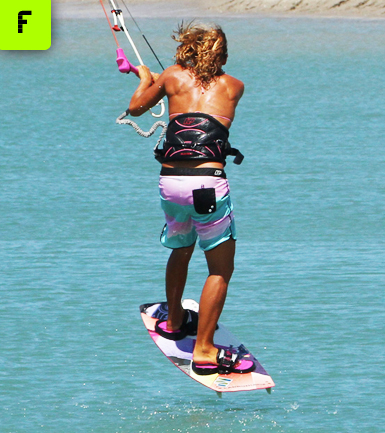 land tail first for a toe side landing and a Krypt claimer. By keeping the bar in close she lands over the board and is not pulled forwards by the kite. Once you have landed, either bear away towards the kite and hook back in, or casually pop back to heel side and ponder what you’ll do next.
Top Tips
- The very first tip is to start off gently, you don’t need to be hounding along at Mach 10 with the intention of a full blown Raley.
- A decent extended pop will give you the feel, so concentrate on carving and extending your legs and body before landing.
- Also have a good look on images.
Common Problems
- If you find that you are landing very downwind and having to carve around onto your heels, the chances are that either your kite has drifted up, or your error have extended which means that the kite will pull you too far downwind. Keep your arms tucked in and don’t be afraid to dive the kite down to keep you going where you should be.
- If you are catching your toe side edge on landing you don’t have enough height, so either pop harder or try with your kite slightly higher in the window. These are the things to keep In mind.
Keystones
- Approach with weight upwind, back and front leg extended
- Carve hard upwind with arms in
- Explode against the edge with your back foot
- Extend and feel the flick
- Pull arms in and bring back knee through
Leave a Reply