Inverted Grabbed Front Loop
Funnily enough some of the most pleasant to watch and pleasing on the eye kiters are not necessarily the most radical, but simply the most stylish. Obviously there are the golden few who combine both and have as a result forged a decent career out of kite surfing. So with that in mind here’s another way of adding the mustard onto a move that you can already do, the glorious front loop. For this very reason we won’t be delving into the finer details of the front loop, as we’ll assume that you have them dialed, but rather concentrate on the required aspects of pimping your FL, polishing and adding to the bits that matter.
The Take Off
Your approach and take off should be as normal. Coming into the front loop you’ll need to be thinking ahead so it’s best not to change the way you get off the water, but for one thing…
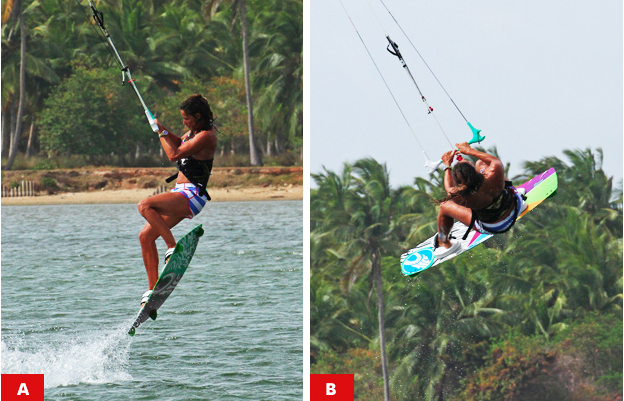
In Pic A. the rider has already committed to her forward rotation as per normal, she’s sent the kite and kicked off her back foot to push into the rotation and has the bar in with tension on the lines to control the kite throughout the move. The important exaggeration is in her head movement. In an effort to create a more inverted rotation the rider has really thrown her head forwards towards the nose of the board. This will rock her weight and centre of gravity forward of her harness hook and literally tip her upper body forwards, lifting the board behind her.
This is in preference to turning her head back and spinning under the kite and around her lines. Also note that her bar is close to her and her hands are not above her. If your arms are straight and the bar is above you, you won’t be able to throw your weight forwards. The resultant tipping from your head on your front shoulder will give a more horizontal body rotation, but not an inverted one – for that we need more. On the way up get the kite close to 12 o’clock so that it is in position for the rest of the move.
Arch de Triumph
Getting your feet up once again relies on some head work. This is potentially the most confusing and disorientating part of the move, as it is very different from what you will have done before.
Pic B. Once the rider feels that she is rotating and has brought her knees up towards her body she initiates phase two of the inversion, most likely just before the 180° mark. To get the extra purchase on the inversion the rider now throws her head back, as if she were trying to see the water underneath her, in a back arching type of movement. It’s very important at this time to keep the bar in and tension on the lines, as you will need to apply some pressure through your hands to help. With her head on the way back and down, the rider’s knees, feet and board will rise further.
It is at this point in a front loop that you would most likely turn your head further to see where you are going, and it will take some concentration to override your muscle memory! Also as you throw your head back don’t be tempted to correct the kite, as strangely once you’re upside down you may well get confused as to which is your front hand. Not to worry though as the grab will sort that bit out.
Show Your Board
Pic C. As soon as the rider threw her head back she released her back hand and went for the tail grab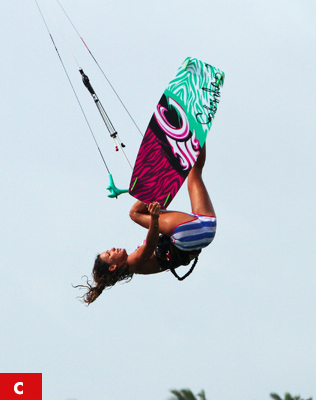 . From this moment on you are committed. Holding the grab the rider has pushed and extended her legs to get the board up. By pushing her feet away whilst holding the grab with her back hand the rider is able to “bone” the grab out. You can see that the rider is looking up at her back foot, but with her head still back.
The good news is that because you throw your head back rather than look for your landing it should slow your rotation down so that you can hold the grab and inversion for longer. Do beware though that if you’re on a small kite, whilst you freeze in this pose the kite might well start to move forward and pull you downwind.
Coming Down
At first you’ll most likely prefer to come down the right way up, upright, and set up for your landing.
Pic D. To get the board down and her head up, the rider uses gravity.
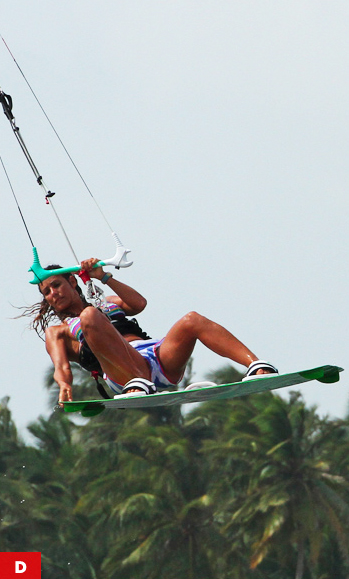 Simply by lifting her head, moving her chin onto her chest, she rolls forward as the weight of the board pulls her feet down. With this new view the rider can focus on where she’s going to land and act accordingly. Here the rider holds her grab whilst diving the kite with her front hand for touchdown. However if you feel that you’ve already over cooked it on the front hand you may have to let the bar out to avoid a super fast reception.
Once you’ve got this nailed and your confidence up, you can hold the inversion and grab for as long as you like, suddenly releasing and turning in time to land.
Top Tips
- For your first attempts just site it all down, be gentle and don’t jump too high. Ideally we’d recommend leaving the grab out and just concentrate on getting the board up. It’s stunning how going upside down can and will disorientate you.
- If you get it wrong taking it easy there’ll be no consequence. However once you have the movements and develop some special awareness we’d recommend sending the kite well on takeoff for two reasons.
- With a front loop you are likely to release the edge early and therefore need the extra oomph to get the height. Secondly as you’ll be hanging off your front hand whilst you grab with the other, with the kite further back to start with you are less likely to overdo it and come in lit.
Following Sequence 1.
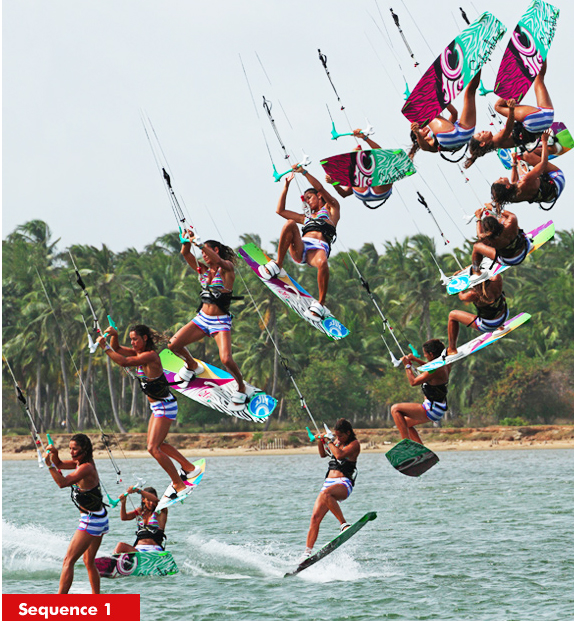
Pic 1. The rider approaches with her kite at 11 o’clock, good speed, hands centered on the bar, a fine edge and the sends the kite as per front loop.
Pic 2. The rider kicks up and into her front loop off her back leg, but really concentrates on throwing her head forward towards the nose of the board to tip her forward into a more horizontal rotation.
Pic 3. As she leaves the water the rider brings her knees up, and gets the kite back up, with the bar held in to keep tension on the lines and aid with the inversion.
Pics 4 & 5. Coming around towards the 180 mark with the board rising the rider throws her head back, arching her back in an effort to get her feet above her.
Pic 6. With her feet up the rider releases her back hand and reaches for the tail grab.
Pics 7 & 8. Grabbing the board the rider pushes her feet up, extending her front leg to bone out the grab and get her sumptuous new board on display.
Pic 9. As she comes around the loop the rider drops the board down by lifting her head, so that gravity can take over and looks towards where she’ll land.
Pics 10 & 11. Releasing the grab on the way down the rider reaches up to get her back hand back on the bar.
Pics 12 & 13. With two hands on the be the rider dives the kite, drops her legs and sets up for a down wind landing.
Common Problems
- If you’re not getting enough inversion don’t look for the grab with your head, but rather lift the board with your legs until you can see it once you’ve thrown your head back. Remember to keep your bar in as you throw your head forward.
- If you’re under rotating and not completing the front loop, drop the grab and board sooner, and then turn your head hard to bring your shoulders around.
- If you’re landing with too much speed and the kite diving hard. Make sure that you send the kite enough, that your front hand is butted up to the chicken loop and that you’re not trying to pull yourself around the site front loop on your hand.
Keystones
- Bar in on take-off
- Throw head and weight forward
- Lift knees
- Throw head back and arch
- Push feet up
Leave a Reply