Beach Start From Two Feet
Many moons ago we covered the beach start where you anchor the board by putting one foot in a strap to stop it misbehaving and running off whilst you fly the kite. As effective a method as that may be, the launch can often be preceded by a game of hop scotch as you hop around on one leg waiting for the moment. Enter stage left the solution to a hopefully more dynamic and picturesque entry into the blue yonder, the beach starts from 2 feet. All the principals are much the same, bar the hopping, so let’s look at the ingredients separately.
1 Preparation Pic A.
How deep you need to start will depend on wind direction and space. Ideally you don’t want to be any deeper than just below the knee, with half way up your shin giving you a good balance between a soft landing if you get it wrong and an easy enough spring onto the board. We’d highly recommend not learning this in onshore conditions unless you have a lot of space down wind, and avoid rocky bottoms, sea urchins, mussel beds etc. and a crashing shore-break, you get the picture. We can see that the rider is carrying the board in her back hand whilst controlling the kite with her front hand. This way she can position the kite just behind her, in this case around 12.30 to 1 o’clock before she drops or places the board down, so that the kite is primed and she has the bar in with tension on the lines – this is your ready position and if you adopt it as you enter the shallows you’ll avoid all sorts of fifing around, swapping hands, repositioning the kite, dropping the board and generally getting out of shape as you rush to get ready. Also if there are waves, with the board in your back hand you are not in danger of getting hit by the board as the waves push against it.
2. Drop It Pic B.
Before dropping or placing the board on the water, make sure that you have your back into the wind, so that you know the wind is coming from directly behind you, as this will help get the board in the right place.
You can either drop or place the board in front of you. Dropping it has the benefit of being quicker and you can get the board further away from you. In the photo the rider has dropped the board in front of her so that it lands heel side edge first, which means that it’ll stay at the same angle whilst not stopping right in front of her. The board should lie across the wind, or ever so slightly up wind, but definitely not pointing off the wind. This means that you’ll have a solid platform to land on and the board will not be right next to you so that you’ll trip over it or fly past it whilst learning this if the board does skew off at the wrong angle you can push either the nose or tail to get it positioned correctly. However once you’ve got it sassed you’ll want this to be quick and dynamic.
Here the rider has already started to pull on the bar with her front hand to get the kite moving as soon as she has dropped the board. This way there is no time for the wind or is wave to move the board before she’s on it.
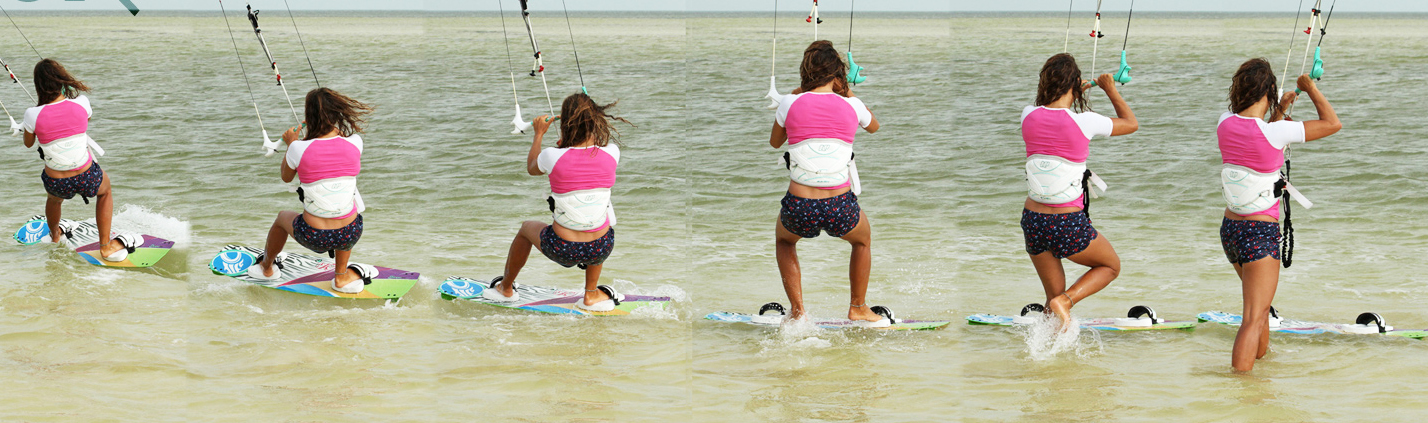
3. The Jump Pic C.
The idea is that you use the lift from the kite to float you up the few centimeters and support you whilst you slot your feet is You are not trying to launch yourself up and acrobatically land on the board from a great height. By moving the kite across the window from behind you, 1 o’clock to 11 o’clock, the principal is the same, but gentler than a water start – the kite will lift before pulling you forward. Now with two hands on the bar and tension on the lines, the rider keeps pulling forward and waits to feel the lift from her kite. As the kite lifts the rider pulls the bar in more and springs up with the emphasis being back foot up first, as this one should be the first to land on the board to keep the nose up. The whole time the rider is looking at her straps, so that she can aim her feet into them.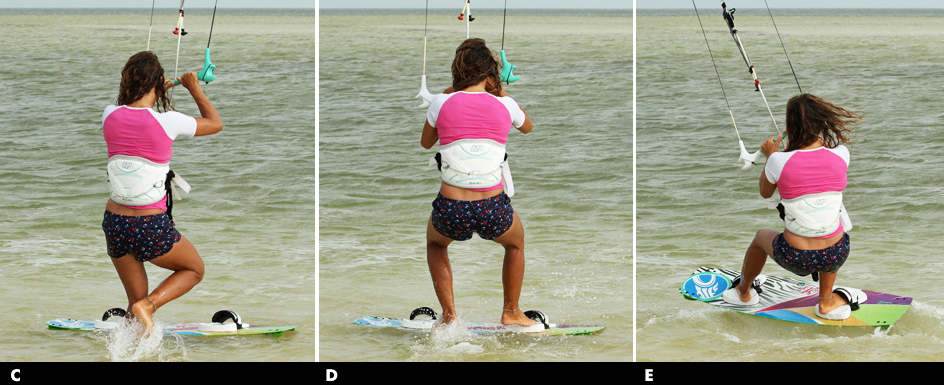
4. Contact Pic D.
When landing on the board, although the rider will get her back foot in first to stop the nose from sinking, she aims to keep her weigh central, as this way the kite will support her and keep her balanced. If she was to lean back against the kite or towards the back of the board she will slide the board away from her and dip her derriere in the water. You can clearly see that she has not gone for height, as she still needs to lift her knees to get her feet into the straps. As is result her feet, knees and board are in front of her and between her and the kite, so she can dive the kite with her front hand and use the pull to move forward and not get catapulted over the board.
5. Accelerate Pic E.
The final piece of the jigsaw is to casually ride away without sliding or tripping. For this you will need power, so as soon as you know/feel that your feet are in you will need to dive the kite harder from the previous lift stage. It’s almost two separate moves, the 1 to 11 movement to lift and support you, and then a dive from 1 to drive you out. To take this power you’ll need to drop your weight both upwind and back whilst pushing the board off the wind so that you can then carve onto your edge with power rather than sliding sideways with your weight on both feet.
You can see that the rider has dropped her weight low, moved her hips back over her back foot and pushed her front leg out so that the board can accelerate on is flat surface whilst her kite dives. Once she is balanced the rider will it’s her head, shoulders and hips to look Upwind and drive against her back foot to carve the board up onto its edge.
Top Tips
- The best way to learn this beach start is to break it into 2 parts, firstly the lift, spring and get your feet in. The emphasis here should be to land comfortably with both feet in the straps and the kite supporting you.
- Without the dive you’ll then drop slowly back into the water, and as you do you can dive the kite to pull you back up. Once you’re comfortable with this you can then anticipate the drop and dive the kite earlier and earlier until you exit dry and relatively powered.
Common Problems
- The most common mistake is to start with the kite too high. If you start with the kite at 12 o’clock, the power will not come on until the kite pulls low and forward. The result is to get pulled across the front of the board, whilst manically attempting to lean back against the power, so you’ll either catapult over the front or have the board tea tray out in front of you as you fly off the back.
- Remember you need the lift to support you getting on, and then the power to move off.
- If you are getting the lift but still seem to be sliding off the back of the board, it’s the result of the board pointing too far off the wind.
- And finally if you keep dropping back into the water, regardless of what you do, make a point of focusing on what your arms and harness do. Your arms are just for steering the kite, and your harness should be taking your weight. If you hold onto the power through the bar you’re both unable to steer the kite or sit back into the power.
Keystones
- Kite just behind you
- Bar in front hand, board in back hand
- Drop board across the wind, pull kite up and over
- Go up with lift, back foot first
- Once in dive hard
Leave a Reply