Hooked in Front to Blind
Hooked in Front to Blind
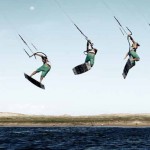
Once again the combination of moves from a blind looks truly amazing. Apparently, several hooked-in moves are outshined by their unhooked counterpart, which is great shame as they still showcase a lot of techniques and can still look so neat. It is indeed a medley of Hooked in a flare.
By Popping High, you should patiently wait to travel forward before performing the “Throw” and “Blind” at the decisive moment. We will begin with the front to blind as for many reasons; it will be the simplest step for surfers to get your head around because it has definite flow in the move. You will need a fine popped front look and solid blind to get this one nailed.
To build up to this technique, it is advised that you practice a bunch of high pops to blind. This will surely help your blind timing and your patience. The focus behind this is that when you do pop to blind, they consciously keep you at a low posture so that the landing will be well positioned. This will not be the case following a front loop. By popping high, you will have to stay still to travel forward before you “throw” and blind at the decisive moment just before your board reaches the water surface. Also it will show you to break your blind rotation from your pop which implies that you can add up into your popped front roll.
Aspects of the Trick
Pic A.
At start, you have to bear away, heading off the wind for any pop technique. Park your kite at 11 o’clock and push your front foot away from you to facilitate the kite to fall back in the window for a bit and to allow your body a decent position to pop. With front leg stretched, hips over rear foot, shoulders back and upwind and head straight forward plus hands at the center of the bar, get ready to execute a clean trick.
Pic B
Popping into the front loop properly will make landing effortless. Carve harder upwind and keep the bar in to put tension on the lines, resulting the kite to pull you through the move, and as you launch, you purposely pull your front hand a little to stall the kite going up. It is important that the kite drags you through the move. Any kitesurfer is aware of that position to have something to pull against when about to throw to blind. If you hang under a high kite with loose back lines you may be able to land blind but will not ride away blind, indeed makes a lot of difference.
Pic C
Lead the spin with your head. As your head turns around, you can estimate where you are about to land. If you think it is much of a height, pull your front hand to fix this. Also, consider that the timing of when to throw the blind depends on your elevation. Maintaining your knees up watching where you are going can actually submit in a virtual slow-mo until you decide to throw the blind.

 Pic D
Pic D
Focus on this segment because this is the only most important part of performing a front blind. A front to blind is not one and a half front loops, it should break the spin from your front loop around to blind. There are two parts of movements: – you appear around the front and concentrate on where you’ll land, then turn your lower body around to blind as you keep on doing it with your high loop blind.
 Pic E
Pic E
Granted that you have already performed a blind, now pull your right leg behind you and shift your left leg beneath which will result to landing new tail first. This will allow the board to turn all the way for a smooth landing and likewise preventing you in burying the new nose in. After a blind, you should release your rear hand for two reasons. First, it helps you turn the full total to blind. Secondly, it releases the tension in the rear lines. The kite does not drag you so you should gain stability before reaching for the bar again. You could be pulled out of the blind if you landed with both hands on the bar.
 Pic F
Pic F
When you have smoothly landed and assessed your weight onto your new rear foot, reach for the bar with your rear hand. This way, you maintain your speed and can prepare you for a move from blind.
Best Tips
Discovering anything to blind is a whole lot easier if the water surface is flat, as your board maintains its speed and you can manageably run on an edge.
For the first attempt, try not to get too much elevation, if you have the kite positioned at 11 or 1 o’clock, you can pop hard but with less speed which will provide you enough time and move more accurately.
Sequence in Summary
1. With your kite parked at 11 o’clock, pop up hard with your front hand connected to hold the kite from going up.
2. As you start to spin, secure the bar in and maintains the front hand connected to hold the kite from going up.
3. To make the rotation nice and smooth, raise up your knees.
4. While the bar is still pulled in, look over your back shoulder so that you can locate your possible landing spot as early as possible and can continue the rotation.
5. Considering that you still have time to have a bit of elevation, bar in and keep the knees up.
6. Coming down, you can performs the throw to blind and shifts the board through and underneath by pulling your front knee forward.
7. As your front leg comes through, whip your back leg around and still pull the bar in with arms bent to keep you well secure to the bar.
8. As you touch down let go off your rear hand to stabilize yourself towards a landing. With the bar pulling away, the kite will automatically drag you over.
9. As the board hits and you feel like moving wobbly, reach back up to the bar to control the kite.

Drawbacks of the Trick
We’ve tackled it earlier but attempting to spin to blind just won’t work. You need to get the front loop organized and then whip yourself around. If you feel that you are over doing the spin, try slowing front loop down and then expedite your throw to blind. Doing the opposite is no good.
If you are landing with just minimum speed, chances are, you came into the move too slowly and with the kite way high. Try to hit the gas a bit more and don’t let the kite hurl up more. Focus on maintaining the bar in, this way, you will gain more control of the kite and will get dragged with it providing you the perfect drive upon landing.
If you fall backwards upon landing, you are releasing your hand too early which allows the kite to hurl away from you and also allows your legs and board to drop. Maintaining both hands secured helps keep the knees up and thus providing you stability.
In reality the trick looks like this:
Hooked in Back to Blind
Hooked in Back to Blind
Just like the hooked in front to blind, a nice solid pop to blind is expected of. It is recommended that you keep doing the pop even higher, wait longer before throwing the blind so you can really divide this movement from whatever still you want to execute.
The other thing you should concentrate is your trusty back loop. It will be worth your while doing slow controlled popped back loops to an uncontrolled blind. An over rotating spin will be much harder though. This signifies that your focus should be on your take-off, putting more power into popping as opposed to throwing your head around by spinning quickly.
Pic A – The surfer has just taken off, and the first thing to note is the position of the head. You should be looking at your arms and not over your shoulders. If you are ready to try this kind of move, you should be positive enough to perform a back loop around without even having to look for the landing. By looking straight ahead you will spin much slower than usual and it will be easier to stop the spin, plus you can turn other ways.
Pic B – Here, the surfer has almost finished the back loop and the board is almost 360 degrees around from the take-off downwind path. The aim here is to stop the rotation in preparation for the throw to blind. Also by pulling on the bar, you can keep powering the kite to drift downwind, which in turn will make landing a whole lot easier. You can see here that the surfer is still looking at its arms and is now ready to throw a blind.
Pic C – You can see here that the surfer keeps the bar in tight using the front hand. This stops the kite and leaves the bar behind to continue the pulling tension in the lines. To turn around, you need to let go your back hand and throw it around your back to have the rotation movement. Also, turn your head quickly to look back while pushing your front foot downwind and keep your rear foot tucked up underneath. This way the nose of the board will touch down first and goes for a clean reception. If you keep the front foot up, you will land flat on the board leading to a sudden stop and you’ll go down into the water.

 Pic D – Touching down. You can see that the surfer landed old nose first, which allows the board to pivot more downwind. Just keep your drive and look back with your weight over the old front foot. Even if you want to continue riding blind, you need to patch things up first before thinking of grabbing the bar for some movements.
Sequences in Summary
1. The surfer has the kite just below 11 o’clock and has come in with enough speed to give momentum for the landing by taking off with the wind before carving up.
2. The surfer pops up off the water before turning far into the wind while keeping the head looking straight towards the arms.
3. As the surfer explodes up into a slow back loop, the surfer looks upwind and trusts the take-off to give enough rotation for the back loop.
4. As the rotation goes, the surfer pulls down with both hands towards the chest and brings the knees up and thus brings the board up towards the bar.
5. The surfer is nearly completing the back loop, pulling the hand and knees together.
6. With the board now coming forward and towards the kite, the surfer releases back hand and prepares to turn blind.
7. The surfer keeps back foot tucked up and turns head and shoulders powerfully against the back loop while keeping the bar pulled in and near.
8. The surfer lands on the old nose of the board, so it can turn to land flat and not on an edge. The surfer has all weight, knees, hips, shoulders and head committed over the old front foot.

Usual Problems
The only problem here is that every landing can be stopped if you do not have the drive going on. This technique needs sufficient speed when you take-off. Also, check your kite’s height so it doesn’t hurl up during the back loop because you will need it through the technique. Try giving a little tweak on your front hand just before releasing the back hand.
Important Keys
1. Speed off the wind
2. Pop early
3. Look through your arms
4. Tuck hard
5. Keep rear leg up
And here is what it should look like in reality:
Front Loop to Toe side
Front Loop to Toe side
We are starting this subject matter with the front loop to toe side as in fact a simple step to achieve. It isn’t something you see very often and this could help you stand out now that those pesky unhookers can’t keep hold of their bars. Doing a front loop can be measured for a high or a low loop, and once it is in the bag, you can accomplish variety of combos.
As you might have guessed, the foundation is front loop with the usage of kite, so if you are not satisfied with these, combine them first before moving on. However, many surfers find landing on one side is a difficult task. Well, this move could be the answer to your front loop prayers.
Proving a point
 Pic A. The surfer performs a front loop to toe side riding from left to right. This means that the surfer will be kicking off the left leg for take-off but will be landing on the right leg. You can see that the surfer is in the after take-off moment, it is precisely the same movement of kite and body as for a standard front loop. Having approached with good speed provides a good edge for sending the kite back. As usual, the surfer takes-off and initiates the front loop by throwing the head and shoulder down and around kicking the back foot.
 Pic B. Here it shows that the surfer is about half way through her front rotation. To land toe side you will need to land on the right foot. To accomplish this, you must push the left foot out in front of you. The simplest way to get this move is to keep the original back leg straight as you rotate. You need to bend your front leg to rotate forward and go with the flow. You can see here that the surfer’s left leg is straight and hanging down for landing purposes. All these said moves need a rotation all the way around with the head.
 Pic C. The surfer rotates further in order to get into a perfect landing position. But before you land, you need to do a couple of task. Firstly, you need the help of the kite for a pull down to land successfully, so you must keep the bar in and the kite moving forward above by diving with front hand. If you let the bar out, the kite will get left behind and you will drop under it. You also need to prepare for a toe side landing.
 Pic D. As the kite comes over the surfer, the pressure will give a downward force against the water so the board will drop beneath and will be ready for a landing. The trick here is for the surfer to get a bit of weight forwards onto the front of the board to prevent sinking the tail and completely stop.
 Pic E. Just after touching down, you can see the surfer’s kite is pulling because of the hard dive, which is essential in landing. This means that the surfer landed on relatively flat board thus, maintaining the speed. Now the surfer is able to carve the board onto a true toe side path by dropping weight to windward.
Sequences in Summary
1. The surfer approaches with speed on a solid edge with the kite around 1 o’clock. The surfer sends the kite back with an aggressive pull on back hand and edges harder by turning upwind.
2. As the kite lifts, the surfer performs the front rotation, kicking off the back heel and throwing the head and shoulders down around while keeping the bar in.
3. The surfer concentrates on redirecting the kite by pulling gently on front hand while going up.
4. The surfer focuses to prevent rear leg to get up.
5. The surfer keeps looking over the back shoulder in order to keep turning.
6. Half way around, the surfer places the kite above, so pulling it on front is the best way. Rear leg straight and front leg bent.
7. As the surfer estimates the landing position, he aims to start diving the kite to help the pulling force for the move and also for a downwind momentum.
8. The surfer is ready for the toe side, so pulling the right leg up is appropriate.
9. As the surfer goes down, the surfer must keep the tension on the lines so that the kite could gain a pulling effect and the surfer can keep the bar in.
10. The surfer drops feet underneath by extending legs and concentrating on keeping the left foot out in front.
11. The surfer aims to land tail first by straightening right leg underneath.
12. As the board touches down, the surfer’s forward momentum from the dive will keep the bar in, so pulling it forward is the clear way.

Best Tips
Bring your front foot all the way the landing event. Landing toeside paves way to complete a front loop. Your shoulders need to turn so that facing forward will not be hard, so go for the full rotation even though it may not look like one.
Common Problems
1. Getting your body to toe side needs a lot of effort at first because you are trying to twist your back shoulder past the bar and the chicken loop. The solution is to keep pulling right up to the bar and let the kite do the work.
2. Performing the toe side can be very delicate at first attempt, so focus on pulling the diving kite at the landing position and control your shoulder back for the rotation. Once you have your mind and body in a perfect state, this should be easy.
Key Points
1. Send the kite
2. Throw the rotation
3. Keep back leg straight
4. Pull front leg under your buttock
5. Dive the kite hard
Here´s what it should look like in real time!
Blind Judge
Blind Judge

Simple but great and definitely one of the fundamentals that you have once nailed, this trick rewards you with a high percentage return rate. Blind Judge is an extension of the raley to blind because it needs accuracy, elevation, kite control and enough power. The Blind judge is an unhooked raley to blind but with an air pass rather than a surface pass.
Ironing out the blues
In preparation to the blind judge technique, you need to practice kite control, the take-off and the authentic raley. In all pass moves, kite control is vital. Too high will result to difficult pass, too low and it becomes too typical. Position yourself to get sufficient height and power to give you an enough forward momentum, so it will be a soft touch when you land the kite.
 Pic A – We see the surfer is practicing for the Blind Judge. It’s pretty simple to see that it is not a raley. Position with both legs parallel to the water, but the surfer carved the board up into the wind and underneath, so it flicked around.
 Pic B – The surfer paused in the raley just before passing. Let’s have a brief rationalization at the strong points of this position.
• Beginning with the feet, we can see that the front foot is high. This is the foot that needs to come through because of its height, it can keep up longer and will not drag the surfer away from the bar.
• The same goes with the front knee, just like the back knee in a shifty, this position can swing the surfer through with a swift power, and it will keep the surfer up plus it will come around the surfer’s body because of the high spacing.
• The surfer has pulled-in hard with both hands and tries to the head over the bar, so the force will move forward. It will be difficult if the kite is too high.
• Lastly, if we look at the hands and the bar, as a result to the surfer’s body position, it is already in a twisting position preparing where it will land and make the pass much easier.
 Pic C – Is the result of all the good work in the previous pictures. As the back hand has been released, the head is above the bar preventing to go too far even if the surfer drops. The front wrist and arm are twisting already, so that it will allow the surfer to spin early. The front knee has swung around and under the bar, giving the surfer the drive to turn all the way while bringing the body under the bar. Finishing point here is that if the kite is well positioned and not too low, the surfer can pinch down a bit to make the pass easier.
 Pic D – The moment of truth! Firstly, releasing the back hand late is wise because it was nearer from the body and therefore it is not too far to grab the bar on the other side of the surfer.
Secondly, because the surfer’s wrist, arm and bar were already twisting, the surfer has got the bar around and ready to grab quickly.
Thirdly, due to the emphasis on getting the head over the bar, the front leg of the surfer is high and swings the body under the bar.
Lastly is to hold on with your hand until the back hand can grab the bar. You need to rotate far enough to grab the bar behind you. And timing is the key to success in this move.
Step by Step Sequence (in Summary)
1. – With the kite around 1 o’clock combined with sufficient speed, the surfer has gone off to the wind unhooked and carves hard upwind, a full kite face and very straight front leg.
2. – As the board turns underneath, the surfer explodes up off his rear leg and allows the shoulders and bar to turn with the legs.
3. – A moment after the take-off, the surfer is in full momentum upwind, stretched out and ready to swing everything through.
4. – After gaining the elevation, the surfer starts the rotation to blind, pulls hard with both hands and aims to pull them all the way to the right buttock. At the same time, the surfer pulls the right leg up aiming to bring the knee up to the hands.
5. – As the body swings towards the kite, the surfer pulls his head up over the bar and started to twist the bar and turn his body into the rotation. Keep both hands on the bar always.
6. –Release the back hand and turn the head down around.
7. – With the bar already set and waiting, the surfer reaches behind the back and grabs the bar with the other free hand.
8. – As you drop, in order to put weight over the feet, go with your old front hand and lift your head.
9. – The surfer will land and ready to absorb the impact with both legs. Once the surfer is stable, a slide back to heel side move is easy, carve around to heel side, pop back to heel side or rid out toe side. If you really want to show off, then go for the pop to wrapped from toe side!

Important Reminders
1. Carve long upwind
2. Body, chest and bar upwind
3. Pull with both hands down the buttocks
4. Turn head before releasing back hand
5. Hold on tight
Jesus Walk
Jesus Walk
 Jesus Style or Jesus Walk, the trick’s name catches your attention, well, we all know kiting is the sport of the gods so are you surprised? Perhaps after doing the trick successfully, you can now turn water into wine. Jesus Walk trick is the kiteboarding equivalent to the “Christ Air” in Skateboarding. Darkslide trick, being a pre-step to another cutting edge kitesurfing trick that is to be discussed here, must be performed smoothly before any Jesus Walk attempt. Darkslide and Jesus Walk are all about Hangtime, but instead of Boost it is almost a hangtime, like a walk above the water.
Ponder on you first attempt to Boost that you just could not get the right height and you simply looked like doing the basics of just swinging under your kite. Well that is just exactly what you are attempting to do with a Darkslide or Jesus Walk. A lot of kitesurfers have not done this latest tricks yet, never have even attempted in mind because of its timing difficulty. Others would tend to ride with their feet locked in so tight that there’s no way they could get the board on and off so easily. Practice makes perfect because quitters do not win and winners do not quit.
What’s the common question a sport enthusiast would ask of this trick? “Do you let your kite loop at the end,or catch it before it loops back to the left and fly it normally?” The answer is actually shown in the actual videos I have provided in this page. Since this is a newly developed trick, I will not go into further details but the keystones and tips for you to consider if you will try to do it first time. Let experiences of kitesurfers speak for the trick. The video likewise has so much to say about this particular trick.
 Highlights of the Trick
Jesus Walk trick does not work underpowered or too over-powered, so make sure just to have enough power in your kite just before the zenith. Ride with your normal speed.
Steer your kite slowly from left to right. Instead of steering the kite back before landing, you pull harder to the right.
When the kite starts to make a kiteloop, you put your feet back on the board. (Of course, by now you already know how to kiteloop, it’s the fundamental trick you learned first in this kind of sport.)
Pop off the water and grab your board while holding down the bar to stay in the air. Do as many steps in the water as possible while you steer the kite slowly over the zenith.
Get back into the straps, but meanwhile keep pulling the kite hard to make it loop, so you get some extra airtime. Land and keep riding.
Best Tips
Doing a kiteloop instead of a transition makes it easier. For a transition, the timing has to be perfect. Less perfect with a kiteloop gives you a bit more time to get back into the straps. The landing will be faster though.
Steer the kite to 11 o clock, then pop off the water, while you pull off the board. Slowly steer the kite back to 1 o clock position while you run over the water. When the kite reaches 1, do the kiteloop. Then put your board back on and land.
To add more power in the kite to stay up in the air, pull the bar in so the kite loops.
You need space; with someone close by you cannot loop the kite.
Be quick with putting that board back on to concentrate on the landing.
Darkslide
Kitesurfing Trick: Darkslide
 Darkslide is a pre-step to another highlighted kitesurfing trick which is the Jesus Walk. This attempt can be really tricky because you do not wax your surfboard’s bottom. Darkslide and Jesus Walk pertain to everything which refers to Hangtime, but instead of Boost it is Hangtime above the water. You just need to recall your first attempt to Boost and you just could not get any height that you simply looked like swinging under your kite. Well that is just exactly what you are attempting to do with a Darkslide or Jesus Walk.
For the starters, Darkslide trick is just a matter of eradicating some kind of psychological barrier through an intentional trip forward over the board’s toeside edge. It depends on how your approach could be in which the trick can really be made successful after quite some tries. Most kitesurfers find it easier to do a Kiteloop which is believed to be an effective sequence to a smooth Darkslide. Such preliminary move prepares the surfer of that surge of power which allows an ideal timing to get back up and immediately get the legs back underneath. Majority of good Darkslide delivery is attributed when the kite is stably powered and smoothly travelling up and almost over 12 o’ clock. As soon as it reaches 1 o’ clock the surfer initiates the kiteloop which will then pull the surfer back up.
Best Tip: A slow kiteloop is the key to the trick.
We all know that kiteloop is an initiation trick for you to be called a surfer. It is the foundation in the family of kitesurfing tricks. It requires skill to neatly loop the kite while you do the spinning. Normally, the surfer loops the kite one way and spins the other way. This is done so that at the end of a kiteloop your lines aren’t twisted (this is not actually a requirement for the trick but it is more a confirmation that the kite actually loops while the surfer do all the spinning). A surfer may opt to use shorter lines (15-20m) to gain more kite’s response and less power while executing a faster loop. A Jump Huge is needed to be practiced to allow enough air time for your kite to loop. The Back Spin technique should also be enhanced in order to kiteloop neatly to pave way for a successful Darkslide. The moment you execute this trick, you may now want longer lines to stretch the sliding time due to the kite’s long distance travel before the loop. Another way to increase the sliding time is probably to be more powered allowing the kite to be flown slower and still generate enough lift.
Trick Sequence
1. Ride with speed and initiate the trick by steering the kite slowly towards 12 o’clock.
2. As soon as you feel the lift, pop off the water and then slightly fall forward
3. Slide the back tip of the board through the water by stretching your back leg and bending your front leg.
4. While doing this, you’ll need to keep pulling with your both hands through the slow kite loop.
5. Bend both your legs to lift the board completely off the water and get back on the board before the kite has finished looping.
6. Hold the tip of the board for full control of the board and likewise to gain stability and style at the same time.
Shifty 3
Shifty 3
Back then we covered the shifty to wrap. If you’ve got that down you will have no uncertainties, thoughts about or even tried its advance version, the shifty 3 – an energetic technique which positively looks chipper and even more strikingly, and thus the key to several moves. Master this technique and later on you’ll be adding up new moves to your routine faster than you could imagine.
Whilst mastering this technique, there are some other things that you’ll have to insert to get the popular air pass in. So let’s not waste time and get this job done.
Elevation and Timing
Stating the obvious is as good as a place to begin. Instead of giving yourself the necessary elevation and timing to do it, you could do a lot worse if you just settle for an average pass. Perhaps you’ve already presumed that the launch should be quite aggressive.
Pic A.
 The surfer is about to pop in an instant. In our Shifty, we consider popping a little serious to make sure we could turn to shifty without the board going into a raley. Now being aware of it, we should be able to edge hard and still get the board behind us. In this picture, the surfer is carving hard across the wind with his weight low and his board upwind. As a matter of fact, the take off of a raley is somehow similar to this. The only thing to prevent this into turning into raley is the head. Observe that his shoulders are not turning up into the wind, only his hips and the board because his head is positioned well looking forward and downwind.
You would want this edge and carve for two good reasons. Clearly you need to get a fierce pop for the elevation, but even more importantly is that you need the pop to be able to make the pass in the air. By edging like this, you clutch the kite back while it drops back in the window and you can blast off against it. The kite hurls forward once you pop, and as you go faster after it, the lines slightly relaxes, giving you the chance for a timely pass.
Pic B. – Patience
 This is the in-flight amusing phase of this technique. The surfer has done a nice slow shifty. The focus here is to prepare you for the pass. When you feel the kite is puling, you must go with it. The surfer has his arms flexed maintaining the bar below the shoulders to gain balance. He’s in a superior position, all set to pull hard when he needs to. If you extend your arms, you’ll have further to pull which requires more power and more time.
The surfer extends his rear leg behind him to keep his body up. Just like in the wrapped version, the surfer needs this leg to produce speed for the spin and to give his lower body enough forward drive for the board to land in front and not get left behind. Also you should plan to thrust the leg back immediately after launch.
Last thing to remember for this part is to make sure you have your kite set in the right position. Pulling the bar up can make the pass even more tough.
Pic C. – The Pull Down
The time has come when just as the surfer senses that he will drop. It is an indication that the tension has gone off from the lines and it is time to make the pass. Observe his arms; the surfer stretches his arms with the bar down towards his back hip, so it’s like pulling the bar in and at the same time also pushing it down. You can also see that the surfer’s rear leg is coming through to provide him the spin. His right knee is on a course towards his hands and the bar. During all of this, the surfer still has both hands on the bar. You should get the bar in and low because using your both arms is a lot easier.
Pic D. – The Spin
Before we proceed, observe the surfer’s right leg. In the previous picture it was coming through and was rather straight. Nevertheless, the surfer brings his knee up once it is underneath him. This is the time where you should let go of your front hand off the bar. In bringing the legs up, the weight of the board comes up and it will not draw you down. Immediately as the surfer let go of the bar, he turns his head and twists the bar, which allows him further turning his shoulders.
Pic E. – Don’t Give Up, Try and Try
Having twisted his wrist, the next thing he needs to do is to grab the bar with his free hand. So he has to concentrate on having his hand around the bar. At first you’ll have a hard time and is most likely the main obstacle when moving from surface passes to air passes. It’s a good idea having the bar ready but it’s no good if you untimely get the other arm around.
This is the portion where most kite surfers think, “I’ve missed it” and just let go. You have to spin around the arm with the bar, so you won’t turn fast when you release it. You will be in a position where you can get to the bar if you hold on. If you can shift the hand quickly and hold on, you will turn just in time. As a matter of fact, you know that you could turn this far because you can already wrap.
The board is now underneath the surfer and is ready for landing. As long as the knees are flexed up, the board will spin with you. It will get left behind if you keep your legs extended.

Best Tips
In this technique, you should also concentrate on the small details due to a lot of pass moves. It can help if you give the kite a sharp pull down with your front hand prior to passing. This will prevent the kite from dragging the bar up and away, and also it will encourage you to keep both hands on the bar. Aside from that we’re back to getting the elevation so you will have time to
Sequence Summary
1. Position your kite around 11 o’clock. Gather up some speed and bear away to let loose, keeping your shoulders back and your hips low.
2. Carves hard up across the wind with your weight over your rear foot and your front leg extended. Look forward and downwind.
3. Continues to look forward upon take-off.
4. Quickly turn your rear foot behind you, extending your rear leg.
5. Maintain your arms bent and your head above the bar. If the kite continuously goes high up, this would be the ideal time to hurl it down.
6. Pull and push the bar hard down towards your back hip, while pulling your back knee in towards your hands to begin the spin.
7. Let go of your front hand and bend your knees up, while moving your head and free hand around with the rotation.
8. Having your wrist twisted. Put the bar where you will be able to reach it. All your effort now is concentrated on getting your free hand around and onto the bar. Grasp on tightly with your right hand, so that you can spin your arm and reach the bar.
9. Grab the bar and let go yourself out of the arm lock, while dropping back down to the water surface.
10. Eventually, land on a flat board successfully.

Usual Problems
If you can’t reach for the bar though you are holding on, chances are, your kite is way too high. However, you will see a lot of surfers doing this technique with their kites quite high, but they’re either amateurs or wannabe’s. Just position the kite no higher than 11 o 1 on your advance, and give it that pull down before passing.
You are spinning too slowly. The key is to simply just use your legs and crunch the knees up. Synchronizing your legs with the arms and pulling with both hands will give you a nice quick spin.
You are not spinning far enough around.
If the kite is dragging you hard, it can halt your spin. There few probabilities here. First, if you set out too early the kite will still be dragging you and thus it pulls you back as you turn away from it. So give it a lot of thought and wait for a timely opportunity.
Having too much power or the kite is dragging you like a train, it may pull you hard all the way through the movement. Importantly, make sure you are trimmed correctly, or if needed to be adjusted down. The more power you have the harder you’ll need to carve and pop to make the kite more controllable.
Important Reminders
1. Burst with speed and pop hard
2. Kick leg, pull arms in and wait
3. Both hands down to back hip
4. Back knee up to hands
5. Hold on and quick free hand
Here are some dudes that know how to perform this trick!
Ole from Blind
Ole from Blind
Here is one harking back to them good old days of Shinn, Tobias et al, and the Ole. Not seen a grand deal now unless you’ve seen those peddlers of surfboard techniques. Cracking name to boot this clever little matador’s flip of the wrist can compose any blind landing with the kite up high. Just popping to blind and spinning with style below your bar and kite will have the crowd going wild.
Ole is a pertinent description of passing of the bar over head from one side of your body to the other, to allow a blind landing to continue a toe side at the same time remains hooked.
Ideally, you will need great hopes of success of a half decent blind and some calm water to execute this technique. So let us get things started.
Pic A
Let’s presume that you could successfully pop and ride blind hooked, the idea is to look at the diversity between the Ole blind and your run off the mill variant. You can see that the surfer has her kite positioned around 11 o’clock, front hand centered on the bar has popped up, twirl her 180, pushed the bar against her and normally setting to land the nose of the board first. However, notice that she is very upright, almost standing over the board with just her head moving back and down. The focus here is that you need to land with your weight over the flat board so that you could maneuver the board downward and towards the kite. This way the lines will not be so tensed and the chance to complete the Ole. You will edge off from the kite if you land on an edge and if you turn your shoulders down making the lines tensed and doing the Ole somehow unstable.
Pic B
The Surfer has landed nose first but flat on her board, that is to say without edge. Her weight is on her front foot (left foot), and she is still standing upright with the bar still pushed away. To get to this position, you will need to pop a bit harder than normal and aim to turn a bit further, landing gently slightly downwind. This landing position is a must as already pointed out. From here, the surfer can actually weigh her heels and turn the board downward towards the kite, making sure to maintain her weight on her left foot.
Pic C
Now with more stability and heading down towards the kite, the surfer should prepare for the next move while she still has some drive and focus. The surfer pulls her hand across and front of her face to the other side. With relative slack lines the bar and all pass her visage without incident – Ole.

 Pic D
Pic D
As the surfer moves her hand across, she follows it with her head, then shoulders and eventually her lower body until she is facing the right direction. Now, all she needs to accomplish is to get the board moving ahead, which is easily done by putting her weight over her back foot ( the right one), which will slide her left foot forward.
Best Tips
Compared to all moves, this technique entails a definite amount of trial and error, as you’ll be trying to adjust something you can already do. However, if there is one part to concentrate on, it is the landing on the board and then turning the board downwind before even having the thought of pushing the bar across to the other side. So pop, land, carve then push, sorry Ole.
We have broken the Ole down into two phases for sequential purpose, the actual popping to blind and then the defining Ole.
Summary of the Trick
Sequence 1
1. With the kite set at 11 o’clock and hand centered on the bar, pop up hard for an early blind.
2. Let go your rear hand and push the bar away.
3. Move your had downward and around, and lift your back leg up aiming to rotate the board further than your normal blind.
4. As you turn, extend your front leg and maintain your back foot raised and chest up.
5. This all leads to a pleasant nose first landing.
6. As you land with nose first, keep your weight on your new rear foot and stand up.
7. Wait temporarily and then consider the heel of your back foot to carve the board down towards the kite and get all the tension off the lines.
8. Now you’re ready for the Ole!
NOW SHEET IN THE BAR TO GET SOME FORWARD POWER FROM THE KITE!

Sequence 2
1. Once you have landed and still has some momentum, weigh your heels and carve the board more downwind.
2. With the tension off the lines and your weight steady on your new rear foot, push the bar upwind.
3. Now with enough room between your face and the bar, pull the bar across the other side
4. And follow it with your head
5. Then your shoulders, and then your hips.
6. With the bar positioned “where it should be” and your body facing the right direction, pull the bar in to get some forward power from the kite.
7. To slide the board around, you must first move your hips and put your weight onto your present front foot.
8. Once you stand on this foot, push your other foot forward and slide the board through the wind.
9. Gracefully ride off into the sunset.

Usual Problems
Landing on an edge and then riding blind! Uncertainly spending time pushing yourself to do this will take a bit of encouragement to undo what you have worked hard for. Try to pop a little harder and plan to land pointing slightly downward. With the board already moving the way you want, this way you will be less likely to edge it. To accomplish this, try to begin further off the wind and pop a little earlier without turning so far across the wind.
Catching your heel side edge and burying the nose of the board as you Ole! We have an effective remedy for this one, the reason is simply you are trying to spin into the Ole from your initial pop. So plan first that you must land blind, and then momentarily wait for a bit until you gain stability and could move with your weight back on the board before doing the Ole.
Keystones
1. Pop hard and early
2. Turn fast
3. Land
4. Carve on heels
5. Ole
Here is the Ole from Blind in reality:
Grabbed Popped Back Loop
GRABBED POPPED BACK LOOP
Whatever level you are in, specializing with the hooked in Grabbed Popped Back Loop technique is very satisfying. This technique will let you master on rotation control if you are really an aspiring popper. There is a lot to be said for carrying out the basics hooked in, comprehending with vital actions and opening both body and mind for some changes. You’ll be soaring up high on a variety of back loop based moves, both hooked and unhooked once you get use to this.
The Goal
If you want to fit in a bona fide grab, attaining a slow rotation is a must. So if you like hurling yourself frantically into a back loop, spinning with eyes shut while hanging around in the air and waiting for the board to land gracefully into the water surface, then this trick is undeniably for you. This can be also of help if you are discovering something like a back to blind.
Importantly, you’ll have to obtain your high elevation from your pop for you’ll not make use of the kite for the time being. So it indicates that the “exploding” rear leg should hurl you upright and high, in contrast of spinning you through the wind. This strap in well with the preceding point too.
Lastly, you’ll be glancing for a degree of inversion in your rotation. Executing a back flip is not a good idea, but if your board sets upright and you turn slightly back in your harness, then the grab will be much easier and modish. Furthermore, this too also strap in rather brightly with the preceding two points.
Highlights of the Trick
Pic A.
 The surfer is about to take off and this picture tackles all about the approach and thus the preparation. Even though this is a pop technique and you’ll not be setting the kite, but with a little bit of positioning, it’s still possible to get some lift assistance to help you around. So put this 45 degree idea out of your mind and park it at about 11 or 1. To be certain that she can get the desired after up pop, the surfer pushed the board nicely into the wind before carving upwind by putting all her weight back over the rear end of the board, relaxing her rear leg and setting her hips back, while pushing the tip of the board against you. You can carve into the rotation timely if you go further off the wind and still give yourself the option to pop up off the water before the board has turned away into the wind and your rear leg is uncontrollably forcing you to spin. Observe in the picture that the board is slightly nosed up due to putting the weight back, and she’s got quite some edge jointed with a timely sturdy stamp resulting to a nice up pop. Lastly, the more you push against off the wind before a pop technique, the more downward you land.
Pic B.
 This is a great instance of contradiction. Previously would have captured the surfer completely extended upright much like a high jumper, as she does it big time to head upward into the stratosphere. She is by now taking her knees up in anticipation. This could be very perplexed, so consider about extending before compressing. Observe how she manage the board in the air, it has not carved through the wind yet, this way she could grab sufficiently during the resultant slow spin, all due to going nicely into the wind and timely stamping off her rear foot. The surfer’s board is going upward in front of her in an inverted manner due to putting all her weight at the back of the board as she carved, as this shaked her back in her harness. Lastly is the surfer’s head. She has her head positioned almost looking forward between her shoulders, this prevents her to spin too fast.
Pic C.
 Now we can look at the outcome of all the previous good work. With the timely and inverted launch, the surfer needs to let go of her rear hand, pull her knees in and look for the grab. This is not completely inverted, but sufficiently to get the right rotation and make the grab easier and stylish. The surfer has just carved through the wind, but she had sufficient time and elevation. This is what it is all about, as you picture with this kind of maneuver and rotation, you’ll be able to do your back loops with ease. Observe that the surfer is concentrated on her grab, this way she’s not expecting to land over her shoulder and therefore will not spin around. Keeping the bar in is crucial, the lines tense and thus the kite will help you get the float, and to hold that grab for as long as possible.
Pic D.
 Once the surfer sense herself descending, she turns her head to see where she’ll be landing. She keeps the bar in with the kite heading towards on tight lines, this way she could get the right speed which is essential for a soft landing. Make sure to get the board back beneath you to have a solid platform to settle on, and you’ll be able to land on a leveled board rather than a bouncing edge if you give your legs a nice extension. This means that you’ll have to reluctantly let go that grab. You should land slightly off the wind with the downward approach, early launch and slow rotation.
Workable Tips
Before things get complicated, let’s break this down into two phases. Foremost, really focus on your early inverted launch and approach. With both hands on the bar and certainty that they are supporting you, you’ll be prepared to work hard on going around gently and not to rush.
Once you get a slow back loop down, give your rear hand some allowance before landing, and focus on getting it earlier and earlier until you master that perfect grab.
Don’t bend your rear leg too much in the approach and carve to get a nice early launch. The board will quickly move underneath you if you bend your leg too hard. If you flex it a bit and at the same time oppose it, you’ll be prepared to stomp off it and in a superior position for a comfortable rotation.
Summary (step-by-step)
Pic 1.
With kite positioned at 11 o’clock, pop off the wind with your lower body back over at the end of the board and a straightened front leg. Carve upwind, pushing back and pops up off your rear leg prior to your back loop not including your head to spin.
Pic 2.
Now go skywards. All your force and pop is focused up while your carve drives you into a slow back loop. Keep the bar in to maintain tension on the lines and to gain some float from the kite.
Pic 3.
With the board nosing up in front of you in an inverted back roll. Now let go of your back hand to get ready for the grab.
Pic 4.
Gently rotating, lift your knees towards your chest and extend your arm towards the board.
Pic 5.
Half way around rotation, search towards where to place the board.
Pic 6.
Tightly grips it on the rail, pulling the board in towards you.
Pic 7.
Grasps onto the grab, maintain the bar in and gracefully wait until you finish the rotation.
Pic 8.
Once you see the water surface, get ready for landing. Grasp onto your grab patiently for the perfect grab.
Pic 9.
As you sense yourself starting to drop, look towards your target landing spot and reluctantly let go the grab.
Pic 10.
Keeping the bar in and slightly extending your legs down to get the board beneath you.
Pic 11.
Finally land the rear end of the board first with both hands back on the bar.

Usual Problems
Rotating too quickly, and thus resulting to an untimely grab. Make sure you ho downward and pop before you carve through the wind. Focus more on extending up before tucking it up. And don’t use your head to turn, not a good idea.
Over rotating the back loop. You may surely over rotate if you set the bar out while grabbing, but assuming that you didn’t hurl the kite up, it’s more likely that you’ve tossed your head around, so keep it focused forward between your shoulders. If you are still having difficulties, try to maneuver the kite as you land.
Important Reminder
• Trim the bar
• Speed to a good edged blind
• Reach for bar without looking for bar
• Push against back foot to slow and turn
• Dive kite hard
Here is what it will look like in reality: