Toe Side Double Front Loop Downloop Transition
Your box of tricks should be always full with surplus of moves; however you have to ensure that you keep up with the transitions too. Having more ways to change direction is never a bad thing so here is another one which will have you flying out gracefully with plenty of beans. When you start doing this we will definitely recommend a controlled front loop from toe side and solid down loop. Let’s have a quick idea at a few pointers that will hopefully make the learning a tad simpler.
The Approach Pic 1.
A huge height is not required for this, however some forward momentum and plenty of float is obligatory,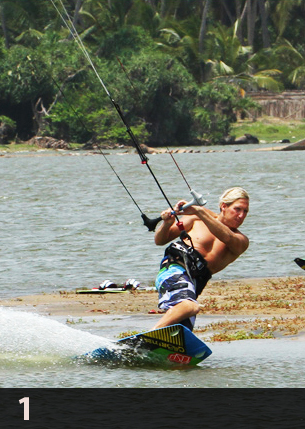 so you’ll need to approach this more as a double front roll with speed and the kite parked at either 1 or 11 o’clock. You’ll be taking off from your toes and therefore trim is important, hence get your sweet spot down towards you. This way you will provide a decent committed edge and still have room to send the kite without stalling it. Your toe side stance needs to be solid in this position. In the image the rider has all of his body upwind of the board; both knees are bent and driving forward with all his weight firmly on both sets of toes, creating a decent rooster tail behind him. Once he gets sweet spot close in, he can get his shoulders and head committed upwind and the kite is not pulling him up onto the board.
Getting Airborne Pic 2.
Take-off is very important in order to get enough height and time from your toes. 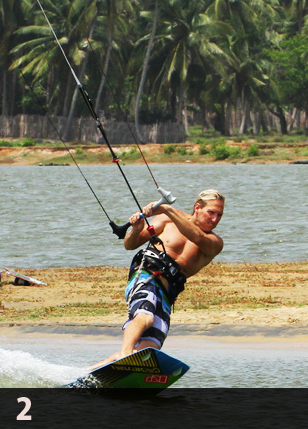 Get it wrong and you’ll fly down wind and pendulum under your kite! In order to initiate your front rotation you need to get your weight back so that you can kick off your back leg and in order to go up you need to send the kite with a good push and pull from both hands. The rider has sent the kite with a decent bar action, and also keeping it on the sweet spot. If he pulled it in any further the kite will pull him up onto the board and he’ll lose his edge. The order of play here is to send the kite with both knees bent and then drop your weight back ready to kick off. You will lose speed and the ability to edge hard if you drop back too early.
Roll With It Pic 3.
Starting the front roll and keeping the edge for as long as possible will help an awful lot. When the kite lifts you’ll be stamping hard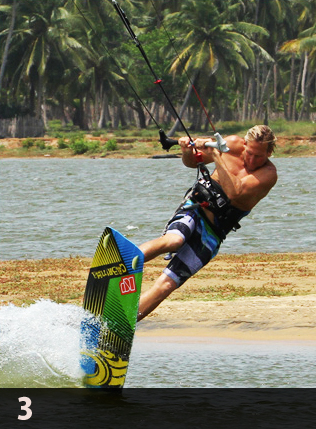 off your back foot, and extending up into your rotation with as much energy as you can muster. In image you can see why it is so vital to obtain the right weight onto the back foot. The rider in image is stamping hard against the edge to initiate the double roll whilst extending up. This keeps the tail of the board in contact with the water for as long as possible giving him added whip and height. The rider throws his head and shoulders down to add inertia and already centers the bar with both hands to stop the kite flying too far back
Moving Forward Pic 4.
Over here in this picture you can check that the rider only past the 360 degree mark. He has finished his first rotation whilst still on the way up and now starts his second. Having kept the kite close to 12 o’clock he has both float from the kite and he can feel where the kite is. You must commit to the second rotation so as soon as you come around the first continue to turn your head and go with the energy you created on take-off.
If the kite is above you or even a little in front of you, you are in right place to well place to start the down loop. We propose two reasons to initiate it now. Initially the pull from the kite will help pull you around the rest of the way. 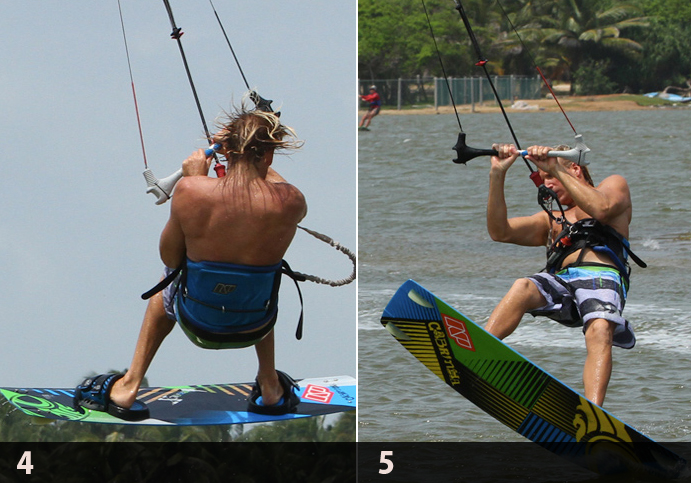 And then secondly the earlier we pull, the less aggressive, relatively speaking, we need to be on the bar. Your sits is for the kite to pull you out of the transition with speed and if the kite down loops too rapidly or from too far behind it will drop you down with no momentum.
You can see in the images that the rider has his knees up tight, bar in close and his head is turned to rotate, all this will rooks hits turn faster. Looking at the bar you can see that he is already initiating the down loop.
Clean Landing Pic 5.
The moment of truth and another insight into the reason you must down loop early, gradually and continually. Looking at the rider in image you can see that he is landing right foot forward downwind on the tail of his board, all set to carve out of the “turn” and back onto his edge.
Realistically he isn’t finishing 2 full rotations; it is more like one and three quarters. So not only does the down loop give you speed but it pulls you out of the rotation. If you initiate the down loop later you will effectively over rotate and land on your heel side edge, stopping all momentum and you in the process. In final stage the rider keeps pulling the kite through the down loop until it is back up at 1 o’clock in the right position to ride away.
Top Tips
- To start with aim to get the rotations and a finish down loop, as this will be better than under cooking it with the kite, so when you do pull on the front hand, pull hard. This will however often result in you stopping when you land.
- Once you’ve practiced that a bit and having read the previous pointers you can see that the aim of this move is not to perform a double rotation and a down loop in the air, but rather get your rotation and use the down loop to pull you out with speed.
- Essentially you will be finishing the down loop as you land, not before. To get your head around this try some air gybe down loops If you go early and hard the kite turns, goes back up to 12 o’clock and you sink.
- Your sits is to progressively turn the kite more gently so that it will go through the bottom of the down loop before you land but as it rises it will pull you through the landing and give you a good speedy landing.
Common Problems
- If you find that you cannot edge enough when sending the kite, and therefore get pulled too much downwind whilst in the air – trim. Even if you have gorilla-length arms you need that sweet spot and the bar in close.
- If you find that you land with no power, as discussed above, you need to get the kite just in front of 12 just after take-off and then down loop the kite more slowly.
- If you’re landing on your hip and can’t get the board underneath you, this is a sign that the kite is down looping too low, so make sure you haven’t redirected the kite too much after take-off, and be a bit more aggressive when you pull on the front hand to down loop it.
Keystones
- Fast toe side with both knees driving forward.
- Rock weight back and send hard
- Kick up off back leg, head and shoulders down
- Redirect kite above you and stay small
- Start down loop progressively once you go into your 2nd rotation
Kite control is important in this trick and you have to initiate the down loop in the right moment. If you´re start down looping to early you might end up crashing hard like this guy
The correct way to do it is like this
Downloop S-Bend
We are throwing this just in time for those winter gusts and/or trips abroad. We have noticed quite a bit of a down looping this summer and this is a fairly simple add-on. The move opens up a plethora of possibilities down with super power up. It can deliver some serious arching height and looks great off a wave and is a real crowd pleaser when thrown to blind.
THE DOWNLOOP
The kite downloops when it is sent with the direction of travel by being somewhat aggressive on the front hand side of the bar. It is best to start with the kite at 12 o’clock position.
THE S-BEND
An S-BEND is the most effective way of completing a pop forward rotation when powered up. The primary difference between this and a standard front loop is the take-off. When learning the front loop, we usually throw our head and front shoulder down towards the water, bending and folding in the process as if we were role-playing. Because we have sent the kite, it gives us the necessary lift.
THE FULL MONTY
Like many moves, your first attempts at this are best when you are not clinging onto your bar. Larger kites will give you more lift and time; smaller kites will give turn more quickly, so middle of the road relative to your weight would be ideal. The key to down looping is the timing, more precisely going early.
GO FOR THE GOLD (sequence)
- The surfer carves the kite and starts to move forward. In anticipation, the surfer has compressed his legs to get ready for the launch. The surfer is not waiting to get ripped off the water by the kite, but instead explodes upwards as soon as he feels the kite begins to pull. Up to this phase the surfer could also be going for a straight down loop. (The only difference being that as the rider jumps, he will look over his hands towards the kite for balance and prepare for a downwind landing).
- As the kite starts to pull, the surfer stamps down on the back leg and throws him upwards, literally jumping into the air.
- To initiate the rotation, the surfer has thrown his trailing right shoulder up.
- The kite is now generating a fair amount of pull as it turns good top to toe stretch. This is real commitment time, just hold on and enjoy your flight.
- The kite continues its journey and the yank will in fact pull the surfer around the rest of his rotation.
- The surfer’s only effort is to twist his head and search for the landing strip.
- Once this kitesurfer sees the water, the rest of the body follows suit, the completion of the S-BEND bringing his feet back underneath. If at this stage you feel you still have some height. It is time to let go with the original back right back hand to help slow your rotation and balance the landing.
- On touchdown, the surfer absorbs the impact with soft knees and once they have recovered, the surfer grabs the bar again with the back hand, sails on downwind to hook back in and giggles blissfully.

PROBLEM YOU MAY ENCOUNTER
Ideally, as you land you’ll see your kite once again diving down towards the sea. That means that you can grab the back of the bar and pull the kite out of its dive posture as you hook in.
There are 2 Reasons why the kite does this.
First – If you edge for your country and wait for the kite to physically rip you off the water, the kite will almost have finished a complete loop before you get airborne. To correct this, just think about going early. By this we mean swap your hands, carve and jump up. You should then get the pull in the air, a slower rotation, more height and a sweeter landing.
Second – You are riding in a tiny kite.
TOP TIPS
If you are having trouble finishing your rotation, try starting with the kite higher. It is fairly unnatural to stick the kite at 12 o’clock.
More power in the kite should give you a slower rotation but a more preferred gun blazing downwind strike.
Once you are confident, try using more power. That is to say do not pull the trim strap as far down as you usually would for and unhooked move.
Here are some videos of this kitesurfing trick
Unhooked Downloop
The unhooked downloop is a satisfying piece that unluckily does not get enough airtime these days. When it is at home this move is performed with a pop at the same time the kite loops in a forward direction, which unavoidably will pull you forward into a raley position. As the pull from the kite comes from your front, it is not that too aggressive, and it is another unhooked move that can be easily performed when you surf at an agitated water. Finally, this trick is the originator for a downloop S-Bend.
ALL IN THE TIMING
In pure timing terms you need to be popping early. You should be able to pop from the speed that you take into the move. This way you do not need to let the kite loop move to give power to perform the pop. The result of this is that you will be going up as the kite starts to go around, simply meant that you will get more land and height as the kite finishes its loop move. The longer you wait the lower the kite you’ll fly. This will also end up with the kite starting another rotation before you land.
UNHOOKING A HIGH KITE
Your first concern is the position of your kite. Ideally you will have your kite pretty much at 12 o’clock to start this move. It is good, but you need to unhook too. This means that your approach needs to work for you. With your kite high, the problems of slowing down and not being able to unhook are lurking in the wings. On your approach you will need to drift the kite up at the same time edging hard and then at the last minute bear away loads to slacken the lines off and then go to unhook. Your body position here for unhooking is crucial, so make sure that you push your hips up and shoulders back, otherwise the chicken loop will not slip out easily.
REDIRECTION
Next you need to get your hands sorted. You need to release your back hand and reach forward to grab the bar just underneath your front hand in a fish pole grip during the redirection phase. There is no relevance to whether you are right or left handed. The important thing only is that your front hand steadily stays up against the center line and the released back hand grabs in close to it as possible. If you have just lathered up with some factor 50, this could prove a tad tricky. The slick movement to one side of the bar will get the kite turning sharpish into a downloop.
THE POP
 You should be well aware by now of the need for a decent edge to pop-off. If you enter with the correct body position, it will be easy enough to get onto your edge quickly. Your shoulders should be in a back position and your hips forward. Even more importantly is that you need to extend your front leg, so your hips are over your back foot and aim upwind while your hips and shoulders twist. This will allow you to drop your bum low to the water and get into a solid craving position in a quick time. Notice how the surfer has already started to drop into carving after the back hand is released. By doing this, the surfer will have a perfect phase to pop off from the edge before the kite gets too far into its downloop. The surfer will explode up off his back leg by suddenly straightening it, kicking it down onto the heel of his back foot to pop perfectly.
ENTERTAINING AIR
 Once you pop up into the air your objective is to follow the pull of the kite. By doing this you will keep your balance and will give you an enough inclination for the landing. The simplest way to go with the kite’s pulling force is to watch it. You can see that the surfer is being pulled through the air by his downlooping kite. Head is in line with the bar, which is pointing at the kite. In a powered downloop, your feet might flick up slightly behind you. As long as you look at the kite, it will not twist you. Also by looking up at the kite, the surfer’s head is lifted. This will make it easier for his feet and board to drop underneath. If you feel the need to take off a hand off for balance, then it must be your back hand.
TOUCH DOWN
 As we mentioned keeping your head up, allow your body to fall into a normal vertical position. If you can keep your arms, or front arm bent, the pull will bring your leading hip forward and set you up for a pleasant downwind landing. The surfer is upright over his board. This gives him the option of going either way depending on where the kite is going.
When you first land a downloop, follow the kite downwind and watch it loop again. As you see it turn through the center of its rotation and is starting to come up, grab the back of the bar with the hand you swapped over. If you do not get the right timing, just grab the chicken loop and let go of the bar. At least the kite will flutter up and you can sort yourself out.
SEQUENCE FOR THE POP PREPARATION
Pic 1 – The surfer approaches with the kite around 11 o’clock and starts to drift the kite up with a sudden pull-away to allow the body to be pulled up over the board, flattening it and pushing the front foot towards the kite and leaning with the back foot with weight over.
Pic 2 – The surfer forces his hips forward and up at the same time pulling down with both hands.
Pic 3 – As the surfer pushes the bar away and the chicken loop out, the surfer starts to drop his bum and shoulders away from the kite and looks where to go and not at the kite.
Pic 4 – The surfer swaps hands and starts to get back on the edge by driving his feet away.
Pic 5 & 6 – The surfer twists his hips and shoulders to face more upwind, forcing the board to carve hard onto its edge. The kite is starting to steer down and will pull soon
Pic 7 – The surfer pops up hard off his edge extending his back leg.


SEQUENCE AFTER THE POP
Pic 1 – As the surfer pops up the kite, pulling forward is the main goal with offering no resistance at all.
Pic 2 & 3 – The surfer looks towards the kite to keep the balance all the way.
Pic 4 – As the kite starts to rise again, it stops pulling and the surfer starts to drop down. Keeping the bar pulled in with bent elbows, this turns the surfer naturally to follow the kite.
Pic 5 – With the head of the surfer up, the feet and the board drops under and releases the back hand for some added balance.
Pic 6 – The surfer lands over the board, waits for the kite to rise, and then gets the other hand back on the bar.

KEY MARKS
- Kite at 12 o’clock
- Unhook with shoulders back and hips forward
- Change hands
- Carve and pop early
- Follow kite once in air
The video of this trick: