The kite loop is an extreme kite trick and you really need big balls to even dare try to perform this insane trick! As an “advanced” kite surfer this is however a trick you most likely will try to perform at least once! If you’re unlucky you might hurt yourself quite bad and will probably not be so keen on trying again! So a good theoretical knowledge about this crazy trick is an advantage before you try to do it practical. Follow this guide and you minmize the risk to crash, but first some ground rules.
Make sure that you are over powered to the limit using a relative small and fast(!) kite, 5-9 m2 is ok. I use a Royal Era though most new kites are fast enough.
Be sure that the water is deep enough to not hit the bottom in case you crash.
It’s best to start doing kite-loops with longer lines, don’t go below 20 meters during your first attempts to make kite loops.
Have a stand by rescue buddy within reach!
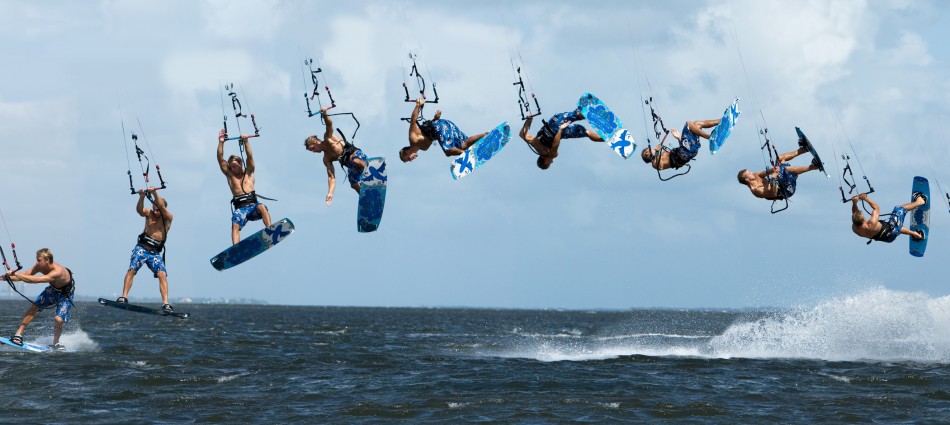
Ok, so the preparations are done and it’s time to loop! Follow these steps:
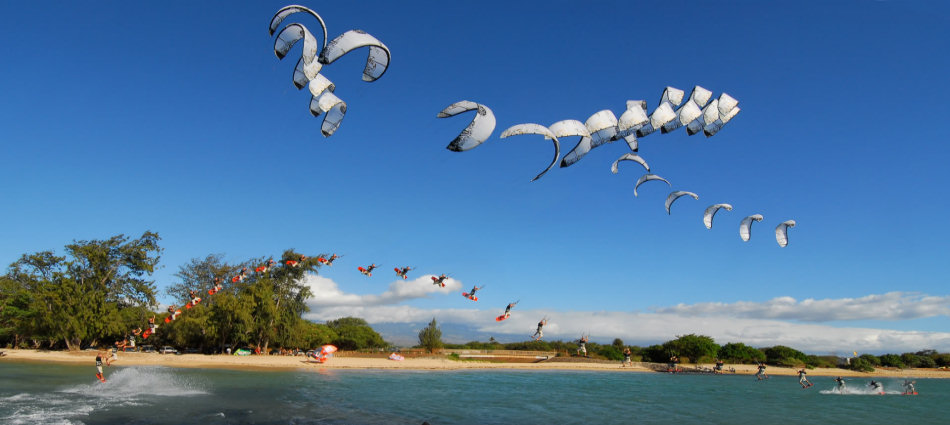
Jump as high as you can and when you’re just about to reach the peak, twitch the bar’s back side (if you going left, pull the right side)
The kite will pass twelve and begin to loop.
As the kite is about 270 degrees through the loop you will eventually start to fall and the lines might slacken a bit. Now don’t freak out. As you fall the lines will apperantly become stretched again and you´ll now be able to fulfil the last 90 degrees of the loop and the kite will catch you again.
When it comes to landing, point the board fully downwind!! You´ll land with high speed and will not be able to land with your board pointing a upwind. Doing this can result in a twisted knee or two. Looking over your back shoulder as you loop will help you twist your hip and get you prepared for a landing with the board pointing downwind. Also avoid land on choppy water.
That’s it! If you done everything correctly you should now be back in the water in one piece!
Good luck and don’t underestimate the use of safety equipment when you´re doing kite loops! Helmet and impact vest can save you months of boring rehab!
Don’t ask me where the name comes from… I can’t see any similarity between KGB and the russian intelligence, but whatever, here is the guide to perform the trick =)
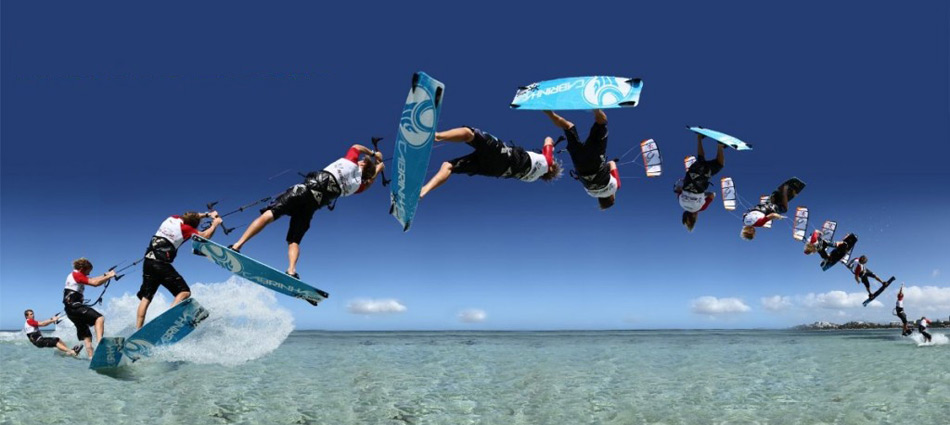
Come into the trick like you would do for an unhooked backroll. Unhook, edge hard and pop out of the water.
Look over your front shoulder and go into a backroll rotation. When just over 1/2 way through your rotation throw your head in the other direction over your back shoulder and pull your hands hard to your front tip.
Pass the bar from your front hand to your front hip.
Once you grab the bar, reach around with your other hand and get them both on the bar.
Spot your landing, bend your knees and ride away.
Tips! When unhooking always keep your elbows bent, this helps you keep a good edge. Try not to lean forward when you unhook. Keep your hands in the middle of the bar. Don’t throw the backroll to hard, it makes it hard to change direction.
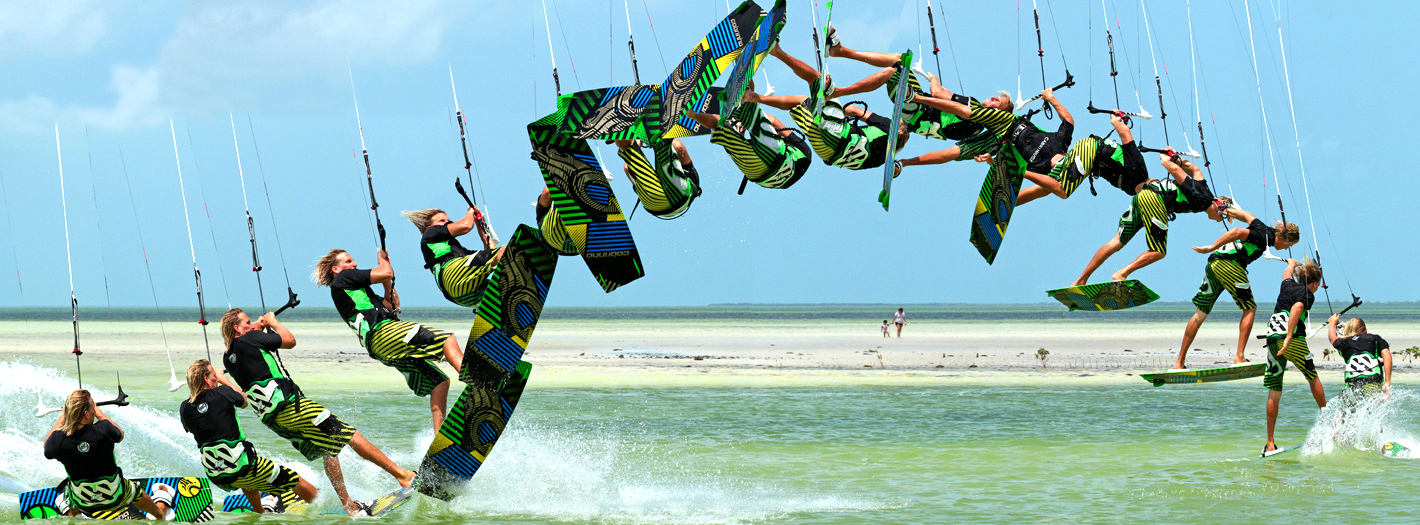
Our front loop love bubble wouldn’t be complete without adding the awe-inspiring blind landing a cheeky surface pass out. Tricks to blind looks phenomenal, feels sensational, and once you get the hang of landing blind; they will all start to be seen in your family of tricks.
THE KNOWLEDGE
You will need to get this move sorted in your head before you go and play. In theory, it is one and a half front rotation, but if you attack it like this, it will be much harder for you to land. To get the control and therefore consistency out of this move, you must consider it for what it is – a front loop, but then in preference to landing on a flat board off the wind as normal. Here are the two parts to perform this trick perfectly without you getting in a midst of nowhere.
CONTROL
No matter what move you’re attempting to blind, the key is having the move consistent so that you know how much rotation, how much speed and height you will have. If you practice your popped front enough, it will eventually feel natural to the point of the landing always being predictable. This way you’ll be able to think ahead, seemingly giving yourself time, and get yourself ready for a blind reception.
THROWING IT LATE
Landing blind in most situations is all about “throwing it late”. That’s to say you go for the twist to blind just before you land. If you try and go blind up in the air, there is a little chance of holding that position on the way down. The answer is to wait until you think it is almost too late, and then go for it. As you can see this will be difficult without having the rotation that you expect.
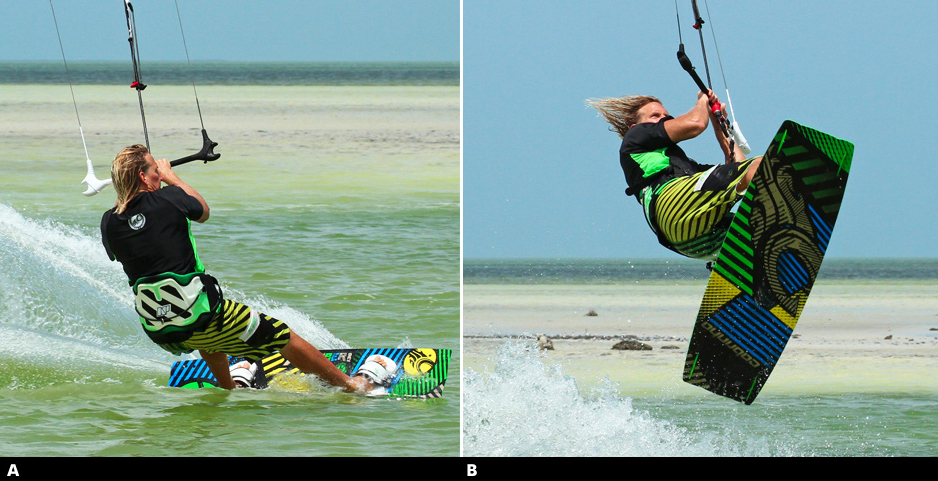
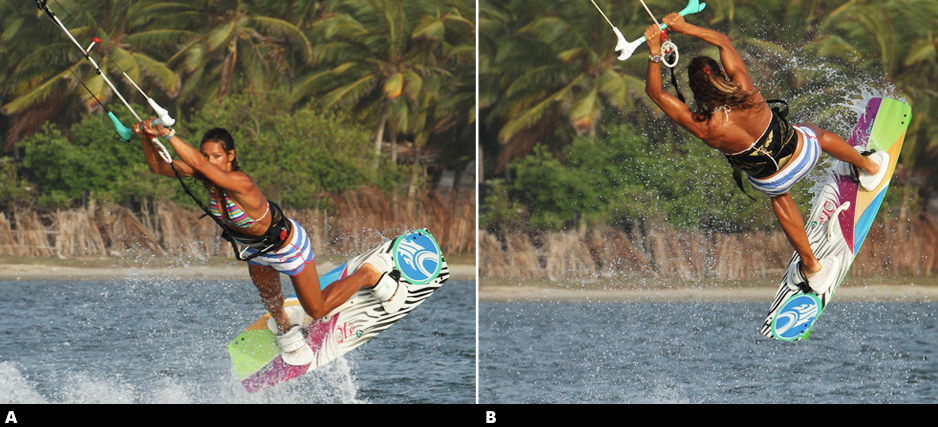
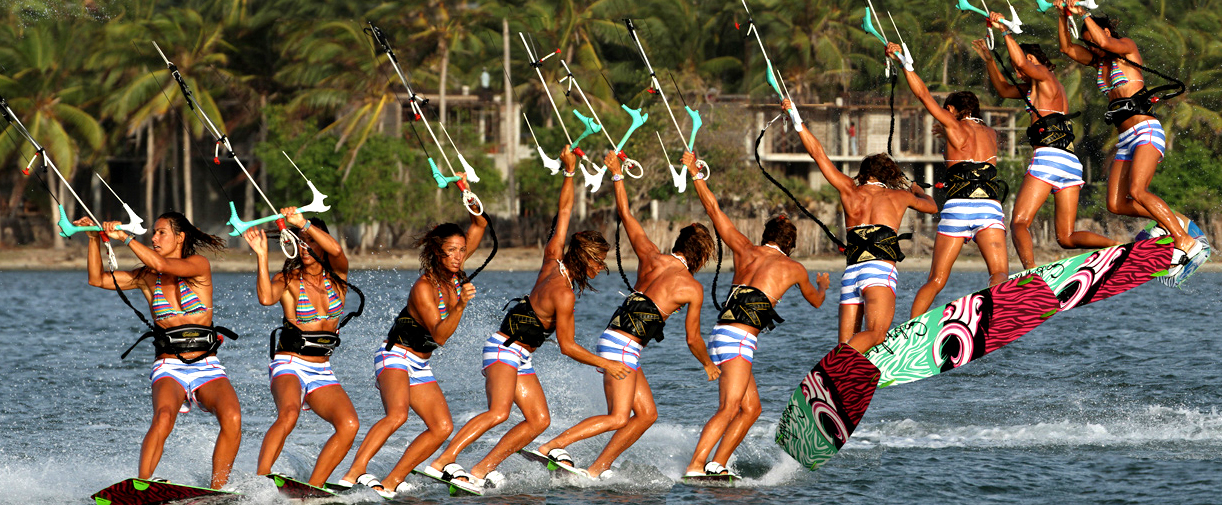
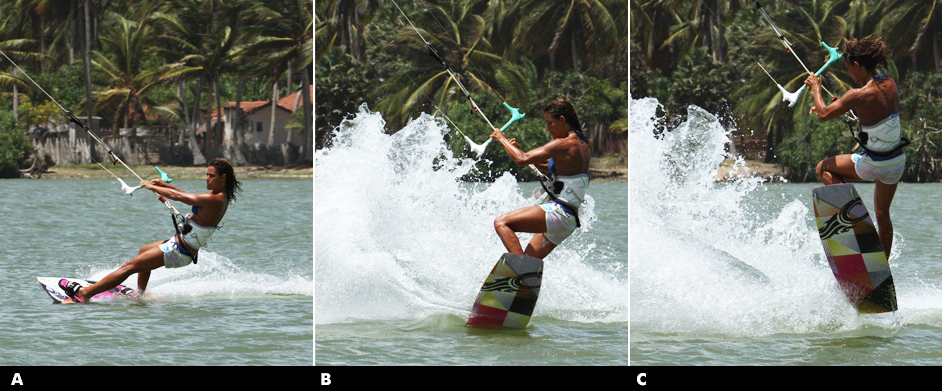
TWO HANDS ARE BETTER THAN ONE You may all want the style of some good surfers but you will have to build up to that. If you have been practicing your pop to raley to blind, you’ll notice that you are using your both hand t pull the bar in to rotate your blind. This gets the bar nearer to you, swings you towards the bar and in the front loop variant will stop you over-rotating. Admittedly doing it all one handed may look like “da bomb”, but it will be much harder, so get a grip. See pic A.
In this phase you are in the “throwing it” phase. You need to pull the bar towards you with both arms and it should be twisted already quite far around, you need to let go of your back hand followed by your body and twist all the way.
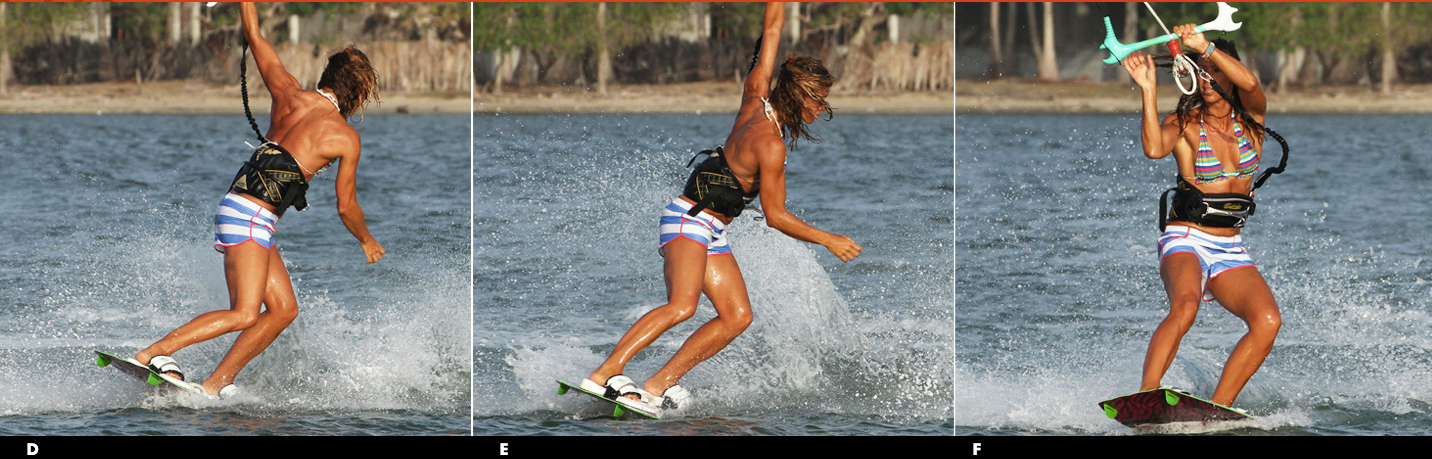
TWIST AND SHOUT You are in the final phase now; this move is getting your body around to face the right way once you have landed. This will give you balance as it will stop you edging against the kite on your toes and it enables you to pass the bar. Like the surfer in pic B You should twist your left hand during the landing so that your thumb is pointing in the way you should go and this also will turn your shoulder more, then turn your head and look where you should go, which in turn puts your weight onto your heels and slackens the kite lines as you steer down towards the kite. It also puts the bar in place for you to reach up and grab it.
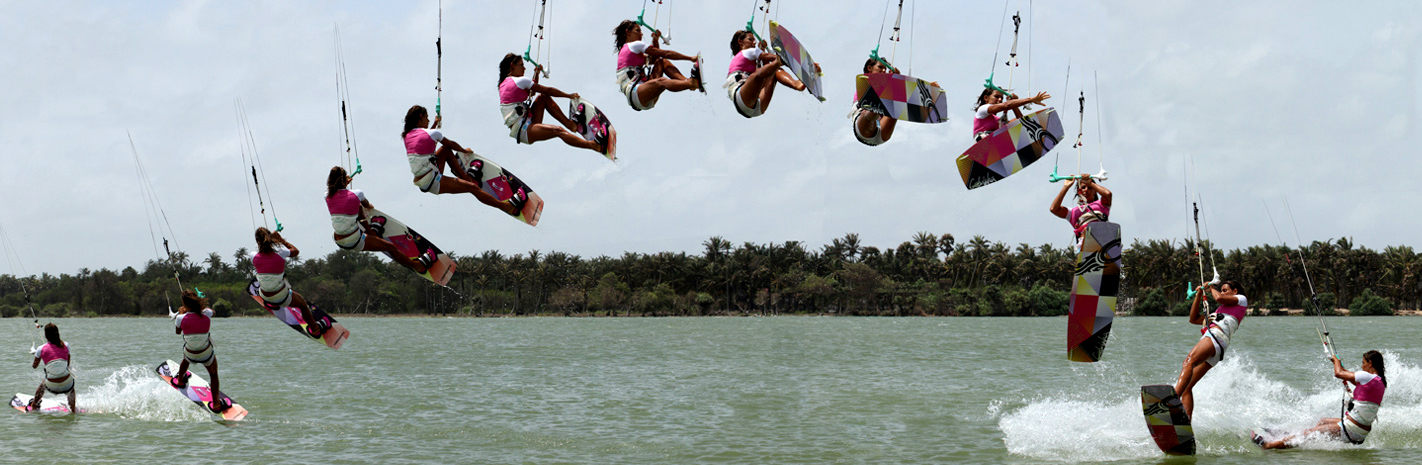
FRONT TO BLIND – ALL IN ONE!
1-3. Carv hard upwind against the kite to get enough lift and time to rotate. Position the kite at about 11 o´clock. If you put it closer to 12 you´ll lose your forward momentum and drop in the water without power. Position the kite lower around 10 o´clock and you´ll land with speed, eventually with too much speed!
4-5. Rotate and extend and turn your head to start spot your landing. Also don’t pull to much on your back hand since this will get much harder to perform the handle pass if the kite is to high.
6. Your are now in the same position as you would be in a simple front roll. Focus on where you will land and force your hands, the control bar and the rest of your body around as if you´re preparing for for a downwind land.
7. Now it´s time to throw the bar. Pull the bar towards you and twist your hip, legs and board further. Pull the back leg up towards your bottom and extend your front leg. This means that even if you land across the wind, the board will pivot under your right foot and end up further off the wind. If both legs are straight you will just hit the water and stop.
8. As you land make sure that your weight is on your right leg to allow the board to pivot further off the wind (of course your right leg will be the left leg if you rotate in the other direction as the surfer in the picture below).
9. Twist your hand and point your thumb in the direction you´re going.
10. Turn your head and shoulder even further
11. The turning will put the weight on your heels and take the tension of the lines, so you can bend over and get the bar nearer your back.
12. Pass the bar without and double-jointed contortionist skills =)
TOP TIPS
Whilst steering, try not to have too much speed, as landing a fast blind is a challenge for you.
KEYSTONES
1. Carve hard to go up.
2. Get enough height and time for the rotation.
3. Use both arms.
4. Let go of the body during the “throwing it” phase to rotate.
5. Throw it late.
6. Look where to land.
7. Control your twist after you land.
8. Twist and shout!
Some videos:
Front To Blind – Wakeboarding
Or why not add an extra front roll like Mike Blomvall and you´ll have a 720 Front To Blind
No, the F-16 is a fundamental nature of an unhooked back loop kite loop, a kite loop being when the kite is hurled against the direction of travel.
Its core difference from the hooked in version, or in fact the purest unhooked version is the way that you hold the bar. As we shall see both hands will be grasping onto one side of the bar, which forces the kite to turn extremely fast. This in turn means that there is very little input from the surfer once it’s all begun, and that the kite will not produce g-suit necessitating forces. A real grin and bear it move, which is well within the reach of anyone who can back loop kite loop and unhook.
ANGLING
Pic A. Here we can see that the surfer is holding the bar with both hands centered in normal position riding to the right side.
Now the surfer has two options, and it is up to you to see which you use. Knowing that you will need to get both hands on the back of the bar, you could either:
Pic B. Leave your back hand where it is, let go of your front hand and move it.
Or Pic C. move your back hand down to the end of the bar, release your front hand and grab the bar just the other side of the chicken loop in front of your back hand also with your palm facing up.
Both of these procedures work, although the first one necessitates less movement. Grab your bar and straighten your arms above your head to see which feels most comfortable.
THE KITE
The kite is very much dictating what is happening in the F-16. It will pull you up, it will rotate you and it will softly drop you back down once it finishes the loop.
It is very vital to trim your kite with the center line adjustment strap so that you are in control. Bowsexuals could leave a little more power in the kite as they do tend to turn quicker.
Doing an F-16, you will need to aim and position your kite very close to 12 o’clock above you. Like other powered techniques, starting while traveling slightly downwind will help. For the F-16, there are two grounds for this, other than the fact that it will be easier to unhook.
Firstly, once you have unhooked, if the lines are not completely tight, the kite will not move swiftly as you change your hands. This is very important especially on small kites.
Secondly, you need to do the whole rotation in the air. Most of us are used to doing the first half of a back loop by carving big time into the wind, which means that we’re already turned 180 degrees before taking off. If we do this for the F-16, we will overdo the spinning process. By cruising slightly off downwind, it allows us to carve for pop without turning too much into the spin.
THE YOU
The other main ingredient to a successful F-16 is an early take off. If you wait until the kite pulls you off the water, it will already have turned too far, and therefore pull you around too early, making landing a little wobbly or leading to a bad case of over rotation.
The best thing to do is to physically jump up into your back loop off your edge just before you think the kite will pull. By doing this, you’ll aim to finish half the spin. If you can look upwind while being at the peak of your jump, the kite will take over and bring you around for a nice soft landing. However, this may take a bit of practice to get the timing.
REAL TIME
The approach for the following sequence is identical to that of the down loop s-bend. Having had a very good look around to check that the coast is clear and that you have provided yourself miles of space downwind, slowly hurl the kite up towards 12 o’clock, flatten the board off to bear off the wind slightly and unhook. As soon as you have unhooked change your hands.
1. Once the hands have moved, it’s time to get back on your edge so that you’d still have some power to pop off. Do this by dropping your weight low and getting your shoulders out and upwind of the board. The bar is now vertical, this will happen automatically.
2. Just before the kite pulls, carve hard bending the rear leg ready to pop upwards. Your head should be looking forward in an effort not to create too much rotation.
3. Pop off; jump up across the air powerfully. Keep your head equally close to your shoulders. Your aim is to do half a back loop.
4. The kite has now travelled far enough behind that it pulls up.
5. As the kite starts looping, the power will extend you. The turning of the kite should pull you around.
6. When you feel the power collapse, look over your shoulder and locate a landing spot.
7-9. Remain focused on where you expect to land. The kite will have little power, and as a result, you will drop back towards the water surface. Grab and pull the bar in towards your hips to get your legs back underneath you.
10. With your legs dropping underneath, try and focus on pointing the board downwind.
11. On landing, try and maintain your weight over the back of the board.
12. Review where the kite is. If it is not travelling forward, let it continue to loop until it is, then release you upward facing palm (original front hand), place it back on the front of the bar and then hook in.
BEST TIPS
A speedy approach will make the pull from the kite seem far less violent while it gives you more control and a smoother landing.
If the bar is getting ripped out of your hands, try not to edge too hard for too long. Go downwind a bit more.
Try to imagine the F-16 as a game of follow the leader. As the kite loops you, just follow it around one step behind.
Dropping the back hand as you come down can help slow down the spin and also makes a speedy landing a whole lot easier.
If you keep on over rotating without getting any height, try not to throw a back loop, but ease into it by jumping up.
The more power you have in the kite, the higher and harder you will go. Just take it easy when learning.
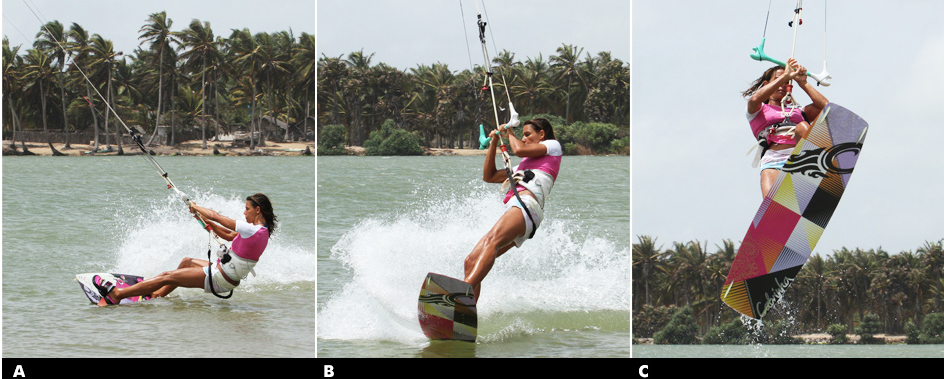
This is a blind move for any aspiring freestylers. The “Front Loop to Wrapped” is an attainable pop move for anyone landing Shifty to Wrapped, also doubles your way to get into a non-inverted slim. Theoretically if you can perform a controlled unhooked front to toeside, then this move is just your step away. Pic 1 – From a front loop to toeside, you can see that the surfer has carved a long way upwind before popping. The result of this is that, regardless of how hard the fronts roll initiation it will have a stalling rotational speed effect at the start for the surfer to pop up into the rotation if needed. In short the surfer’s hands, bar and even the board are the way to a 360 degree rotation.
Pic 2 – You can see that the surfer’s head and shoulders have all but completed rotation. The legs however are trapped in a time warp and are following some way behind. The point here is to forget your legs and as long as you are ready for the landing with your head and shoulders, the board will drop down toeside.
Building Blocks
Approach Pic A – This should be a familiar scene for many of you, as we are the usual ingredients for good unhooked pop. The surfer has the kite parked somewhere 10:30 and 11:00 o’clock and carving hard upwind with the bum low, shoulders, back and arms are bent slightly. The bent arms are is a must to do this trick. The surfer’s front leg are pretty extended with hips over the back foot and back leg resisting for preparation to pop off once carving into the wind is applicable.
Take-Off
Pic B – During the take-off you need to keep your arms in close. Popping up will make this a lot easier. You will also need to get the kite where it should be as the chances are it will rise slightly during your carving stage. Here you can see the surfer has popped up hard off using the back leg with hands close to the bar. The surfer has also steered the kite down a little by pulling on using front hand, which also helps the initiation of the rotation combined with dropped front shoulder at the same time to turn swiftly.
Waiting
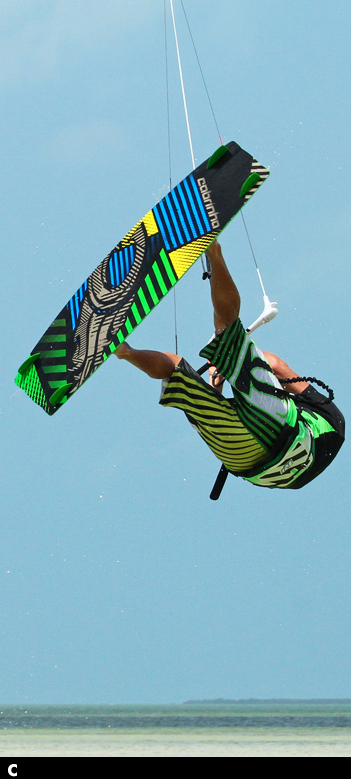
Pic C – This picture sums the move up and also demonstrates the similarity between a shifty to wrapped, shifty 3 and the front to wrapped. With the rotation on going, the surfer focused on where to land while feet are catching up but still behind position. The objective here is to wait until you feel that your feet are dropping down because that is the sign to go for the wrapped. Timing is very important.
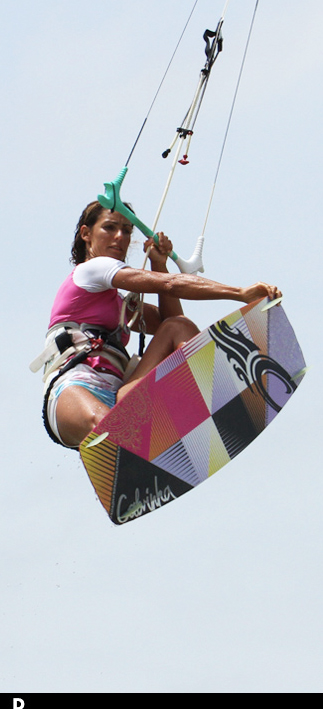
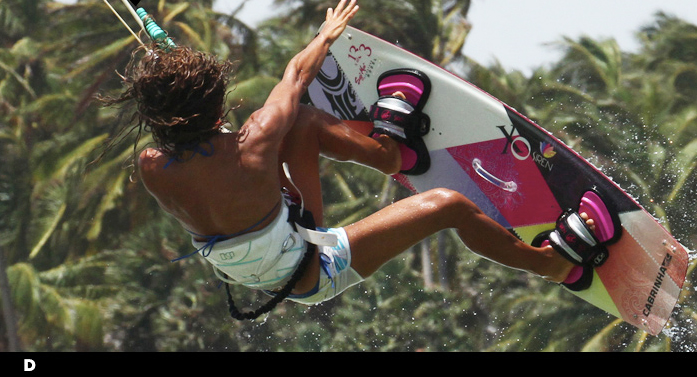
The Pull
Pic D – As mentioned, you’re the dropping of your leg is the signal to go for wrapped. The reason is you will be using the momentum of your dropping legs to bring them through and up to turn to a wrapped. Once they start to fall – use them!
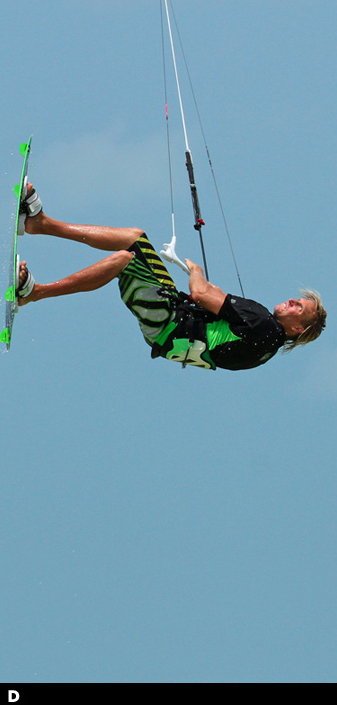
The surfer here has reaction to the legs because of both hand pulling hard and aiming to go past the right hip while bringing the back (right) leg up towards the bar. If the kite is too high, the lift will make the landing and passing difficult. When pulling on the hands, it is a good idea to give the kite a little tweak down because it can make the rest of the move much easier. As soon as the surfer’s back knee comes up, other knee is bent, turn head with the rotation and let go with front hand, thus allowing the surfer to turn with the momentum on going.
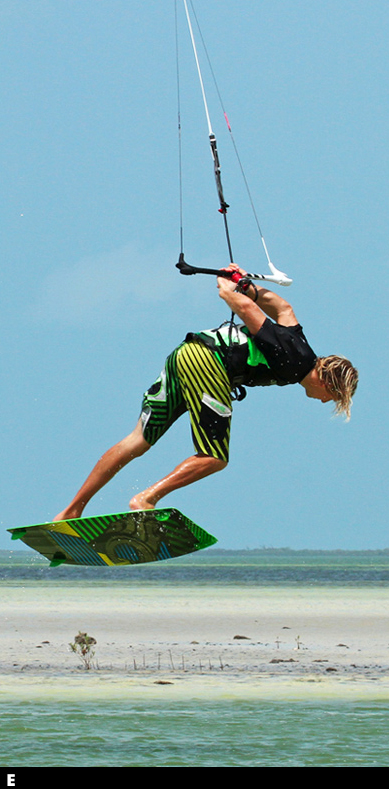
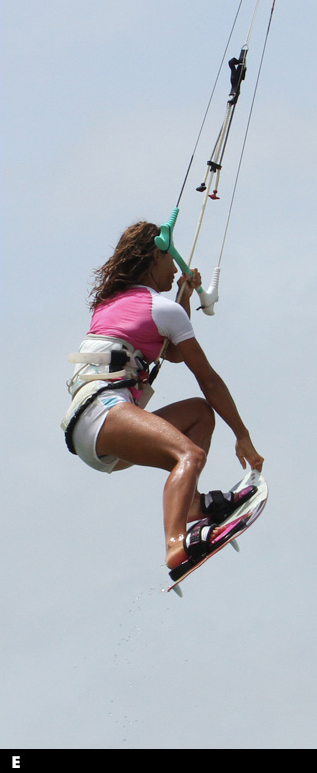
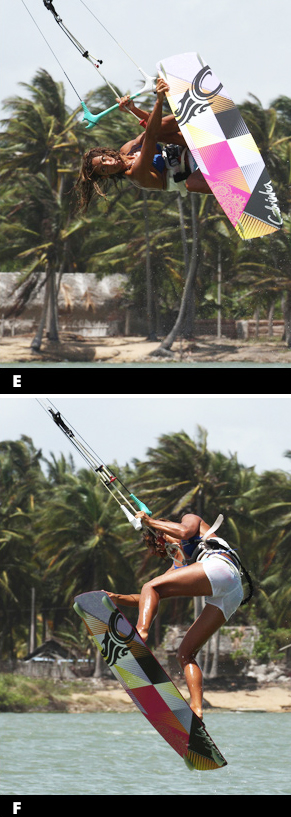
The Landing
Pic E – Your aim is to get the board at least downwind but preferably a bit further around, so that you will keep your speed and move towards the kite to make the pass out of wrapped much easier. Continue to turn your head to look where you should be going. In the picture, the surfer almost has too much weight back, which can lead to bouncing on landing. As you come down, even though you released your front hand, you should carry on pulling the bar behind your back with your back hand and twist your wrist. This will place the bar correctly, and it will wait obediently for the pass.
Step by Step Sequence Summary
1. The surfer bears off the wind considerably, unhooks, drops weight and starts to carve into the wind.
2. The surfer aims to carve a long way up into the wind and keeps the hands in close.
3. As the kite starts to pull, the surfer pops up hard by extending back leg with all might while pulling hands down towards the body.
4. The surfer initiates the rotation by throwing front shoulder down towards the water and at the same time dips the kite by tweaking it with front hand.
5. In this position, the surfer can now rotate the head around, looking back over the trailing shoulder which will guarantee him enough rotation to get the way around the first loop.
6. With eyes focused on where to land, the surfer waits, timed, and doesn’t try to land quickly then he brings the legs around through the landing position.
7. As the legs start to drop, the surfer pulls hard on both hands, trying to rip the bar past the back hip, at the same time bringing the knees up towards the bar.
8. The surfer releases front hand and turns the head while keeping the knees up. Remember to twist as this will make your body rotate much easier.
9. Coming in for the landing as you can see that the surfer has the bar and wrist turns and ready, he turns the head to try and look where to land giving weight forward over the board.
10. The surfer lands with the board facing slightly off the wind and the arms wrapped around behind.
11. All that’s left to do is to reach behind with your free hand and pass the bar. The further you rotate the quicker you will need to do this as you will have more tension on the lines and the kite will rise.
Tips to Remember
1. Edge hard upwind
2. Keep hands in
3. Pop up over your hands to rotate
4. Lead with head and shoulders
5. Pull both hand hard past your back hip
This technique is really much a cheat as it is a trick, and a very handy one. A late kite loop in this case means that the kite loops once you are on the water, not in the air. Perhaps you’ve already seen it many times before. The fact of the matter is when your kite control goes southward while altering direction in the air, doing this will provide you a nice bit of pull.
An upbeat outlook would predict several more advantages of combining this to the humble air gybes. It’ll give you the chance to hold them for longer and rack up the style points while still bursting with speed. On smaller kites, there is more chance of steering your kite too far behind and this yet against is a perfect answer. More retro pop transitions often result in you swinging away from the kite. Once more, this is the cure.
To cut it short, if you sometimes find your kite low and way to the side when you’re hoping to plane out of a transition, this trick will give you a handy boost of power right where and when you need it, and those days of sinking down will totally be gone. And finally, this can be an exceptionally comfortable way of building up yourself trust and skills in anticipation of a winner kite loop. Warning though, if you have never voluntarily looped your kite, we would strongly suggest learning the under turn first.
BIG POINTERS
As with any attempt to air gybe, it will still benefit you to try and get the basics right and add the late kite loop onto the end rather than try to apparently fluff it. We will be repeating ourselves to save you looking elsewhere.
Pic A.
The surfer is about to take off and has approached with speed and kite not lower than 1 o’clock. To drop speed, you need to carve into the wind by putting weight over the rear foot, moving the hips towards the tail of the board and extending the front leg. The straight front leg keeps the board on its edge. The surfer has already steered the kite back aggressively and has the bar pulled into the spot where here back lines are tight. From this state, you can jump up off the back leg into the air gybe.
Pic B.
Now the surfer illustrates dropping back down towards the spot landing. You must be well balanced in this position. Have the board pointed off downwind by pushing your new front foot away while keeping the rear foot underneath. You need also to dive the kite hard to get it moving down in front rather than letting it drift slowly to the side. This way, it will pull you out of your free fall and get on moving as soon after landing.
Pic C.
However, this is where it all changes from a regular air gybe to one with a late kite loop. Normally, assuming that you had dived the kite enough to ride away as soon as you land, you would be pulling hard on your new back hand in an effort to stall your kite crashing straight down into the water and turn it back up. Rather than steering the kite back up, continue to pull with the front hand, in fact pull even harder. This means that the kite keeps turning under itself and does not hit the water. As long as you keep pulling, the kite will start to rise and then turn forward in the desired path. To make this fun, keep the bar pulled in so that the kite continues to turn. Keep the board pointing off the wind and keep your weight back over the tail of the board.
If you have another look at the video, you’ll see that the kite is diving straight down as if the surfer was landing an air gybe, but upon touching down, the kite goes under and around by pulling it a bit strong, dragging the surfer nicely along to the left side.
THE GREEN LIGHT
Once you’ve decided to do this, there are a few good ways of getting you warmed up. Firstly, practice a couple of under turns. If you’ll be going for this air gybing on your right, do the under turns on your left and vice versa. Now, you’ll be confident enough that the kite will go around.
Secondly, knock off a few air gybes and focus on diving the kite hard for your landing. If this feels comfortable, try watching your kite as it dives down. So basically, turning it one way or the other shouldn’t make any difference.
SEQUENCE 1
In these images, the surfer is using a 7m Nomad, which turns fairly quickly but won’t give her a massive amount of hang time. The surfer has the advantage of a kite that will loop with only a little positive input on the bar. But the disadvantage is that, the preparation for landing in a big chill position is cut short.
1. Making sure that there is no one at the back and could have more space to party. The surfer carves hard into the wind and sends the kite back. Weight back, front leg straight and bar close in.
2. As the surfer feels the kite starts to lift up, the next thing to do is to stop steering the kite back and places the bar at center parallel to the water. Still keeping the bar close in
3. The surfer then explodes up off the rear leg rather than waits for the kite to pull up, and pulls the bar right in – hands to hips.
4-7. Upon take off, the surfer tries to get the kite back above at 12 o’clock by keeping the bar level and keeping the tension on the lines by keeping both hands close and arms bent. Also the surfer starts to lift both knees up for stability. Now, it’s the big chill – keep this position up until the tip of your jump and wait until you drop.
SEQUENCE 2
1. As soon as the surfer feels like dropping, the surfer dives the kite hard with the new front hand, the left hand.
2. To make sure to have full control over the kite, the surfer keeps the bar in close, and thus has tension on the lines, so the kite will react whenever wanted/needed.
3. In readying for the landing, the surfer pushes the front leg forward and keeps the rear leg underneath. The scissoring of the board will point the board downwind. The surfer keeps sight on the kite as it wanted to be diving down.
4. Just before touching down, the surfer drops the legs to take the landing, the whole time the surfer has the bar pulled in and is still pulling on the front hand. Pulling off the can be of help to land downwind.
5. As the surfer lands, the board continues downwind. It would stop if you land on an edge, not ideal when the kite is about to generate more power. To compensate for any extra force, the surfer puts weight over the back and front leg extended.
6. Because the surfer has kept pulling, the kite has turned under itself and back up. Because the board is facing downwind, there is no abrupt pull, just a smooth acceleration out of the landing.
7. As the kite turns forward towards the new path, the surfer carves back onto the edge by pivoting the hips and shoulders further around to face which direction to go. The surfer also halts on pulling on the front hand, as another loop would be unnecessary.
USUAL PROBLEMS
There are several possible causes…
If you keep dumping the kite into the water while you land balanced and over the board.
If you are not 100% committed to what you will be performing, looping the kite once you have landed, it is very tempting to let the bar out as soon as you feel a little pulling force from the kite, as it starts to turn under itself. Once you’ve released the tension from the back lines, even steering hard won’t keep the kite moving round. The answer is absolutely get some under turns and hard diving air gybe exits under your belt and then merge them up.
You may not be actually steering the kite good enough. On larger kites, you may need to move what will be the new front hand towards the end of the bar to provide you the power to really pull the bar in.
If you are landing with your kite unusually low to the water and to the side where you came from, and want to go back to it will not have enough room to turn under itself. The higher the kite starts the loop, the easier it will be.
If you find out that you are getting dragged off balance in the air.
Chances are, rather than considering this as an air gybe, you’re more into super loop territory. Remember to get the kite back above you so that you’ll be in good terms with it at 12 o’clock. This way, the pull will come more from downwind and less likely from behind you.
Timing is key. You need to be diving the kite at the same time you would for landing an air gybe just before touching down. If you pull too early, the kite will try and turn under itself while you are still up in the air, also known as kite loop which you can learn onto, but focus more on the late kite loop timely.
Lastly, if you are getting pulled onto your face when the kite loops, make sure you’re not edging against the pull AND put your weight back with your front leg extended.
The KGB is the next step on from a back to blind with an air pass. Much like the excitement of a Blind Judge 3, the add on is the final 180 of rotation so that you land heel side, therefore completing the move. It’ll have you laughing on the inside for weeks once you claim it, as that final float around to your heels is one mighty achievement. We will of course advise that you should already be stomping back to blind with air passes, as then it is more a matter of tweaking and polishing rather than learning something from scratch. If you did nail the Blind Judge Three it will help a lot, as you’ll already have built up some muscle memory to get the passing and kicking movement for the heel side landing.
Approach and Carve Pic A.
In order to get the height, pop and slow enough rotation your entry into the KGB must be bang on. First off make sure you come in well off the wind, so bear away a lot before unhooking. Why? This will let you carve hard enough to get your rotation into the back loop without turning too far into wind, and therefore you’ll actually “do” more of the back loop in the air, and thus it will feel slower, giving you more chance to pass and turn. Secondly make sure you lean back towards the tail of the board as you bear away. You can see in the pit that the rider’s hips are leaning back over his back foot, and his shoulders are leaning back towards the tail of the board. This will help him invert, which in turn will make the pass both easier and closer so that he can pass later and therefore get all the way around to his heels. Finally don’t be afraid to have your kite a tad higher for learning this, as it’ll be more pleasant and confidence boosting knowing that there’s enough room to complete the manoeuvre.
The Take Off Pic B.
Once you’ve got off the water with a right royal stamp against the back foot your aim is to get the board swinging up whilst you turn slowly through your rotation until you just about complete a back loop – but with the board up high and the bar in close. Here the rider has kept his hands in close to his waist from the off by locking his elbows in, and thus hopefully the bar will stay nice and close too and he won’t need superhuman strength to pass the bar. The rider’s head, although just about leading the rotation, is not looking over his front shoulder, but rather forward, perpendicular to his shoulders. This prevents him from spinning too quickly, thus helping him to turn the other way when needed and pass. Finally as his shoulders are still leaning back from the take off and his board rises the rider and brings his knees up and close, so that the board moves with him and doesn’t pull him down later in the move.
The Inversion Pic C.
Getting the board up is what gives you time to pass the bar late and get your front foot through.
The timing and amount you turn can vary, but the more you complete the back rotation the better your KGB will look, much the same as a back to blind. The rider is coming around his back loop, not quite a full 360, but almost in relation to the angle he went off the wind to start, which gives him the most chance of landing comfortably downwind and not on an edge. Your aim is to get to this point with your board high and the bar still tucked in close to your hips. The further you come around the more your hips will come up towards the bar and save you having to pull your weight up to the bar, and this way you can rotate the opposite way for the pass without getting pulled backwards. Like many passes you will think you’ve left it too late, but this is your cue to go.
Turn The Other Cheek Pk D.
Time to pull the trigger! Once you’ve completed the back loop you need to go for the pass before your board and legs drop and therefore pull you down and away from the bar. With two hands still holding the bar, The rider keeps his knees in and up whilst he turns his head to initiate the pass. The head should lead the entire move from here; if it does you can turn and claim the KGB. As you turn your head look up, not down at the water. The fact that the board and his feet have completed the back loop mean that the board is in front of him and therefore he won’t get pulled backwards away from the board but rather drop forwards towards it. This is not a bad time to give the kite a quick tweak down if you find that it keeps rising.
However if you keep your elbows in your kite will naturally dip once you release your back hand, as all your weight will transfer to the front. The MAIN DIFFERENCE here to a back to blind with air pass, is that your focus is not on passing the bar but rather on spinning your head, body and board so that you can see where you’ll land. If you just concentrate on the pass you’ll drop down without turning the full 360 to heel side.
Forward Pass Pic E.
Looking forward to where you want to go will make you lead the rotation, so stretch your chin out in front of you and keep your eyes up. Normally you would turn your head down, and therefore pass but then drop down. In a KGB you must keep the head looking above the water, searching for where you’ll land. Here you can see the result – The rider is still turning as his head and body are leading the way. As the rider turns he rotates onto the bar and can therefore pass, but the priority is the rotation and therefore the pass from one hand to the other is late. Finally if you look at Christian’s front leg you can see that it is still bent. Keeping your landing foot close will guarantee that it comes with you and doesn’t get left behind. Once you get this far, prepare to scream and celebrate, as the KGB will be yours.
Top Tips
The foundation for this move is a decent slow and inverted back loop, so repeat as many of these as you can, getting the board high and finishing your rotation at the apex.
This will get you prepared and visually ready for the final 360. If your feet are dropping as you come around your back loop, you need more inversion, so more leaning back, more locked elbows and more knees up.
We won’t be adding any common problems for this move, as it is a matter of concentrating on the relevant skills and putting them together – an inverted slow back loop, and a pass rotation lead by you head held high.
Keystones
Massively off the wind
Lean back towards the tail
Hands in, knees up
Full rotation to inverted position.
Lead the pass with your head held high and front knee in.
This is very exciting and this is one of those many jumping moves that many of you learnt during your early steps and adding a glorious nose grab so that it doesn’t look in the slightest stale. In fact may get many of your peers back on the back roll bandwagon. Obviously all grabs are great but a nose grab really stands out as it forces you into a tweak, which just oozes style and smile. Only prerequisite for this is a sent back roll, but if you’ve already got the nose grab jump dialed, things will be very easier for you.
The Jump Pic A
To grab the nose whilst back rolling you’ll need time, and for time read slow back loop rotation. The only way to pull off a fancy slow roll is to get enough height, so the jump is everything. Approach wise you should be coming in on a good edge with the kite either at 11 or 1 o’clock, no higher. Extend your front leg to push your hips back on the board, essential for a controlled back rotation, and even though this will bend your back leg, keep it solid not soft; otherwise you won’t be able to hold the edge against the kite’s pull.
In Pic A the rider’s front leg is straight and her back leg is locked to maintain a solid edge and her derriere is low. With her kite moved into position and her but in the sweet spot she can now send the kite as for a jump and concentrate on resisting the resultant pull and lift with her back leg.
The Initiation Pic B
The way you start your back roll will dictate the entire rotation, so bearing that in mind let’s have a look at when and how the rider get’s things under way. Having resisted with a good edge whilst sending the kite quite hard from 11 o’clock the pull should come early, at about 12 or just after . As soon as the rider feels the pull she stamps up off her back leg in a popping motion and then pulls the bar in. By popping up into the back loop she can’t lean too far back or bend both legs and therefore can’t carve too hard into wind under the kite, so her rotation will be slower. This is because she is taking off upwind, not already into wind, so she has further to rotate in the air. And by pulling the bar in the rider can immediately freeze the kite above her, preventing it from continuing back as is often the way in sent back rolls. Note that although the rider has carved into this rotation she has not thrown her head over her front shoulder. You want slow and controlled so keep your head looking forward.
Go Early Pic C
It’s the same for pretty much every grab, you have to go for the grab straight off the bat, the longer you wait the less time you’ll have and the less likely you’ll think it’s a good idea, especially when it involves:: bit of stretching and twisting. You can clearly see another advantage of not throwing your head into the rotation. As the rider gets airborne, by looking forward she is actually staring right at the board. This way she can see where she will grab and can prepare for it. The rider lifts her front knee up and across her body, knee towards opposite shoulder and releases her back hand and reaches it down towards the nose – all the while keeping the bar in with her front hand.
The Nose Grab Pic D
This is a beauty, and by jove does it suit a back roll. Once you’ve got the nose or toe side edge up front, do actually grab it firmly as it’ll help you pull your front leg in and give you something to push against with the back leg, leading to a wonderful tweak, which you can hold for as long as you dare. Looking at the grab keeps your head between your shoulders, so will keep you rotating slowly.
This is probably a good moment to mention the advantage of giving the kite a decent send for the jump. It’s not just about getting height, but because you’ll spend a considerable amount of time keeping the bar pulled in with only your front hand, the kite will merely move from behind you to slightly in front of you. If you gingerly drift the kite up, by the time you come around your back roll the kite will be way too for forward and pulling you off balance.
The Finish Pic E
If your rotation is controlled and the kite is not too for forward you can hold the grab until just before touchdown. However looking at your grab and the front of the board will not encourage you to finish off the rotation. To make sure that you complete the 360° and get far enough around landing perfectly you will eventually need to turn your head over your front shoulder to see where you’re going, spot your landing and get the board pointing downwind. When you do release the grab, only release the grab – so keep your knees up and the bar in so that you can dive the kite for landing.
Top Tips
Keeping in line with practicalities do start with some back rolls, concentrating on the send, upward take off and slow rotation.
Then start to bring your front knee up and across whilst keeping your back leg bent. Once you’re happy with this release the front hand and go for the early grab, which you can hold or touch for just a fraction of a second. Finally build up to a long tweaked hold.
Trim your bar and sweet spot in a touch, as it’ll make reaching the shoulder across for the grab more comfortable. And keep your harness tight!
Common Problems
If you are over-rotating your back roll and either landing across the wind on an edge or starting another rotation make sure that you don’t carve up excessively during your take off.
You should go from the edge that you’ve approached with, and then kick up and around. Also make sure you dive the kite for the landing as this will stop your rotation and pull you off down wind. If you can’t reach the grab, try a few without a back roll.
The nose grab is more about bringing your knee up and across under your harness hook, rather than you reaching down for it.
If you’re getting pulled forward and off balance by the kite in the air, either crashing or landing nose first. This is a result of the kite flying forward of
12 o’clock, so in the rider’s case towards 11, and can be due to a number of reasons. Firstly make sure your hands are centered on the bar, keep the bar in with one hand without yanking it forward. Make sure you send the kite, the further it goes back, the further it needs to return, so there is a perfect balance depending on your height and kite size.
There are a few takes on the front to blind, powered, unhooked, hooked, sent kite, you name it and it’s probably likely. We’re adding the unhooked Ole to the list as it serves a couple of purposes. Firstly it does allow you to go for and learn the blind with a slightly higher kite. Secondly on a big lefty kite in light winds, you will often need to have the kite a bit higher and with the resultant upward pull on the bar “Oleing” out is a health conscious option – oh yes and it does have a different look and feel to a standard bar pass ending. Before you attempt this we’d suggest you can pop front roll, and preferably relay to blind, but if you’ve got the hooked version down then this is a mere step away. Following are a few points worth more than a moment’s consideration.
Take off, pause and rotate Pic A.
As with all things unhooked and popped we’ll assume that you’ll have the bar trimmed correctly, hands centered and approach with good speed before bearing off with your weight back to unhook, dropping low and edging hard into your pop, stamping hard to get the height without a cheeky kite send. If you use your kite you’ll lose forward momentum and the landing will be difficult to pull off.
For extra lift when learning you can have your kite positioned higher, just above 11 or 1 o’clock – but don’t move it up. Here the rider has her kite parked at 11 o’clock and has just popped hard to get up off the water. What’s clear to see is that the rider has not yet started her front rotation; she is still looking forward to where she’s going. You too must separate the movement, even if only by a fraction of a second, but you need to pop before throwing your head and shoulders down and around. As a result you’ll get the height, if not you’ll be diving yourself down into the water and onto your back.
Front Hand Pic B.
Whilst rotating around, especially if you have the kite high, it will be very tempting to lean on the back hand, and also very natural to have pulled on it whilst edging to pop. Therefore as you spin around it is very good form to keep applying a bit of pressure onto your front hand as this will both stop the kite from floating up above you, and it will keep the kite moving forwards, which will make the landing easier as you’ll have momentum. The rider is only just into her rotation but she is already “leaning” on her front hand. This means that when she finishes her rotation she’ll be able to pull herself towards the bar to throw the blind – if you end up hanging under the bar you can only spin to blind, which won’t offer you any consistency.
Look Pic C.
We’ve said this before but whether it be a hooked front to blind or an S-bend pass the principal is always the same, another very brief pause between finishing your rotation and throwing the blind. This prevents you from over rotating and you have much more chance of keeping the kite in the air, rather than releasing one arm and starting the mother of all down loops.
Here the rider has rotated the full 360° and is focused again on where she’ll land. This momentarily slows her down, almost pauses the rotation, enabling her to set up for the blind. If not she would be spinning under her kite. From here she can now pull on the bar hard with both hands and throw the blind. With her head, hands and bar leading the rider can throw the blind and swing her legs through to turn far enough for the landing.
Landing Pic D.
Landing blind for an Ole or pass needs to be flat on the board, downwind, not on an edge across the wind. This way you’ll be moving toward the kite and therefore there won’t be any tension on the lines.
Sc bearing away into the move is important, as this leads to a more downwind landing, and pulling hard before committing to the blind will also help. In the photo the rider’s board is off downwind so her momentum will keep her moving towards the kite. Now what differentiates an Ole from a surface pass here are the position of the rider’s body and her bar. The rider is standing upright over the board with her head high, not bent over double, and she is holding her bar high above her on an outstretched arm. This position is the perfect set up to an Ole.
The Ole Pic E.
Firstly let’s remember what an Ole is. You will be moving the hand that is holding the bar, across, upwind of your head and shoulders to the other side of your body, from where you’ll be able to continue riding, but now toe side rather than blind.
That’s all it is, you’re not trying to turn the board or slide it around to bedside. It’s an upper body movement to get the bar across to the direction of travel and no pass is required. You can see in the photo that because she is travelling towards the kite the rider can push the bar upwind of her and then simply move her hand across in front of her face – now the bar is the same side of her body as the kite and the natural order of things are restored.
The Finale Pic F.
You have a few options to finish things off, and regardless of what you do it’s a good idea to get both hands back on the bar so that you get control of the kite. Continuing on toe side shows good control, and will certainly confuse a few onlookers. That said if you land with a lot of power and speed the chances are that you will carve onto your heels, so keep going and ride out in the other direction. Here the rider has pushed the bar across, finished her Ole and is reaching for her bar. She has a lot of weight on her heels and as a result will steer her kite across the window once she has her back hand on the bar and follow it by continuing to carve on her heels.
Top Tips
Apart from making sure that your popped front rolls are working off pat, the secret is to land blind and yes you’ve guessed it, pause foss split second before attempting the Ole.
If you rush the Ole you’ll fall backwards or if you really rush the Ole you’ll start to rotate into it before you’ve even landed. So first land, balance and then push the bar.
Common Problems
Assuming that you can get to blind the main issue will be falling backwards. This is normally a result of leaning back to push the bar across your face, rather than keeping your weight balanced and physically pushing the bar up wind and past.
If you land on your toes across the wind the lines will tighten and you won’t be able to push the bar without it pushing you back, or you leaning back.
Making your move look good is an art and result of regular practice. The best key is whatever you do, do it with right way and follow instruction from professionals. Every professional kite rider has his experiences to share and valuable tips for new joiners. An amazing enthusiast this sport is and with that in mind here is our guide to a popped front roll with a Crail or Nose grab thrown into the mix for extra spice. The grab itself is done with the back hand reaching forward and touching, stroking or preferably holding either the nose of the board or as near as possible on the toe side way up near the fin. It goes without saying that you’ll already need a competent popped front to nail this beauty, as the more powered it is performed with, the better the axis of rotation will be and thus all the sweeter the grab will look. Let us remind you of a few vital key moments for a decent popped front whilst also sneaking in the grab.
Coming In
If you want pop you need to approach in the right way, as it will not only aid in getting up and off the water, but also the rotation and the landing.
In Pic A. the rider is perfectly set up for some hefty pop. With her kite parked just below 11 o’clock she pushes the nose of the board off the wind and flexes her back leg to flatten the board, increase speed and move towards the kite, allowing it to drop back a bit in the window. At the sometime she has all her weight, hips, head and shoulders dropped back over and behind the back foot. Her hands are centered and she has her bar trimmed in enough that she can get into this position without pulling too much tension onto the back lines. It is advisable to move your front hand over the middle of the bar, center line between your first two fingers if you can. This will allow you to keep the power on throughout the move without the kite diving down.
Take Off
Going into a popped front rotation it is all too tempting to drift the kite up and wait for something to happen, which will inevitably lead to a dangly and uncontrolled spin under a very high kite. It’s a most to keep the kite flying forward and get your height from a very aggressive pop. Breaking the pop and rotation apart, even just by a millisecond will make all the difference. If you concentrate on going up before throwing your head around and shoulders down you will get enough height. If you dive straight into the rotation you’ll not extend up and rather fire yourself down towards the water.
Pic B. shows the rider popping up hard. Having carved quickly back up onto her edge with her weight still back, she has now stamped down hard, pushing her back leg down against the edge of her board and extending her body upwards for maximum pop. She keeps her front elbow tucked in and bent to prevent the kite from drifting up and the bar is still angled towards the kite as if she were riding. The only give away showing a prospective front rotation is the bending and lifting of the front knee.
Rotate and Release
Once you know that you’re on the way up you need to get spinning and think about the grab. You won’t have long in the air so its chop chop. To initiate the rotation lean the head and shoulders forward, so that you are going with the pop. By lifting the front leg and allowing your body to be kicked up you will start to rotate from the back legs impetus. Turning your head to guarantee spin will help, but if you whip around too quickly it’ll be tricky to get the grab in early enough. As for the grab you need two actions, release the front hand and start to reach forwards, and you must bring the front knee up and across your body to bring the nose of the board within reach.
Pic C. the rider is just off the water and she already has her front knee up and across in front of her. She resists the temptation to pull her back leg up and keeps it straight – with it extended the nose of the board will tip even closer to her.
She allows her head and shoulders to tip down and forward into the rotation as she fully extends up and keeps the bar pulled in. Her back hand is reaching down towards the already well-positioned board.
The Grab Getting the grab in early has two advantages. The first is purely aesthetic, you’ll be able to hold it for longer and thus it’ll be more noticeable. The second however is more functional – once you have the grab you can pull the board in, making you small and then concentrate on getting around the rest of your front roll. Theoretically at least, if you get the take off right the grab should fall into place.
Pic D. As a result of all the hard work the rider has got a pleasantly satisfying pop, good height and controllable slow rotation. This allows her to get her hand onto the nose area before she has rotated 90°. Keeping the front knee up and releasing the back hand early were key. Keeping the bar in and power on guarantee that she won’t just drop out of her rotation, but will continue to be pulled forward. The Money Shot Once you’ve got the grab, hold it. As stated before, this isn’t just for poseur status, massaging your ego or blatant show boating, but with a solid hold of your board you can pull it in and turn your head and therefore finish your rotation.
Pic E. With her grab held the rider turns her head to spot the landing. To speed up her rotation she has pulled both knees up whilst still holding the bar in, keeping the kite moving forward and pulling.
Touch Down
Aim to hold your grab for as long as possible, until you complete the rotation. You’ll find the timing quite natural, as you’ll need to let go to allow your board to drop under you as you start to drop. Assuming you went off the wind in your approach you should come around to a comfortable downwind landing towards the kite, which will kill the power in the kite and make tutu comfortable stomped landing.
Pic F. You can see that the rider has released the grab and lets her legs and the board drop down beneath her for a solid reception. She still has the pulled in so will land following the kite with her weight squarely over the board.
Top Tips
A good pop and confident front roll are key, so before throwing yourself up into one of these get warmed and ready with a few two handed front rolls.
When you’ve knocked out a few high and controlled ones you’ll be more confident to go for the grab.
Common Problems
If you’re struggling to reach the grab there are two solutions. Firstly if you can already nose or nearly nose (troll) grab the board in sent jumps or front rolls try popping with the kite higher, or even drift it up a tad.
With a higher kite and a more vertical rotation it will be easier to reach the board. Secondly if you’ve never tried a two grab before and you’re finding it tricky here, revert to getting the body movement right in a sent jump and then a sent front roll.
 The kite loop is an extreme kite trick and you really need big balls to even dare try to perform this insane trick! As an “advanced” kite surfer this is however a trick you most likely will try to perform at least once! If you’re unlucky you might hurt yourself quite bad and will probably not be so keen on trying again! So a good theoretical knowledge about this crazy trick is an advantage before you try to do it practical. Follow this guide and you minmize the risk to crash, but first some ground rules.